
Cutting with the Alignment Cutting Function
Cutting procedures differ depending on the editing tool you use.
In this procedure, use the [Design Editor] tool.
In Artspira's Home screen, tap
 [New], tap the [Cutting] tab, and then tap [Design Editor].
At the top of this screen, tap the mat size, tap [Bellissimo], and then specify the settings for the data to be created.
Tap the [Cutting] or [Printing] tab, and then create the corresponding data for cutting and printing.
To edit data, tap the data you want to update, and then edit it from the menu that appears.
- The [Printing] tab does not appear if the machine is not paired with Artspira.
- Editing functions differ depending on the selected data.
- Cut lines can be added only to the print design or text object.
- Designs selected in the [Printing] tab cannot be convert to a draw data.
After editing is finished, tap [Done].
The print preview screen appears.
Tap [Print] to print the data on the printer.
The mobile device’s print options appear. Select the option you want, and then print.
Tap the [Cut] tab to show the cut preview screen, and then tap [Transfer] to transfer the data to the machine.
Follow the in-app instructions to cut the printed material.
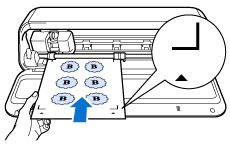
- Before loading the material, make sure that the feed rollers are not dirty. If the feed rollers are dirty, clean them before cutting.
- Make sure that the print ink is completely dry before loading.
- When cutting using a cutting mat, attach the material in the upper-left corner of the mat so that the registration marks and feeding direction are aligned.
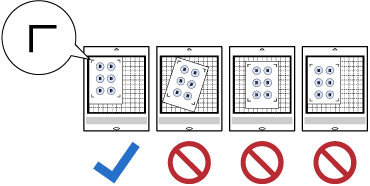
When finished, press
 (Feed Button) to eject the material or mat.
- If the cutting line is misaligned with the printed data, use the calibration function to adjust the cutting position.