Home > Print > Print from Your Computer (Windows) > Print Settings (Windows)
Print Settings (Windows)
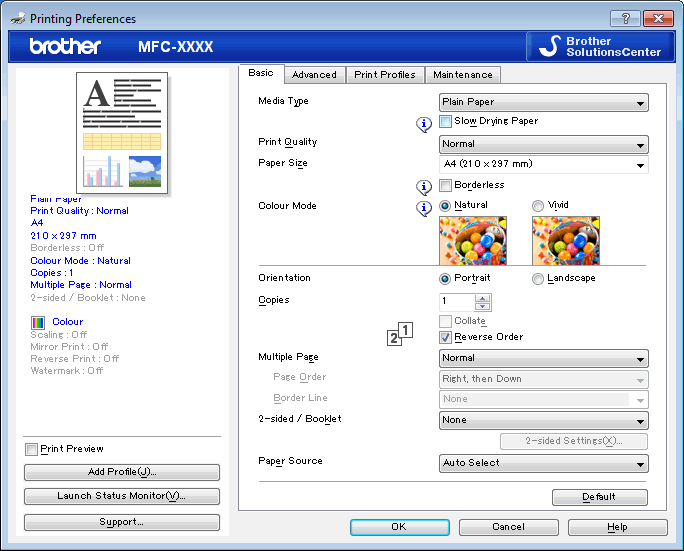
Basic Tab

- Media Type
- Select the type of media you want to use. To achieve the best print results, the machine automatically adjusts its print settings according to the selected media type.
-
- Slow Drying Paper
- Select this option if you use a type of plain paper on which ink dries slowly. This option may cause slight blurring of the text.
- Print Quality
- Select the print resolution you want. Because print quality and speed are related, the higher the quality, the longer it will take to print the document.
- Paper Size
- Select the size of the paper you want to use. You can either choose from standard paper sizes or create a custom paper size.
-
- Borderless
- Select this option to print photos without borders. Because the image data is created slightly larger than the paper size you are using, this will cause some cropping of the photo edges.
You may not be able to select the Borderless option for some combinations of media type and quality, or from some applications.
- Colour Mode
- Select the colour mode to suit your preference.
- Orientation
- Select the orientation (portrait or landscape) of your printout.
If your application contains a similar setting, we recommend that you set the orientation using the application.
- Copies
- Type the number of copies (1-999) that you want to print in this field.
-
- Collate
- Select this option to print sets of multi-page documents in the original page order. When this option is selected, one complete copy of your document will print, and then reprint according to the number of copies you choose. If this option is not selected, then each page will print according to the number of copies chosen before the next page of the document is printed.
- Reverse Order
- Select this option to print your document in reverse order. The last page of your document will be printed first.
- Multiple Page
- Select this option to print multiple pages on a single sheet of paper, or print one page of your document on multiple sheets.
-
- Page Order
- Select the page order when printing multiple pages on a single sheet of paper.
- Border Line
- Select the type of border to use when printing multiple pages on a single sheet of paper.
- 2-sided / Booklet
- Select this option to print on both sides of the paper, or print a document in booklet format using 2-sided printing.
-
- 2-sided Settings button
- Click this button to select the type of 2-sided binding. Four types of 2-sided bindings are available for each orientation.
- (MFC-T910DW) Paper Source
- Select the paper source setting according to your print conditions or purpose.
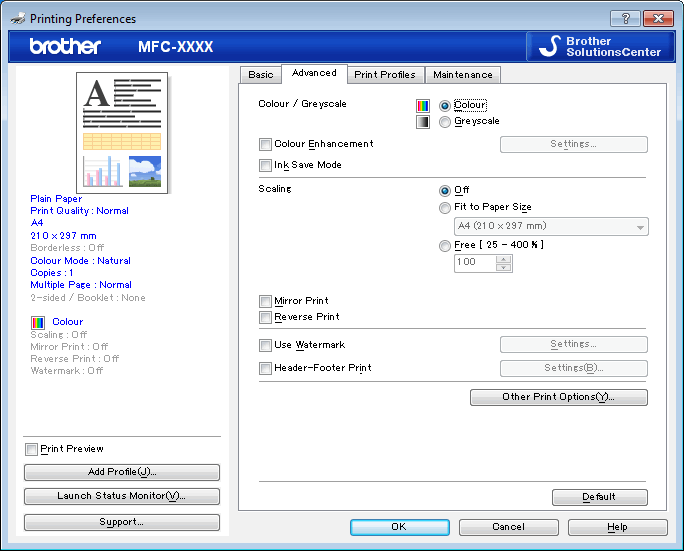
Advanced Tab

- Colour / Greyscale
- Select colour or greyscale printing. The print speed is faster in greyscale mode than it is in colour mode. If your document contains colour and you select greyscale mode, your document will be printed using 256 levels of greyscale.
- Colour Enhancement
- Select this option to use the Colour Enhancement feature. This feature analyses your image to improve its sharpness, white balance and colour density. This process may take several minutes depending on the image size and your computer's specifications.
- Ink Save Mode
- Select this option to print using lighter colours and emphasise image outlines. The amount of ink that is saved varies, depending on the type of documents printed. Ink Save Mode may make your printouts look different than they appear on your screen.
The Ink Save Mode feature is supported by technology from Reallusion, Inc.

- Scaling
- Select these options to enlarge or reduce the size of the pages in your document.
-
- Fit to Paper Size
- Select this option to enlarge or reduce the document pages to fit a specified paper size. When you select this option, select the paper size you want from the drop-down list.
- Free
- Select this option to enlarge or reduce the document pages manually. When you select this option, type a value into the field.
- Mirror Print
- Select this option to reverse the printed image on the page horizontally from left to right.
- Reverse Print
- Select this option to rotate the printed image 180 degrees.
- Use Watermark
- Select this option to print a logo or text on your document as a watermark. Select one of the preset watermarks, add a new watermark, or use an image file you have created.
- Header-Footer Print
- Select this option to print the date, time and PC login user name on the document.
- Other Print Options button
-
- Change Data Transfer Mode
- Select the print data transfer mode to improve print quality or print speed.
- Advanced Colour Settings
- Select the method that the machine uses to arrange dots to express halftones.
The printout colour can be adjusted to achieve the closest match to what appears on your computer screen.
- (DCP-T310/DCP-T510W) Advanced Quality Settings
- Select this option to print your documents at the highest quality.
- Reduce Smudge
- Some types of print media may need more drying time. Change this option if you have problems with smudged printouts or paper jams.
- Retrieve Printer's Colour Data
- Select this option to optimise the print quality using the machine's factory settings, which are set specifically for your Brother machine. Use this option when you have replaced the machine or changed the machine's network address.
- Print Archive
- Select this option to save the print data as a PDF file to your computer.
Was this page helpful?


 Adobe Acrobat Reader is required to view this printable guide.


