- Load Paper
- Load Documents
- Print from Your Computer (Windows)
- Print a Photo (Windows)
- Print a Document (Windows)
- Cancel a Print Job (Windows)
- Print More Than One Page on a Single Sheet of Paper (N in 1) (Windows)
- Print as a Poster (Windows)
- Print on Both Sides of the Paper Automatically (Automatic 2-sided Printing) (Windows)
- Print on Both Sides of the Paper Manually (Manual 2-sided Printing) (Windows)
- Print as a Booklet Automatically (Windows)
- Print as a Booklet Manually (Windows)
- Print a Colour Document in Greyscale (Windows)
- Prevent Smudged Printouts and Paper Jams (Windows)
- Use a Preset Print Profile (Windows)
- Change the Default Print Settings (Windows)
- Print Settings (Windows)
- Print from Your Computer (Mac)
- Print a Photo (Mac)
- Print a Document (Mac)
- Print on Both Sides of the Paper Automatically (Automatic 2-sided Printing) (Mac)
- Print on Both Sides of the Paper Manually (Manual 2-sided Printing) (Mac)
- Print More Than One Page on a Single Sheet of Paper (N in 1) (Mac)
- Print a Colour Document in Greyscale (Mac)
- Prevent Smudged Printouts and Paper Jams (Mac)
- Print Options (Mac)
- Scan Using the Scan Button on Your Brother Machine
- Scan Photos and Graphics
- Save Scanned Data to a Folder as a PDF File
- Save Scanned Data to a USB Flash Drive
- Scan to an Editable Text File Using OCR
- Scan to Email Attachment
- Web Services for Scanning on Your Network (Windows 7, Windows 8 and Windows 10)
- Change Scan Button Settings from ControlCenter4 (Windows)
- Change Scan Button Settings from Brother iPrint&Scan (Mac)
- Scan from Your Computer (Windows)
- Scan Using ControlCenter4 Home Mode (Windows)
- Scan Using ControlCenter4 Home Mode (Windows)
- Select Document Type Using ControlCenter4 Home Mode (Windows)
- Change Scan Size Using ControlCenter4 Home Mode (Windows)
- Crop a Scanned Image Using ControlCenter4 Home Mode (Windows)
- Print Scanned Data Using ControlCenter4 Home Mode (Windows)
- Open with an Application Using ControlCenter4 Home Mode (Windows)
- Save Scanned Data to a Folder as a PDF File Using ControlCenter4 Home Mode (Windows)
- Scan Settings for ControlCenter4 Home Mode (Windows)
- Scan Using ControlCenter4 Home Mode (Windows)
- Scan Using ControlCenter4 Advanced Mode (Windows)
- Scan Photos and Graphics Using ControlCenter4 Advanced Mode (Windows)
- Save Scanned Data to a Folder as a PDF File Using ControlCenter4 Advanced Mode (Windows)
- Scan Both Sides of an ID Card Using ControlCenter4 Advanced Mode (Windows)
- Scan to Email Attachment Using ControlCenter4 Advanced Mode (Windows)
- Scan to an Editable Text File (OCR) Using ControlCenter4 Advanced Mode (Windows)
- Scan to an Office File Using ControlCenter4 Advanced Mode (Windows)
- Scan Settings for ControlCenter4 Advanced Mode (Windows)
- Scan Using Nuance™ PaperPort™ 14SE or Other Windows Applications
- Scan Using Windows Fax and Scan
- Install BookScan Enhancer and Whiteboard Enhancer (Windows)
- Scan Using ControlCenter4 Home Mode (Windows)
- Scan from Your Computer (Mac)
- Copy a Document
- Enlarge or Reduce Copied Images
- Sort Copies
- Make Page Layout Copies ( N in 1 or Poster)
- Copy on Both Sides of the Paper (2-sided Copy)
- Copy an ID Card
- Copy Options
- Send a Fax
- Receive a Fax
- Voice Operations and Fax Numbers
- Telephone Services and External Devices
- Fax Reports
- PC-FAX
- PC-FAX for Windows
- PC-FAX Overview (Windows)
- Configure PC-FAX (Windows)
- Configure your PC-Fax Address Book (Windows)
- Add a Member to your PC-FAX Address Book (Windows)
- Create a Group in your PC-FAX Address Book (Windows)
- Edit Member or Group Information in your PC-FAX Address Book (Windows)
- Delete a Member or Group in your PC-FAX Address Book (Windows)
- Export your PC-FAX Address Book (Windows)
- Import Information to your PC-FAX Address Book (Windows)
- Send a Fax Using PC-FAX (Windows)
- Receive Faxes on Your Computer (Windows)
- PC-FAX Overview (Windows)
- PC-FAX for Mac
- PC-FAX for Windows
- Print Photos Directly from a USB Flash Drive
- Print Photos from ControlCenter4 (Windows)
- Supported Basic Network Features
- Network Management Software and Utilities
- Additional Methods of Configuring Your Brother Machine for a Wireless Network
- Before Configuring Your Brother Machine for a Wireless Network
- Configure Your Machine for a Wireless Network Using the One Push Method of Wi-Fi Protected Setup™ (WPS)
- Configure Your Machine for a Wireless Network Using the PIN Method of Wi-Fi Protected Setup™ (WPS)
- Configure Your Machine for a Wireless Network When the SSID is Not Broadcast
- Use Wi-Fi Direct®
- Print or Scan from Your Mobile Device Using Wi-Fi Direct
- Configure Your Wi-Fi Direct Network
- Wi-Fi Direct Network Configuration Overview
- Configure Your Wi-Fi Direct Network Using the One-Push Method
- Configure Your Wi-Fi Direct Network Using the One-Push Method of Wi-Fi Protected Setup™ (WPS)
- Configure Your Wi-Fi Direct Network Using the PIN Method
- Configure Your Wi-Fi Direct Network Using the PIN Method of Wi-Fi Protected Setup™ (WPS)
- Configure Your Wi-Fi Direct Network Manually
- Advanced Network Features
- Technical Information for Advanced Users
- Brother Web Connect
- Google Cloud Print
- AirPrint
- Mobile Printing for Windows
- Mopria® Print Service
- Brother iPrint&Scan for mobile
- Error and Maintenance Messages
- Document Jams
- Printer Jam or Paper Jam
- Paper is Jammed in the Machine (Paper Jam)
- Paper is Jammed Inside and in the Front of the Machine (Jam A Inside/Front)
- Paper is Jammed in the Front of the Machine (Jam B Front)
- Paper is Jammed in the Back of the Machine (Jam C Rear)
- Paper is Jammed in the Multi-purpose Tray (Jam D MP tray)
- Paper is Jammed Inside and in the Multi-purpose Tray (Jam E Inside/MP)
- If You Are Having Difficulty with Your Machine
- Paper Handling and Printing Problems
- Telephone and Fax problems
- Other Problems
- Network Problems
- Google Cloud Print Problems
- AirPrint Problems
- Check the Machine Information
- Reset Your Brother Machine
- Refill the Ink Tanks
- Clean Your Brother Machine
- Clean the Scanner
- Clean the Print Head from Your Brother Machine
- Clean the Print Head from Your Computer (Windows)
- Clean the Print Head from Your Computer (Mac)
- Clean the Machine's LCD
- Clean the Outside of the Machine
- Clean the Machine's Printer Platen
- Clean the Paper Feed Rollers
- Clean the Base Pad
- Clean the Paper Pick-up Rollers
- Check Your Brother Machine
- Correct the Paper Feed to Clear Vertical Lines
- Change the Print Setting Options When Having Printing Problems
- Pack and Ship Your Brother Machine
- Change Machine Settings from the Control Panel
- In the Event of Power Failure (Memory Storage)
- General Settings
- Set the Mode Timer
- Adjust the Machine Volume
- Change for Daylight Saving Time Automatically
- Change for Daylight Saving Time Manually
- Set Sleep Mode Countdown
- Set the Machine to Power Off Automatically
- Set the Date and Time
- Adjust the LCD Backlight Brightness
- Change How Long the LCD Backlight Stays On
- Set Your Station ID
- Set Tone or Pulse Dialling Mode
- Reduce Printing Noise
- Change the Language Displayed on the LCD
- Print Reports
- Settings and Features Tables
- Change Machine Settings from Your Computer
Some features are not available depending on the model.
 Download a printable version of this guide.
-
 Adobe Acrobat Reader is required to view this printable guide.
Click here to install.
Adobe Acrobat Reader is required to view this printable guide.
Click here to install.


Home > Paper Handling > Load Paper > Load Paper in the Paper Tray > Load Photo Paper in the Paper Tray


Load Photo Paper in the Paper Tray
- If the [Check Paper] setting is set to [On] and you pull the paper tray out of the machine, a message appears on the LCD asking if you want to change the paper type and paper size. Change the Paper Size and Paper Type settings if needed, following the LCD instructions.
- Load only one size and type of paper in the paper tray at a time.
- When you load a different paper size in the tray, you must change the Paper Size setting in the machine or the paper size setting on your computer.
Doing this enables the machine to automatically feed paper from the appropriate tray if Auto Tray Select has been set in the machine or printer driver. (MFC-T910DW)
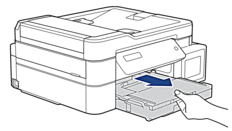
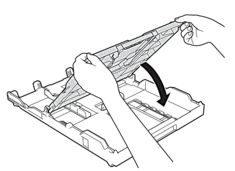
- If the paper support flap (1) is open, close it, and then close the paper support (2).
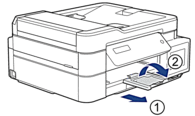
- Pull the paper tray completely out of the machine.
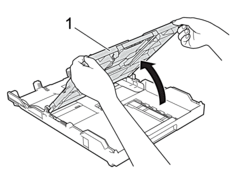
- Open the output paper tray cover (1).
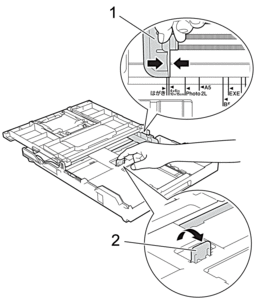
- Gently press and slide the paper width guides (1) to fit the paper size, and then lift up the stopper (2).
- Close the output paper tray cover.
- Load up to 20 sheets of photo paper with the printing surface face down.Loading more than 20 sheets of photo paper may cause paper jams.
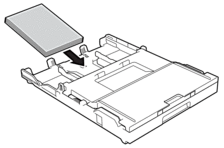
- Gently adjust the paper width guides (1) to fit the paper.Make sure the paper width guides touch the edges of the paper and the paper is flat in the tray.
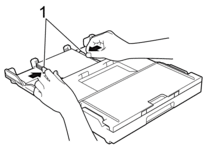
- Slowly push the paper tray completely into the machine.
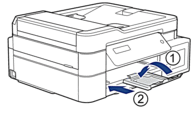
- Pull out the paper support (1) until it locks into place, and then unfold the paper support flap (2).
- Related Information
- Related Topics:
Was this page helpful?
Thank you for your feedback.