Some features are not available depending on the model.
 Download a printable version of this guide.
-
 Adobe Acrobat Reader is required to view this printable guide.
Click here to install.
Adobe Acrobat Reader is required to view this printable guide.
Click here to install.


Home > Routine Maintenance > Check Your Brother Machine > Check the Print Quality


Check the Print Quality
If faded or streaked colors and text appear or if text is missing on your printouts, the print head nozzles may be clogged. Print the Print Quality Check Sheet and look at the nozzle check pattern.
DCP-T310/DCP-T510W/DCP-T710W/MFC-T810W
- Press Menú (Menu).
- Press
 or
or  to select the following:
 - Select [Maintenance]. Press OK.
- Select [ImproveQuality]. Press OK.
- Select [Check Quality]. Press OK.
- Press Inicio Color (Color Start).The machine prints the Print Quality Check Sheet.
- Check the quality of the four color blocks on the sheet.
- The LCD asks about the print quality. Do one of the following:
- If all lines are clear and visible, press to select [Yes].
Press Detener/Salir (Stop/Exit) to finish the Print Quality check.
- If lines are missing (see Poor, below), press to select [No].
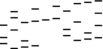
OK (DCP-T310/DCP-T510W)

Poor (DCP-T310/DCP-T510W)
OK (DCP-T710W/MFC-T810W)

Poor (DCP-T710W/MFC-T810W)

- The LCD asks you to check the print quality of each color. Press or to select one of the patterns that most closely matches the printing result, and then press OK.

Refer to the sample below to check the print quality.
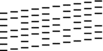
DCP-T310/DCP-T510W
Patterns


Print Quality
None
A Few
About Half
Many
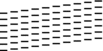
DCP-T710W/MFC-T810W
Patterns

Print Quality
None
A Few
About Half
Many
- Do one of the following:
- If print head cleaning is needed, press Inicio Color (Color Start) to start the cleaning procedure.
- If print head cleaning is not needed, press Detener/Salir (Stop/Exit) to finish the Print Quality check.
- After the cleaning procedure is finished, press. Then, press Inicio Color (Color Start). The machine prints the Print Quality Check Sheet again. Check the quality of the four color blocks on the sheet again.
If you clean the print head at least five times and the print has not improved, try cleaning the print head again up to three more times. If the print has not improved, contact Brother Customer Service.
- IMPORTANT
- DO NOT touch the print head. Touching the print head may cause permanent damage and may void the print head's warranty.
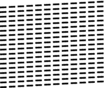
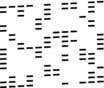
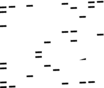
When a print head nozzle is clogged, the printed sample looks like this. 
After the print head nozzle is cleaned, the horizontal lines are gone.
MFC-T910DW
- Press Ajustes (Settings).
- Press or to select the following:
- Select [General Setup]. Press OK.
- Select [Maintenance]. Press OK.
- Select [Impr. PrintQuality]. Press OK.
- Select [Impr. PrintQuality] again. Press OK.
- Press
 . The machine prints the Print Quality Check Sheet.
 - Check the quality of the four color blocks on the sheet.
- The LCD asks about the print quality. Do one of the following:
- If all lines are clear and visible, press
 to select [No].
 The Print Quality check finishes.
- If lines are missing (see Poor, below), press to select [Yes].
OK
Poor
- The LCD asks you to check the print quality of each color. Press or to select the pattern (1–4) that most closely matches the printing result, and then press OK.
- Do one of the following:
- If print head cleaning is needed, press to start the cleaning procedure.
- If print head cleaning is not needed, the Ink or Maintenance screen reappears on the LCD.
- After the cleaning procedure is finished, the LCD asks if you want to check the print quality again.
Press
[Yes] to start the print quality check. - Press again. The machine prints the Print Quality Check Sheet again. Check the quality of the four color blocks on the sheet again.
If you clean the print head at least five times and the print has not improved, try cleaning the print head again up to three more times. If the print has not improved, contact Brother Customer Service.
- IMPORTANT
- DO NOT touch the print head. Touching the print head may cause permanent damage and may void the print head's warranty.
When a print head nozzle is clogged, the printed sample looks like this.
After the print head nozzle is cleaned, the horizontal lines are gone.
Was this page helpful?