
Winding the Bobbin
Use the plastic bobbins that came with this machine or bobbins of the same type: 11.5 mm (approx. 7/16 inch) plastic Class 15 (A style) bobbins, which are available from your Brother dealer.
This section describes how to wind thread onto a bobbin.
- When winding bobbins for embroidery, be sure to use the recommended bobbin thread for this machine.
Embroidering Attractive Finishes
Open the top cover.
Place the bobbin on the bobbin winder shaft so that the notch in the bobbin aligns with the spring on the shaft, and then slide the bobbin winder shaft to the right until it snaps into place.
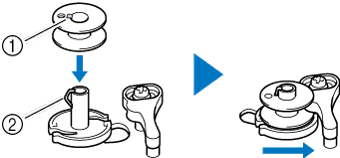
- Notch
- Bobbin winder shaft spring
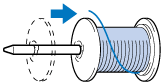
Remove the spool cap and place the spool of thread for the bobbin onto the spool pin.
Slide the spool onto the spool pin so that the thread unwinds to the front from the bottom.

- The thread unwinds to the front from the bottom.
Slide the spool cap onto the spool pin as far as possible to the right, with the rounded side on the left.
 IMPORTANT
- If the spool or the spool cap is not installed correctly, the thread may become tangled around the spool pin, and the machine may be damaged.
- Three spool cap sizes are available, allowing you to choose a spool cap that best fits the size of spool being used. If the spool cap is too small for the spool being used, the thread may catch on the slit in the spool or the machine may be damaged. When using mini king thread spool, use the thread spool insert.
For details on thread spool insert (mini king thread spool), refer to the following “Note”.
- When using the spool as shown below, use the thread spool insert (mini king thread spool). Make sure that the thread spool insert is firmly inserted. After installing it, pull out some thread, and check that the thread unwinds without getting caught.
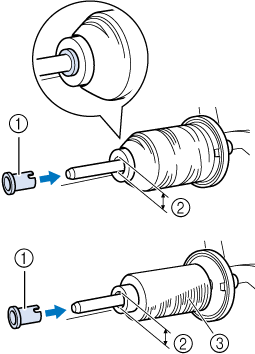
- Thread spool insert (mini king thread spool)
- Hole diameter 8.0 mm to 10.5 mm (approx. 5/16 inch to 13/32 inch)
- Spool (cross-wound thread)
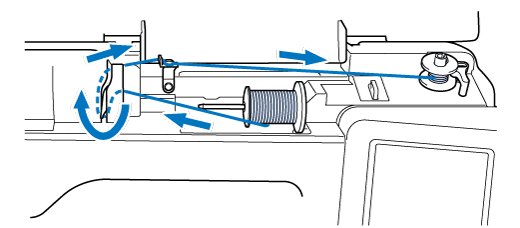
While holding the thread near the spool, pass the thread through the thread guide cover.
And then, pass the thread under the thread guide plate, and pull it to the right.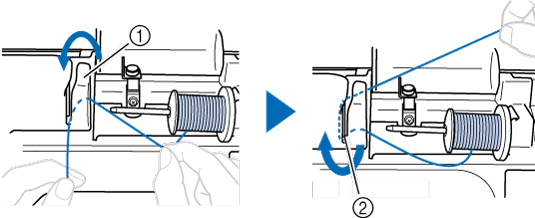
- Thread guide cover
- Thread guide plate
Pass the thread under the hook on the bobbin winding thread guide, and then wind it counterclockwise under the pretension disk.
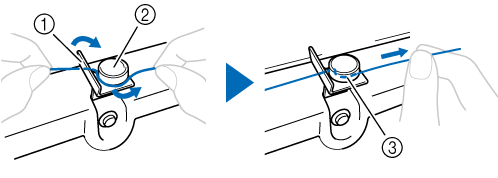
- Bobbin winding thread guide
- Pretension disk
- Pull it in as far as possible
Make sure that the thread is passed under the pretension disk.
Wind the thread clockwise around the bobbin 5 or 6 times, pass the thread through the guide slit in the bobbin winder seat, and then pull the thread to cut it.
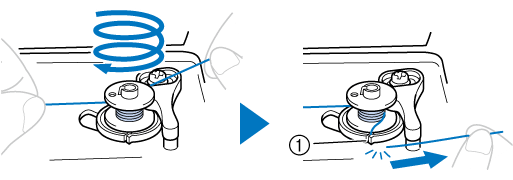
- Guide slit in bobbin winder seat (with built-in cutter)
Be sure to wind the thread clockwise around the bobbin, otherwise the thread may become wrapped around the bobbin winder shaft.
 CAUTION
Be sure to cut the thread as described. If the bobbin is wound without cutting the thread using the cutter built into the guide slit in the bobbin winder seat, the thread may become tangled in the bobbin or the needle may break and cause injury when the bobbin thread starts to run out.
Turn on the machine.
- The “Start/Stop” button lights up in orange.
Press the “Start/Stop” button to start winding the bobbin.
When the bobbin winding becomes slow, press the “Start/Stop” button to stop the machine.
IMPORTANTWhen the bobbin winding becomes slow, stop the machine, otherwise the machine may be damaged.
Cut the thread with the cutter.
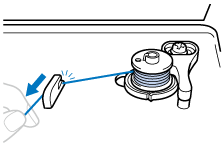
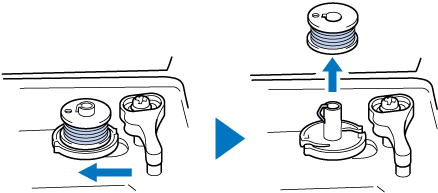
Slide the bobbin winder shaft to the left until it snaps into place, and then remove the bobbin.
Remove the spool for the bobbin thread from the spool pin.