Online User's Guide
DCP‑7090DW / DCP‑L2535DW / DCP‑L2550DW / DCP‑7190DW / DCP‑7195DW / MFC‑7895DW
- Control Panel Overview
- Control Panel Overview
- Touchscreen LCD Overview
- How to Navigate the Touchscreen LCD
- Settings Screen Overview
- Access Brother Utilities (Windows)
- Load Paper
- Paper Settings
- Recommended Print Media
- Load Documents
- Unscannable and Unprintable Areas
- Using Special Paper
- Scan Using the Scan Button on Your Brother Machine
- Scan Photos and Graphics
- Save Scanned Data to a Folder as a PDF File
- Scan to an Editable Text File (OCR)
- Scan to Email Attachment
- Scan to FTP
- Scan to Network (Windows)
- Web Services for Scanning on Your Network (Windows 7, Windows 8 and Windows 10)
- Change Scan Button Settings from ControlCenter4 (Windows)
- Change Scan Button Settings from Brother iPrint&Scan (Mac)
- Configure Certificate for Signed PDF
- Disable Scanning from Your Computer
- Scan from Your Computer (Windows)
- Scan Using ControlCenter4 Home Mode (Windows)
- Scan Using ControlCenter4 Home Mode (Windows)
- Select Document Type Using ControlCenter4 Home Mode (Windows)
- Change Scan Size Using ControlCenter4 Home Mode (Windows)
- Crop a Scanned Image Using ControlCenter4 Home Mode (Windows)
- Print Scanned Data Using ControlCenter4 Home Mode (Windows)
- Scan to an Application Using ControlCenter4 Home Mode (Windows)
- Save Scanned Data to a Folder as a PDF File Using ControlCenter4 Home Mode (Windows)
- Scan Both Sides of a Document Automatically Using ControlCenter4 Home Mode (Windows)
- Scan Settings for ControlCenter4 Home Mode (Windows)
- Scan Using ControlCenter4 Home Mode (Windows)
- Scan Using ControlCenter4 Advanced Mode (Windows)
- Scan Photos and Graphics Using ControlCenter4 Advanced Mode (Windows)
- Save Scanned Data to a Folder as a PDF File Using ControlCenter4 Advanced Mode (Windows)
- Scan Both Sides of a Document Automatically Using ControlCenter4 Advanced Mode (Windows)
- Scan Both Sides of an ID Card Using ControlCenter4 Advanced Mode (Windows)
- Scan to Email Attachment Using ControlCenter4 Advanced Mode (Windows)
- Scan to an Editable Text File (OCR) Using ControlCenter4 Advanced Mode (Windows)
- Scan Settings for ControlCenter4 Advanced Mode (Windows)
- Scan Using Nuance™ PaperPort™ 14SE or Other Windows Applications
- Scan Using Windows Fax and Scan
- Scan Using ControlCenter4 Home Mode (Windows)
- Scan from Your Computer (Mac)
- Configure Scan Settings Using Web Based Management
- Copy a Document
- Enlarge or Reduce Copied Images
- Make N in 1 Copies Using the Page Layout Feature
- Sort Copies
- Copy an ID Card
- Copy on Both Sides of the Paper (2-sided Copy)
- Copy Options
- Send a Fax
- Send a Fax
- Send a 2-sided Fax from the ADF
- Send a Fax Manually
- Send a Fax at the End of a Conversation
- Set the Fax Logic (Sending and Receiving Sequence)
- Send the Same Fax to More than One Recipient (Broadcasting)
- Send a Fax at a Specified Time (Delayed Fax)
- Cancel a Fax in Progress
- Check and Cancel a Pending Fax
- Fax Options
- Receive a Fax
- Receive Mode Settings
- Receive Modes Overview
- Choose the Correct Receive Mode
- Use PC-Fax Receive to Transfer Received Faxes to Your Computer (Windows only)
- Set the Number of Rings Before the Machine Answers (Ring Delay)
- Set Fax Detect
- Shrink Page Size of an Oversized Incoming Fax
- Set the 2-sided Printing for Received Faxes
- Set the Fax Receive Stamp
- Receive a Fax at the End of a Telephone Conversation
- Register a Number in the Blocked List
- Receive Mode Settings
- Voice Operations and Fax Numbers
- Telephone Services and External Devices
- Fax Reports
- PC-FAX
- PC-FAX for Windows
- PC-FAX Overview (Windows)
- Configure PC-FAX (Windows)
- Configure your PC-Fax Address Book (Windows)
- Add a Member to your PC-FAX Address Book (Windows)
- Create a Group in your PC-FAX Address Book (Windows)
- Edit Member or Group Information in your PC-FAX Address Book (Windows)
- Delete a Member or Group in your PC-FAX Address Book (Windows)
- Export your PC-FAX Address Book (Windows)
- Import Information to your PC-FAX Address Book (Windows)
- Send a Fax Using PC-FAX (Windows)
- Receive Faxes on Your Computer (Windows)
- PC-FAX Overview (Windows)
- PC-FAX for Mac(Sending only)
- PC-FAX for Windows
- Supported Basic Network Features
- Network Management Software and Utilities
- Additional Methods of Configuring Your Brother Machine for a Wireless Network
- Before Configuring Your Brother Machine for a Wireless Network
- Configure Your Machine for a Wireless Network
- Configure Your Machine for a Wireless Network Using the One Push Method of Wi-Fi Protected Setup™ (WPS)
- Configure Your Machine for a Wireless Network Using the PIN Method of Wi-Fi Protected Setup™ (WPS)
- Configure Your Machine for a Wireless Network Using the Machine's Control Panel Setup Wizard
- Configure Your Machine for a Wireless Network When the SSID Is Not Broadcast
- Use Wi-Fi Direct®
- Print or Scan from Your Mobile Device Using Wi-Fi Direct
- Configure Your Wi-Fi Direct Network
- Wi-Fi Direct Network Configuration Overview
- Configure Your Wi-Fi Direct Network Using the One-Push Method
- Configure Your Wi-Fi Direct Network Using the One-Push Method of Wi-Fi Protected Setup™ (WPS)
- Configure Your Wi-Fi Direct Network Using the PIN Method
- Configure Your Wi-Fi Direct Network Using the PIN Method of Wi-Fi Protected Setup™ (WPS)
- Configure Your Wi-Fi Direct Network Manually
- Advanced Network Features
- Technical Information for Advanced Users
- Lock the Machine Settings
- Network Security Features
- Before Using Network Security Features
- Secure Function Lock 3.0
- Manage Your Network Machine Securely Using SSL/TLS
- Introduction to SSL/TLS
- Certificates and Web Based Management
- Supported Security Certificate Features
- Create and Install a Certificate
- Manage Multiple Certificates
- Manage Your Network Machine Securely Using Web Based Management
- Manage Your Network Machine Securely Using BRAdmin Professional (Windows)
- Print Documents Securely Using SSL/TLS
- Send an Email Securely
- AirPrint
- Mobile Printing for Windows
- Mopria® Print Service
- Brother iPrint&Scan for Mobile Devices
- Near-Field Communication (NFC)
- Error and Maintenance Messages
- Document Jams
- Paper Jams
- Printing Problems
- Improve the Print Quality
- Telephone and Fax Problems
- Network Problems
- Error Messages for Network Problems
- Where Can I Find My Brother Machine's Network Settings?
- I Cannot Complete the Wireless Network Setup Configuration
- Use the Network Connection Repair Tool (Windows)
- My Brother Machine Cannot Print, Scan, or PC-FAX Receive over the Network
- I Want to Check that My Network Devices are Working Correctly
- AirPrint Problems
- Other Problems
- Transfer Your Faxes or Fax Journal Report
- Machine Information
- Change Machine Settings from the Control Panel
- In the Event of Power Failure (Memory Storage)
- General Settings
- Adjust the Machine's Volume
- Set Sleep Mode Countdown
- About Deep Sleep Mode
- Set Auto Power Off Mode
- Set the Date and Time
- Set the Time Zone
- Adjust the LCD Backlight Brightness
- Change How Long the LCD Backlight Stays On
- Set Your Station ID
- Set Tone or Pulse Dialling Mode
- Reduce Toner Consumption
- Set the Continue Mode
- Learn About Receiving Faxes in Continue Mode
- Add a Prefix to Every Fax Number
- Prevent Dialling a Wrong Number (Dial Restriction)
- Reduce Printing Noise
- Change the Language on the LCD
- Save Your Favourite Settings as a Shortcut
- Print Reports
- Settings and Features Tables
- Change Machine Settings from Your Computer
Home > Paper Handling > Load Paper > Load and Print Paper in the Manual Feed Slot > Load and Print on Envelopes in the Manual Feed Slot
Load and Print on Envelopes in the Manual Feed Slot
Before loading, press the corners and sides of the envelopes to make them as flat as possible.
When you load a different paper size in the tray, you must change the Paper Size setting in the machine or on your computer at the same time.
- Open the machine's back cover (the face up output tray).
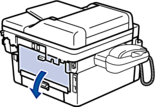
 The machine automatically turns on Manual Feed mode when you load paper in the manual feed slot.
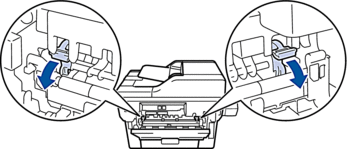
 - Pull down the two green levers, one on the left side and one on the right side, as shown in the illustration.
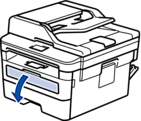
- On the front of the machine, open the manual feed slot cover.
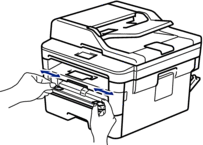
- Use both hands to slide the manual feed slot paper guides to fit the width of the paper that you are using.
- Using both hands, put one envelope in the manual feed slot until the front edge touches the paper feed roller. When you feel the machine pull it in, let go.
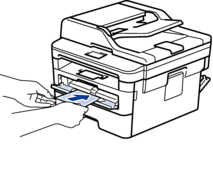

- Load the envelope into the manual feed slot with the printing surface facing up.
- Pull the envelope out completely when you reload the envelope into the manual feed slot.
- Do not put more than one envelope in the manual feed slot at one time, as it may cause a jam.
- Make sure the envelope is straight and in the correct position on the manual feed slot. If it is not, the envelope may not be fed correctly, resulting in a skewed printout or a paper jam.
- Send your print job to the machine.
 Change your print preferences in the Print dialog box before sending the print job from your computer.SettingsOptions for Envelopes
Paper Size
Com-10
DL
C5
Monarch
Media Type
Envelopes
Env. Thick
Env. Thin
- After the printed envelope comes out of the machine, put in the next envelope. Repeat for each envelope that you want to print.
- When you have finished printing, return the two green levers you adjusted in the earlier step back to their original positions.
- Close the back cover (the face up output tray) until it locks in the closed position.
- Related Information
Was this page helpful?
Thank you for your feedback.


