

  |   |
Error message | Cause | Action | ||||||
Out of Memory | The machine's memory is full. | Do one of the following: | ||||||
Replace Pad | The Separation Pad has been used over 50,000 times. | Replace the Separation Pad with a new one. Scanning errors may occur if you do not replace the part. See Replace the Separation Pad. | ||||||
Replace Roller | The Pick-up Roller has been used over 50,000 times. | Replace the Pick-up Roller with a new one. Scanning errors may occur if you do not replace the part. See Replace the Pick-up Roller. | ||||||
Replace Parts | Both the Separation Pad and the Pick-up Roller have been used over 50,000 times. | Replace the Separation Pad and the Pick-up Roller with new ones. Scanning errors may occur if you do not replace the parts. See Replace the Separation Pad and Replace the Pick-up Roller. | ||||||
Unable to Scan XX (XX is an error code.) | A machine error is occurring. | Turn the machine off and then on, and then try to scan again. If the error is not cleared after turning the machine off and then on, make a note of the error message and report it to your dealer or to Brother Customer Service. | ||||||
Document Jam/too Long | Clear the document jam (see Document Jam) and then do the following:
| |||||||
Multifeed | Multiple pages were fed at the same time. | Clear the Multifeed. See Multifeed. | ||||||
Unusable Device | An unusable device is inserted in the USB port. | Disconnect the device. Turn the machine off and then on by unplugging the machine from the AC power outlet and then plugging the machine in again. | ||||||
Unusable USB Device | An unsupported USB device is inserted in the USB direct interface. | Remove the unsupported USB device, such as a mouse or mobile device that does not support USB flash memory drive mode, from the USB direct interface. | ||||||
USB Hub Not Supported | A hub or USB flash memory drive with a hub is inserted in the USB direct interface. | Remove the unsupported device, such as a USB hub or USB flash memory drive with a hub, from the USB direct interface. | ||||||
Insufficient USB Storage | The inserted USB flash memory drive is full. | Press | ||||||
USB Access Error | The USB flash memory drive was removed while it was being accessed. | Press | ||||||
USB Write-protected | The inserted USB flash memory drive is write-protected. | Remove the write-protected USB flash memory drive, press | ||||||
Too Many Files on USB | Your machine cannot save to a USB flash memory drive if it contains too many files. | Remove the USB flash memory drive, press | ||||||
File Name Cannot Be Used | The maximum sequential number for the file name has been reached. | Press
| ||||||
No Profile set | No Scan to FTP profile or Scan to Network profile is registered. | Configure the Scan to FTP profile or the Scan to Network profile before using Scan to FTP or Scan to Network. See Scan Documents Directly to an FTP Server or Scan Documents Directly to a CIFS Server (Windows®). | ||||||
No Certificate | The certificate does not exist, or is corrupted. | Configure the settings under Signed PDF in the Administrator tab in Web Based Management. See Scan Documents Directly to an FTP Server or Scan Documents Directly to a CIFS Server (Windows®). | ||||||
Address Full | The Address Book is full. | Delete unnecessary E-mail addresses and then try again. | ||||||
Registration Failed (E-mail Address) | The E-mail address is too long. | You can enter an E-mail address that contains up to 64 characters. | ||||||
Shortcuts Full | The maximum number of shortcuts has been reached. | Delete unnecessary shortcuts and then try again. | ||||||
Registration Failed (Shortcut) | The maximum number of E-mail addresses in a shortcut has been reached. | Delete unnecessary E-mail addresses and then try again. | ||||||
Cannot Delete | The E-mail address is registered in a shortcut. | You cannot delete an E-mail address used in a shortcut. Delete the shortcut first, and then try again. |
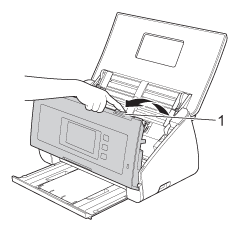
| 1 | Take out any paper from the ADF that is not jammed. |
| 2 |  |
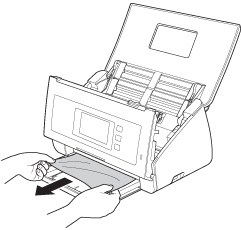
| 3 | Pull the jammed document out of the machine.  |
| 4 | Close the Front Cover. |
| 5 | Press |
| • | To avoid damage to the jammed document, DO NOT pull the document out before opening the Front Cover. | ||||||||||||||
| • | Take out any paper from the ADF before closing the Front Cover. | ||||||||||||||
| • | To avoid future document jams, do the following:
|
  |   |