When you choose Scan to Network, you can scan documents directly to a shared folder on a CIFS server located on your local network or the internet. The Scan to Network feature supports Kerberos and NTLMv2 authentication.
The details required to use Scan to Network can be entered by using Web Based Management to preconfigure and store the details in a Scan to Network profile. The Scan to Network profile stores user information and configuration settings for use on a network, or the internet.

Note
| • | Scan to Network is available when Scan to Network profiles are configured by using Web Based Management. |
| • | YOU MUST CONFIGURE THE SNTP PROTOCOL (NETWORK TIME SERVER), OR YOU MUST SET THE DATE, TIME AND TIME ZONE CORRECTLY FOR AUTHENTICATION. FOR MORE INFORMATION, SEE THE Network User’s Guide. |
| • | We recommend Microsoft® Internet Explorer® 8.0/9.0. Please also make sure that JavaScript and Cookies are always enabled in whichever browser you use. If a different web browser is used, make sure it is compatible with HTTP 1.0 and HTTP 1.1. |
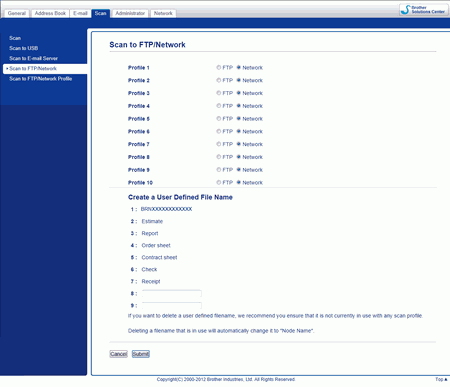
To use Web Based Management, type http://xxx.xxx.xxx.xxx (where xxx.xxx.xxx.xxx is the IP address of your machine) into your browser and then you can configure or change the settings in Scan to FTP/Network in the Scan tab. You can configure up to ten Scan to Network profiles and choose what profile numbers (1 to 10) to use for Scan to Network settings in Scan to FTP/Network Profile.
In addition to the seven preset file names you can store two user defined file names that can be used for creating a Scan to Network profile.
Choose Scan to FTP/Network in Web Based Management. In Create a User Defined File Name, enter a file name in one of the two user defined fields and click Submit. A maximum of 15 characters can be entered in each of the user defined name fields.
Note
| | Do not use unsuitable characters in the file name (for example ?, /, \, or *). They may cause a sending error when using Scan to Network. |
Configure the Scan to Network Default Settings
| 1 | Choose Network in Scan to FTP/Network from the Scan tab. Click Submit. |
| 2 | Choose the Profile you want to configure in Scan to FTP/Network Profile. |
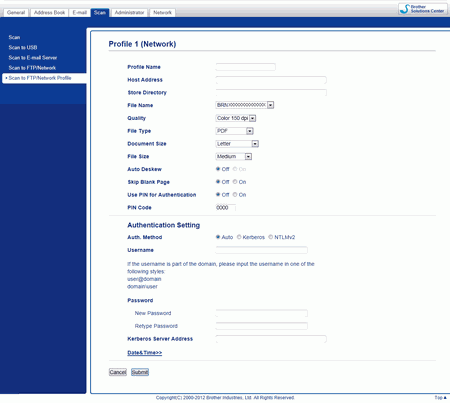
| 3 | Enter the name that you want to use for the Scan to Network profile. This name will be displayed on the LCD of the machine and can be up to 15 characters. |
| 4 | The Host Address is the domain name of the CIFS server. Enter the Host Address (for example mypc.example.com) (up to 64 characters) or the IP address (for example 192.23.56.189). |
| 5 | Enter the destination folder where your document will be stored on the CIFS server (for example brother\abc) (up to 60 characters). |
| 6 | |
| 7 | If you want to protect the profile, choose On from Use PIN for Authentication and enter a 4-digit PIN number in PIN Code. |
| 8 | Choose the authentication method. You can choose Auto, Kerberos or NTLMv2. If you choose Auto, the authentication method will be detected automatically. |
| 9 | Enter the Username that has been registered with the CIFS server for the machine (up to 96 characters). |
| 10 | Enter the Password for access to the CIFS server (up to 32 characters). |
| 11 | Click Submit. |
| 12 | Choose Date&Time from the General tab. |
| 13 | Enter the date and time used on the CIFS server. |
| 14 | Choose the time zone from the pull-down list. |
| 15 | Click Submit. |
Scan Using Scan to Network Profiles
| 1 | Load your document. |
| 2 | Swipe left or right, or press  or  to display Scan 1. |
| 3 | Press to Network. |
| 4 | Swipe up or down, or press  or  to choose one of Network server profiles listed. If the LCD prompts you to enter a PIN number, enter the 4-digit PIN number for the profile on the LCD. Press OK. Do one of the following: | • | If the Scan to Network profile is complete, go to 7. | | • | If the Scan to Network profile is not complete, go to 5. |
|
| 5 | Press Options. |
| 6 | Choose the settings for 2-sided Scan, Scan Type, Resolution, File Type, Document Size, File Size, Auto Deskew, Skip Blank Page and User Name as needed. Press OK. Note | • | If you choose Secure PDF for File Type, the machine will ask you to enter a 4 digit password using numbers 0-9 before it starts scanning. | | • | If you choose Signed PDF for File Type, you must install and then configure a certificate to your machine using Web Based Management. | | • | If you want to save the settings as a shortcut, press Save as Shortcut. |
|
| 7 | Press Start. The LCD shows Connecting. When the connection to the Network is successful the machine starts the scanning process. |