When you choose Scan to FTP, you can scan a black and white or color document directly to an FTP server on your local network, or on the internet.
The details required to use Scan to FTP can be entered by using Web Based Management to pre-configure and store the details in an FTP Profile.

Note
| • | Scan to FTP is available when FTP profiles are configured by using Web Based Management. |
| • | We recommend Microsoft® Internet Explorer® 8.0/9.0 for Windows® and Safari 5.0 for Macintosh. Please also make sure that JavaScript and Cookies are always enabled in whichever browser you use. If a different web browser is used, make sure it is compatible with HTTP 1.0 and HTTP 1.1. |
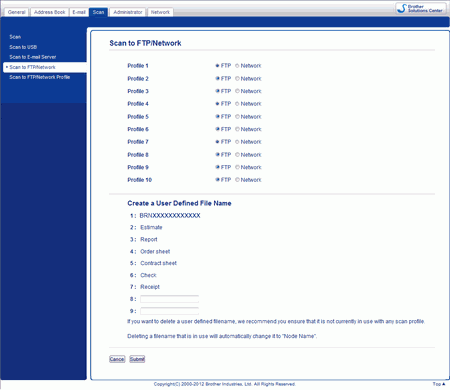
To use Web Based Management, type http://xxx.xxx.xxx.xxx (where xxx.xxx.xxx.xxx is the IP address of your machine) into your browser and then you can configure or change the settings in Scan to FTP/Network in the Scan tab. You can configure up to ten FTP server profiles and choose what profile numbers (1 to 10) to use for Scan to FTP settings in Scan to FTP/Network Profile.
In addition to the seven preset file names you can store two user defined file names that can be used for creating an FTP Server Profile.
Choose Scan to FTP/Network in Web Based Management. In Create a User Defined File Name, enter a file name in one of the two user defined fields and click Submit. A maximum of 15 characters can be entered in each of the user defined name fields.

Note
| | Do not use unsuitable characters in the file name (for example ?, /, \, or *). They may cause a sending error when using Scan to FTP. |
Configure the FTP Default Settings
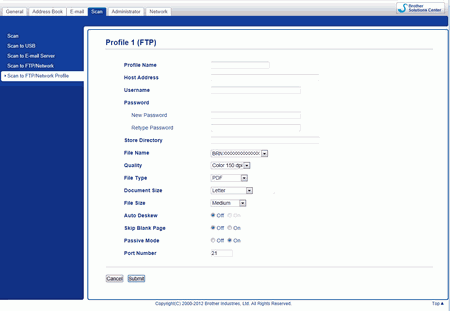
You can set Passive Mode to Off or On depending on your FTP server and network firewall configuration. By default this setting is On. You can also change the port number used to access the FTP server. The default for this setting is port 21. In most cases these two settings can remain as default.
| 1 | Choose FTP in Scan to FTP/Network from the Scan tab. Click Submit. |
| 2 | Choose the Profile you want to configure in Scan to FTP/Network Profile. |
| 3 | Enter the name that you want to use for the profile of the FTP server. This name will be displayed on the LCD of the machine and can be up to 15 characters. |
| 4 | The Host Address is the domain name of the FTP server. Enter the Host Address (for example ftp.example.com) (up to 64 characters) or the IP address (for example 192.23.56.189). |
| 5 | Enter the Username that has been registered with the FTP server for the machine (up to 32 characters). |
| 6 | Enter the Password for access to the FTP server (up to 32 characters). |
| 7 | Enter the destination folder where your document will be stored on the FTP server (for example brother\abc) (up to 60 characters). |
| 8 |
Choose the file name you want to use for the scanned document. You can choose from seven preset and two user defined file names. The file name that will be used for your document will be the file name you selected plus the last 6 digits of the scanner counter plus the file extension (for example, Estimate_098765.pdf). |
| 9 | Choose the quality, file type, document size and file size you want to use for the scanned data. The following settings can be changed. Setting | Options | Description | Quality | Color 150 dpi Color 200 dpi Color 300 dpi Color 600 dpi Gray 150 dpi Gray 200 dpi Gray 300 dpi Gray 600 dpi B&W 150 dpi B&W 200 dpi B&W 300 dpi B&W 600 dpi Auto 150 dpi Auto 200 dpi Auto 300 dpi User Select | | • | You can select a scanning quality from the Quality drop-down list. Higher qualities take more memory and transfer time, but produce a finer scanned image. | | • | If you select User Select, you must select the setting from the control panel of the machine. |
| File Type | PDF Secure PDF PDF/A Signed PDF TIFF JPEG XPS User Select | | • | You can select the file type you want to use for the scanned data. | | • | If you select Secure PDF, the machine will ask you to enter a 4 digit password using numbers 0-9 before it starts scanning. | | • | If you select Signed PDF, you must install a certificate to your machine using Web Based Management. Select Signed PDF from Administrator in Web Based Management. For how to install a certificate, see Using Certificates for device security in the Network User’s Guide. | | • | PDF/A is a PDF file format intended for long-term archiving. This format contains all the necessary information to be able to reproduce the document after long-term storage. | | • | Signed PDF helps prevent data tampering and the impersonation of an author by including a digital certificate within the document. | | • | You can select PDF, Secure PDF, PDF/A, Signed PDF, JPEG or XPS when you select Color or Gray in Quality. | | • | You can select PDF, Secure PDF, PDF/A, Signed PDF or TIFF when you select B&W in Quality. | | • | You can select PDF, Secure PDF or Signed PDF when you select Auto in Quality. | | • | If you select User Select, you must select the setting from the control panel of the machine. |
| Document Size | Auto A4 Letter Legal B5 A5 B6 A6 Business Card Long Paper | | • | If you select Auto, you can scan documents of any size without making any adjustments to Document Size. For faster scan speeds, you can select the exact size of your document from the Document Size drop-down list. | | • | If you select 600 dpi for Quality, you cannot select Auto. | | • | Long Paper in the Document Size drop-down list will appear when you select other than Auto XXX dpi (XXX is a value of the quality) for Quality and Auto Deskew is set to Off. | | • | You can select A4, Letter, Legal, B5, A5, B6, A6, Business Card or Long Paper (when you select other than Auto XXX dpi for Quality) when Auto Deskew is set to Off. | | • | You can select Long Paper when you configure the settings as following: | • | Quality: other than Auto | | • | Auto Deskew: Off | | • | Skip Blank Page: Off |
|
| File Size | Small Medium Large User Select | | • | You can adjust the file size for the scanned data. | | • | If you select Color or Gray in Quality, select the file size for the scanned data from the drop-down list. | | • | If you select User Select, you must select the setting from the control panel of the machine. |
|
|
| 10 | Choose On if you want to correct the skew (within 5 degrees) of the scanned data. |
| 11 | Choose On if you want to remove blank pages of the document from the scanned data. |
| 12 | Click Submit. |
Scan Using FTP Server Profiles
| 1 | Load your document. |
| 2 | Swipe left or right, or press  or  to display Scan 1. |
| 3 | Press to FTP. |
| 4 | Swipe up or down, or press  or  to choose one of the FTP server profiles listed. Do one of the following: | • | If the Scan to FTP profile is complete, go to 7. | | • | If the Scan to FTP profile is not complete, go to 5. |
|
| 5 | Press Options. |
| 6 | Choose the settings for 2-sided Scan, Scan Type, Resolution, File Type, Document Size, File Size, Auto Deskew, Skip Blank Page and User Name as needed. Press OK.  Note | • | If you choose Secure PDF for File Type, the machine will ask you to enter a 4 digit password using numbers 0-9 before it starts scanning. | | • | If you choose Signed PDF for File Type, you must install and then configure a certificate to your machine using Web Based Management. | | • | If you want to save the profile as a shortcut, press Save as Shortcut. |
|
| 7 | Press Start. The LCD shows Connecting. When the connection to the FTP server is successful the machine starts the scanning process. |


