Online User's Guide
DCP‑L2535D / DCP‑L2550DW / MFC‑L2715DW / MFC‑L2716DW / MFC‑L2750DW / MFC‑L2751DW / MFC‑L2771DW
Some features are not available depending on the model.


Home > Introduction to Your Brother Machine > Control Panel Overview


Control Panel Overview
The control panel may vary depending on your model.
MFC-L2715DW/MFC-L2716DW
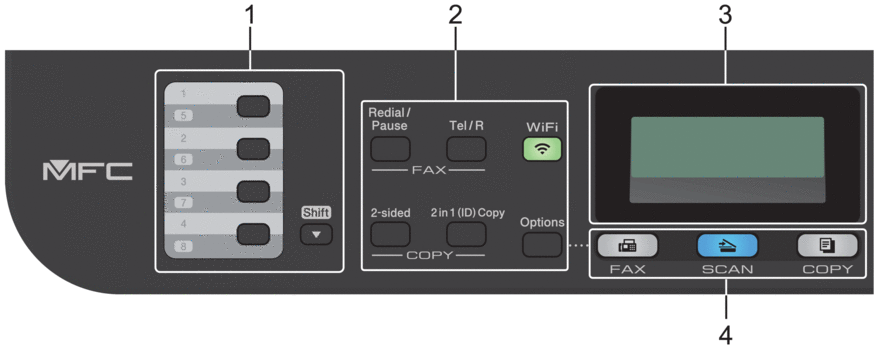
- One Touch Buttons
-
Store and recall up to eight fax and telephone numbers.
To access stored One Touch fax and telephone numbers 1-4, press the One Touch button assigned to that number. To access stored One Touch fax and telephone numbers 5-8, press and hold Shift as you press the button.
- Function Buttons
-
- Redial/Pause
-
Press to dial the last number you called. This button also inserts a pause when programming quick dial numbers or when dialling a number manually.
- Tel/R
-
Press Tel/R to have a telephone conversation after picking up the external handset during the F/T fast double-ring.
When connected to a PBX, use this button to gain access to an outside line, to recall an operator, or to transfer a call to another extension.
- WiFi (for wireless models)
-
Press the WiFi button and launch the wireless installer on your computer. Follow the on-screen instructions to set up a wireless connection between your machine and your network.
When the WiFi light is on, your Brother machine is connected to a wireless access point. When the WiFi light blinks, the wireless connection is down, or your machine is in the process of connecting to a wireless access point.
- Resolution (for certain models only)
-
Press to change the Fax resolution.
- 2 in 1 (ID) Copy
-
Press to copy both sides of an identification card onto a single page.
- 2-sided
-
Press to copy on both sides of a sheet of paper.
- Options
-
Press to access temporary settings for faxing, scanning, or copying.
- Liquid Crystal Display (LCD)
-
Displays messages to help you set up and use the machine.
- If the machine is in Fax Mode, the LCD displays:
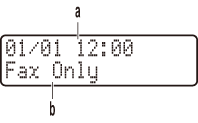
a. Date & Time
b. Receive Mode
- When you press COPY, the LCD displays:
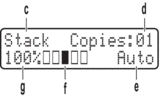
c. Type of copy
d. Number of copies
e. Quality
f. Contrast
g. Copy ratio
- Mode Buttons
-
- FAX
-
Press to switch the machine to Fax Mode.
- SCAN
-
Press to switch the machine to Scan Mode.
- COPY
-
Press to switch the machine to Copy Mode.
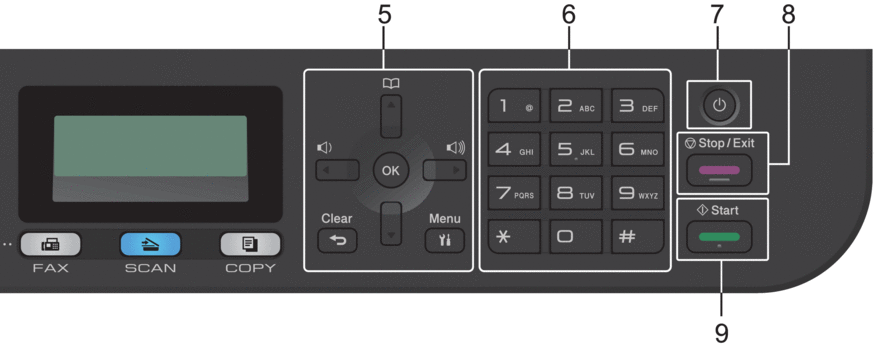
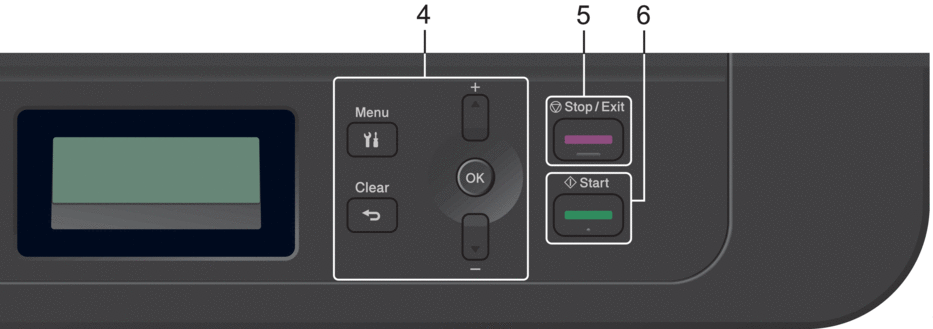
- Menu Buttons
-
- Clear
-
Press to delete entered data or cancel the current setting.
- Menu
-
Press to access the Menu for programming your machine settings.
- OK
-
Press to store your machine settings.
 or
or 
-
Press to scroll back or forward through menu selections.
 or
or 
-
- Press to scroll up or down through menus and options.
- Press to change the resolution in Fax Mode.

-
Press
to access speed dial numbers.
- Dial Pad
-
- Use to dial fax and telephone numbers.
- Use as a keyboard to enter text or characters.
 Power On/Off
 -
Turn the machine on by pressing
. Turn the machine off by pressing and holding
. The LCD displays [Shutting Down] and stays on for a few seconds before turning off. If you have an external telephone or TAD connected, it is always available.
- Stop/Exit
-
- Press to stop an operation.
- Press to exit from a menu.
- Start
-
- Press to start sending faxes.
- Press to start copying.
- Press to start scanning documents.
DCP-L2535D/DCP-L2550DW
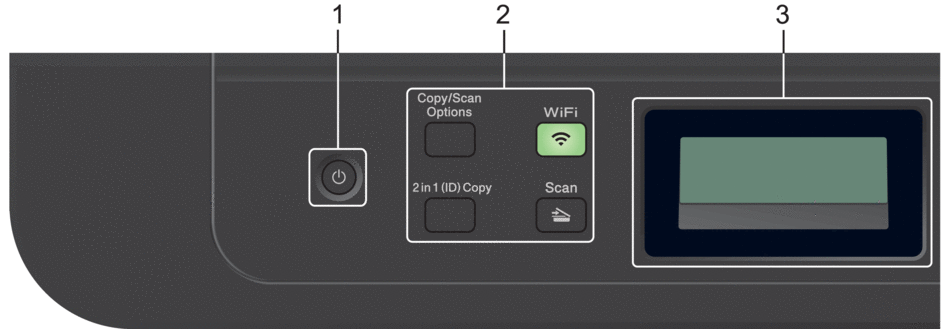
- Power On/Off
-
Turn the machine on by pressing
. Turn the machine off by pressing and holding
. The LCD displays [Shutting Down] and stays on for a few seconds before turning off.
- Function Buttons
-
- Copy/Scan Options
-
Press to access temporary settings for scanning or copying.
- WiFi (for wireless models)
-
Press the WiFi button and launch the wireless installer on your computer. Follow the on-screen instructions to set up a wireless connection between your machine and your network.
When the WiFi light is on, your Brother machine is connected to a wireless access point. When the WiFi light blinks, the wireless connection is down, or your machine is in the process of connecting to a wireless access point.
- Scan
-
Press to switch the machine to Scan Mode.
- 2 in 1 (ID) Copy
-
Press to copy both sides of an identification card onto a single page.
- 2-sided (for certain models only)
-
Press to copy on both sides of a sheet of paper.
- Liquid Crystal Display (LCD)
-
Displays messages to help you set up and use the machine.
- If the machine is in Ready Mode or Copy Mode, the LCD displays:
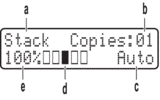
a. Type of copy
b. Number of copies
c. Quality
d. Contrast
e. Copy ratio
- Menu Buttons
-
- Menu
-
Press to access the Menu for programming your machine settings.
- Clear
-
- Press to delete entered data.
- Press to cancel the current setting.
- OK
-
Press to store your machine settings.
- or
-
Press to scroll up or down through menus and options.
- Stop/Exit
-
- Press to stop an operation.
- Press to exit from a menu.
- Start
-
- Press to start copying.
- Press to start scanning documents.