Online User's Guide
DCP‑J572DW / DCP‑J772DW / DCP‑J774DW / MFC‑J491DW / MFC‑J497DW / MFC‑J890DW / MFC‑J895DW
Some features are not available depending on the model.
 Download a printable version of this guide.
-
 Adobe Acrobat Reader is required to view this printable guide.
Click here to install.
Adobe Acrobat Reader is required to view this printable guide.
Click here to install.


Home > Scan > Scan from Your Computer (Windows) > Scan Using ControlCenter4 Home Mode (Windows) > Scan Using ControlCenter4 Home Mode (Windows) > Select Document Type Using ControlCenter4 Home Mode (Windows) > Custom Scan Settings (Windows)


Custom Scan Settings (Windows)
- Select Custom, and then click the Custom Settings button.The Custom Scan Settings dialog box appears.
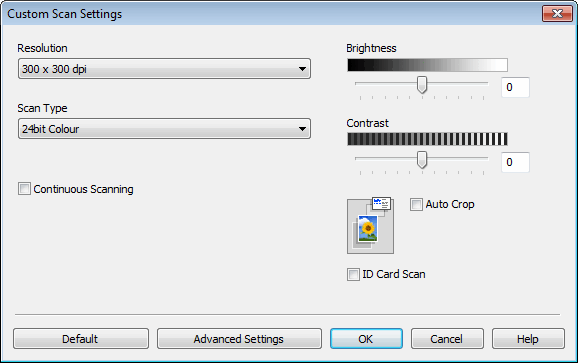
You can change the following settings:
- Resolution
- Select a scanning resolution from the Resolution drop-down list. Higher resolutions take more memory and transfer time, but produce a finer scanned image.
- Scan Type
- Select from a range of scan colour depths.
-
- Auto
- Use for any type of document. This mode automatically picks an appropriate colour depth for the document.
- Black & White
- Use for text or line art images.
- Grey (Error Diffusion)
- Use for photographic images or graphics. (Error Diffusion is a method for creating simulated grey images without using true grey dots. Black dots are put in a specific pattern to give a grey appearance.)
- True Grey
- Use for photographic images or graphics. This mode is more accurate because it uses up to 256 shades of grey.
- 24bit Colour
- Use to create an image with the most accurate colour reproduction. This mode uses up to 16.8 million colours to scan the image, but it requires the most memory and has the longest transfer time.
- Brightness
- Set the Brightness level by dragging the slider to the right or left to lighten or darken the image. If the scanned image is too light, set a lower brightness level and scan the document again. If the image is too dark, set a higher brightness level and scan the document again. You can also type a value into the field to set the Brightness level.
- Contrast
- Increase or decrease the Contrast level by moving the slider to the right or left. An increase emphasises dark and light areas of the image, while a decrease reveals more details in grey areas. You can also type a value into the field to set the Contrast level.
- Auto Crop
- Scan multiple documents placed on the scanner glass. The machine will scan each document and create separate files or a single multi-page file.
- Continuous Scanning
- Select this option to scan multiple pages. After a page is scanned, select either continue scanning or finish.
- ID Card Scan
-
Select this check box to scan both sides of an identification card onto one page.
- Advanced Settings
- Configure advanced settings by clicking the Advanced Settings button in the Scan Settings dialog box.
-
- Remove Bleed-through / Pattern
- Remove Background Colour
Remove the base colour of documents to make the scanned data more legible. (Available only for certain models)
- Rotate Image
Rotate the scanned image.
- Skip Blank Page
Remove the document's blank pages from the scanning results.
- Display Scanning Results
Show on your computer screen the number of total pages saved, and blank pages skipped.