When you need to replace the consumable items, the following messages will appear on the LCD.
LCD messages | Consumable item to replace | Approximate life | How to replace | Order No. |
Toner Life End | Toner cartridge | <Black> <Cyan, Magenta,Yellow> | |
TN-130C2,
TN-130M2,
TN-130Y2,
TN-130BK2,
TN-135C3,
TN-135M3,
TN-135Y3,
TN-135BK3
|
Waste Toner Full | Waste toner box | | | WT-100CL |
The following messages appear on the LCD in the Ready state. These messages provide advanced warnings to replace the consumable items before they run out. To avoid any inconvenience, you may want to buy spare consumable items before the printer stops printing.
LCD messages | Consumable part to replace | Approximate life | How to replace | Order No. |
Ready
 | Toner cartridge, Black | | | |
Ready
 | Toner cartridge, Yellow | | |
Ready
 | Toner cartridge, Magenta | |
Ready
 | Toner cartridge, Cyan | |
The following are maintenance messages that appear alternately with the Ready message on the upper row of the LCD when the printer is in the Ready state. These messages advise you that you will need to replace each of the consumable items as soon as possible, since the consumable item’s end of life has been reached. The printer will continue printing when any of these messages appear on the LCD.
LCD messages | Consumable part to replace | Approximate life | How to replace | Order No. |
Drum End Soon | Drum Unit | | | DR-130CL |
Waste Toner Soon | Waste toner box | | | WT-100CL |
Change Belt Unit | Belt unit | | | BU-100CL |
Fuser Unit End | Fuser unit | | Call your dealer or Brother Customer Service for a replacement fuser unit. | |
Laser Unit End | Laser unit | | Call your dealer or Brother Customer Service for a replacement laser unit. | |
Change PF Kit1,2 | Paper feeding kit 1, 2. (Paper pick-up roller Separator pad) | | Call your dealer or Brother Customer Service for a replacement paper feeding kit 1, 2. | |
Change PF KitMP | Paper feeding kit MP. (Paper pick-up roller Separator pad) | | Call your dealer or Brother Customer Service for a replacement of the paper feeding kit MP. | |

Note
| • | Discard used consumable items according to local regulations, keeping it separate from domestic waste. If you have questions, call your local waste disposal office. Be sure to reseal the consumable items tightly so that the material inside does not spill. |
| • | We recommend placing used consumable items on a piece of paper to prevent accidentally spilling or scattering the material inside. |
| • | If you use paper that is not a direct equivalent for the recommended paper, the life of consumable items and printer parts may be reduced. |
| • | The projected life for each of toner cartridges and a waste toner box is based on an average of 5% coverage of the printable area using any colour toner cartridge. Frequency of replacement will vary depending on the complexity of printed pages, percentage of coverage and type of media used. |
Toner cartridges
Note
| • | The amount of toner used varies according to what is printed on the page and the print density setting. |
| • | Wait to unpack the toner cartridge until immediately before you put it into the printer. |
Toner nearly empty message
Check printed pages, page counter, and display messages regularly. If the

indicator starts blinking, the printer has nearly run out of toner or the toner is not evenly distributed inside the cartridge.
Ready  |
The four
marks (also

,
=blinking
) indicate the Black (K), Yellow (Y), Magenta (M), Cyan (C) toner cartridges from left to right.
Although you can print up to 300 additional pages (at 5% coverage) after the Toner Low message first appears, be sure to replace the toner cartridge with a new one before it becomes completely empty. When this occurs, the
indicator on the LCD will disappear.
Toner Life End message
When the following message appears on the LCD, you need to replace the toner cartridge:
Toner Life End Replace Black(K) |
The second line of the LCD indicates which colour you need to replace.
Replacing a toner cartridge
Note
| • | To ensure high quality printing, we recommend that you use only genuine Brother toner cartridges. When you want to buy toner cartridges, call your dealer or Brother Customer Service. |
| • | We recommend that you clean the printer when you replace the toner cartridge.See Cleaning. |


CAUTION
| | Wait to unpack the toner cartridge until immediately before you put it in the printer. If toner cartridges are left unpacked for a long time the toner life will be shortened. |
| | If an unpacked drum unit is put in direct sunlight or room light, the unit may be damaged. |
| | Put the toner cartridge in the drum unit immediately after you have removed the protective cover. To prevent any degradation to the print quality, DO NOT touch the shaded parts shown in the illustrations. |
CAUTION
| | For USA and Canada |
| | Brother strongly recommends that you do not refill the toner cartridge provided with your printer. We also strongly recommend that you continue to use only genuine Brother brand replacement toner cartridges. Use or attempted use of potentially incompatible toner and/or cartridges in the Brother machine may cause damage to the machine and/or may result in unsatisfactory print quality. Our warranty coverage does not apply to any problem that is caused by the use of unauthorized third party toner and/or cartridges. To protect your investment and obtain premium performance from the Brother machine, we strongly recommend the use of genuine Brother supplies. |
CAUTION
| | For UK and other countries |
| | Brother machines are designed to work with toner of a particular specification and will work to a level of optimum performance when used with genuine Brother branded toner cartridges. Brother cannot guarantee this optimum performance if toner or toner cartridges of other specifications are used. Brother does not therefore recommend the use of cartridges other than genuine Brother branded cartridges with this machine. |
| | If damage is caused to the drum unit or other part of this machine as a result of using other manufacturer’s products with this machine, any repairs required as a result may not be covered by the warranty. |

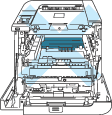
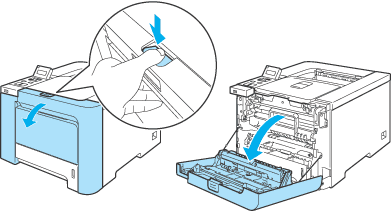
| 1 | Turn off the printer power switch. Press the front cover release button and then open the front cover. |
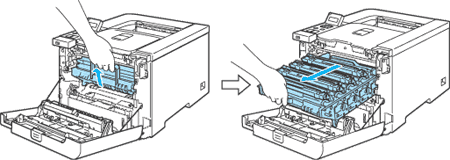
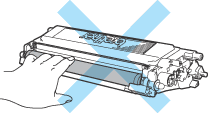
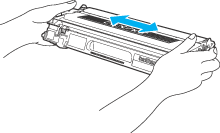
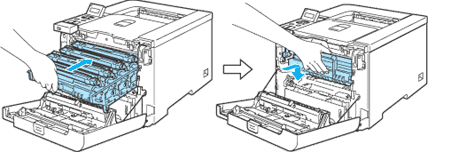
| 2 | Hold the green handle of the drum unit. Lift the drum unit up and then pull it out until it stops. |
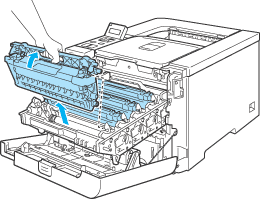
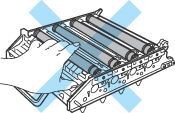
| 3 | Hold the handle of the toner cartridge and pull it out of the drum unit. Repeat this for all the toner cartridges. CAUTION | | We recommend that you place the toner cartridges on a clean, flat surface with a piece of disposable paper underneath them in case you accidentally spill or scatter toner. | | | DO NOT put a toner cartridge into a fire. It could explode, resulting in injuries. | | | Handle the toner cartridge carefully. If toner scatters on your hands or clothes, wipe or wash it off with cold water at once. | | | To avoid print quality problems, DO NOT touch the shaded parts shown in the illustrations. |
Note | • | Be sure to seal up the toner cartridge tightly in a suitable bag so that toner powder does not spill out of the cartridge. | | • | Discard the used toner cartridge according to local regulations, keeping it separate from domestic waste. If you have questions, call your local waste disposal office. |
|
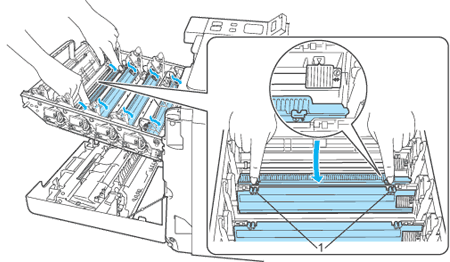
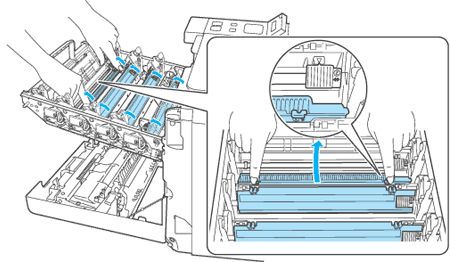
| 4 | Clean the corona wire as follows: | (1) | Push to release the latches of the white corona wire cover (1), and then open the cover. | | (2) | Clean the corona wire inside the drum unit by gently sliding the green tab from left to right and right to left several times. CAUTION | | Be sure to return the tab to the home position  (1) (1). If you do not, printed pages may have a vertical stripe. |
| | (3) | Close the corona wire cover. | | (4) | Repeat steps (1) to (3) to clean each of three remaining corona wires. |
|
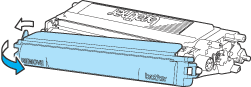
| 5 | Unpack the new toner cartridge. Hold the cartridge with both hands and gently rock it five or six times to spread the toner evenly inside the cartridge. |
| 6 | Remove the protective cover. |
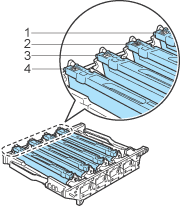
| 7 | Hold the handle of the toner cartridge and slide the toner cartridge into the drum unit. Make sure that you match the toner cartridge colour to the same colour label on the drum unit, and make sure that you fold down the toner cartridge handle (1) once the toner cartridge is in place. Repeat this for all the toner cartridges. | 1.C - Cyan 2.M - Magenta 3.Y - Yellow 4.K - Black |
|
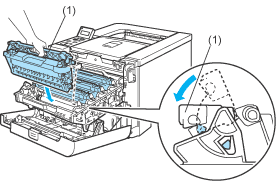
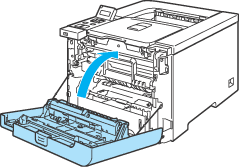
| 8 | Put the drum unit back in the printer. |
| 9 | Close the front cover of the printer. |
| 10 | Turn on the printer power switch. CAUTION | | DO NOT turn off the printer power switch or open the front cover until the LCD shows Ready. |
|