Some features are not available depending on the model.
 Download a printable version of this guide.
-
 Adobe Acrobat Reader is required to view this printable guide.
Click here to install.
Adobe Acrobat Reader is required to view this printable guide.
Click here to install.


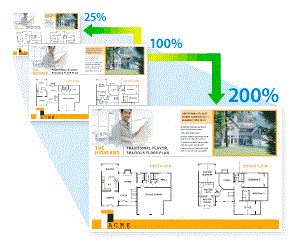
Enlarge or Reduce Copied Images
Select an enlargement or reduction ratio to resize your copied data.
MFC-J4340DW
- Load your document.
- Press
 (COPY).
 - Enter the number of copies using the dial pad.
- Press
 or
or  to select [Enlarge/Reduce]. Press OK.
 - Press or to select the available options. Press OK.
- Do one of the following:
- If you selected the [Enlarge] or [Reduce] option, press or to select the enlargement or reduction ratio you want to use. Press OK.
- If you selected the [Custom(25-400%)] option, enter an enlargement or reduction ratio from [25%] to [400%]. Press OK.
- If you selected [100%] or the [Fit to Page] option, go to the next step.
- When finished, press Mono Start or Colour Start.

If you selected the [Fit to Page] option, your machine adjusts the copy size to fit the paper size set in the machine.
- The [Fit to Page] option does not work correctly when the document on the scanner glass is skewed more than three degrees. Using the document guidelines on the left and top, place the document face down in the upper-left corner of the scanner glass.
- The [Fit to Page] option is not available for Legal size documents.
MFC-J4440DW/MFC-J4540DW
- Load your document.
- Press
 [Copy].
 - Enter the number of copies in one of the following ways:
- Press [-] or [+] on the touchscreen.
- Press
 to display the keyboard on the touchscreen, and then enter the number of copies using the touchscreen keyboard. Press [OK].
- Press
 .
. - Press or to display the available options, and then press the option you want to change.
- Do one of the following:
- If you selected the [Enlarge] or [Reduce] option, press the enlargement or reduction ratio you want to use.
If you selected the [Custom(25-400%)] option, press
 (backspace) to erase the displayed percentage, or press
  to move the cursor, and then enter an enlargement or reduction ratio from [25%] to [400%].
 Press [OK].
- If you selected [100%] or the [Fit to Page] option, go to the next step.
- Read and confirm the displayed list of options you have selected, and then press [OK].
- When you have finished changing settings, press [Mono Start] or [Colour Start].
If you selected the [Fit to Page] option, your machine adjusts the copy size to fit the paper size set in the machine.
- The [Fit to Page] option does not work correctly when the document on the scanner glass is skewed more than three degrees. Using the document guidelines on the left and top, place the document face down in the upper-left corner of the scanner glass.
- The [Fit to Page] option is not available for Legal size documents.
Was this page helpful?