Online User's Guide
DCP‑B7500D / DCP‑B7520DW / DCP‑B7530DN / DCP‑B7535DW / MFC‑B7700D / MFC‑B7720DN
- Load Paper
- Paper Settings
- Recommended Print Media
- Load Documents
- Unscannable and Unprintable Areas
- Using Special Paper
- Scan Using the Scan Button on Your Brother Machine
- Scan Photos and Graphics
- Save Scanned Data to a Folder as a PDF File
- Scan to an Editable Text File (OCR)
- Scan to Email Attachment
- Scan to FTP
- Web Services for Scanning on Your Network (Windows 7, Windows 8 and Windows 10)
- Change Scan Button Settings from ControlCenter4 (Windows)
- Change Scan Button Settings from Brother iPrint&Scan (Mac)
- Configure Certificate for Signed PDF
- Disable Scanning from Your Computer
- Scan from Your Computer (Windows)
- Scan Using ControlCenter4 Home Mode (Windows)
- Scan Using ControlCenter4 Home Mode (Windows)
- Select Document Type Using ControlCenter4 Home Mode (Windows)
- Change Scan Size Using ControlCenter4 Home Mode (Windows)
- Crop a Scanned Image Using ControlCenter4 Home Mode (Windows)
- Print Scanned Data Using ControlCenter4 Home Mode (Windows)
- Scan to an Application Using ControlCenter4 Home Mode (Windows)
- Save Scanned Data to a Folder as a PDF File Using ControlCenter4 Home Mode (Windows)
- Scan Settings for ControlCenter4 Home Mode (Windows)
- Scan Using ControlCenter4 Home Mode (Windows)
- Scan Using ControlCenter4 Advanced Mode (Windows)
- Scan Photos and Graphics Using ControlCenter4 Advanced Mode (Windows)
- Save Scanned Data to a Folder as a PDF File Using ControlCenter4 Advanced Mode (Windows)
- Scan Both Sides of an ID Card Using ControlCenter4 Advanced Mode (Windows)
- Scan to Email Attachment Using ControlCenter4 Advanced Mode (Windows)
- Scan to an Editable Text File (OCR) Using ControlCenter4 Advanced Mode (Windows)
- Scan Settings for ControlCenter4 Advanced Mode (Windows)
- Scan Using Nuance™ PaperPort™ 14SE or Other Windows Applications
- Scan Using Windows Fax and Scan
- Scan Using ControlCenter4 Home Mode (Windows)
- Scan from Your Computer (Mac)
- Configure Scan Settings Using Web Based Management
- Copy a Document
- Enlarge or Reduce Copied Images
- Make N in 1 Copies Using the Page Layout Feature
- Sort Copies
- Copy an ID Card
- Copy an ID Card or Bills
- Copy on Both Sides of the Paper (2-sided Copy)
- Copy Options
- Send a Fax
- Receive a Fax
- Receive Mode Settings
- Receive Modes Overview
- Choose the Correct Receive Mode
- Use PC-Fax Receive to Transfer Received Faxes to Your Computer (Windows only)
- Set the Number of Rings Before the Machine Answers (Ring Delay)
- Set Fax Detect
- Shrink Page Size of an Oversized Incoming Fax
- Set the 2-sided Printing for Received Faxes
- Set the Fax Receive Stamp
- Receive a Fax at the End of a Telephone Conversation
- Register a Number in the Blocked List
- Receive Mode Settings
- Voice Operations and Fax Numbers
- Telephone Services and External Devices
- Fax Reports
- PC-FAX
- PC-FAX for Windows
- PC-FAX Overview (Windows)
- Configure PC-FAX (Windows)
- Configure your PC-Fax Address Book (Windows)
- Add a Member to your PC-FAX Address Book (Windows)
- Create a Group in your PC-FAX Address Book (Windows)
- Edit Member or Group Information in your PC-FAX Address Book (Windows)
- Delete a Member or Group in your PC-FAX Address Book (Windows)
- Export your PC-FAX Address Book (Windows)
- Import Information to your PC-FAX Address Book (Windows)
- Send a Fax Using PC-FAX (Windows)
- Receive Faxes on Your Computer (Windows)
- PC-FAX Overview (Windows)
- PC-FAX for Mac(Sending only)
- PC-FAX for Windows
- Supported Basic Network Features
- Network Management Software and Utilities
- Additional Methods of Configuring Your Brother Machine for a Wireless Network
- Before Configuring Your Brother Machine for a Wireless Network
- Configure Your Machine for a Wireless Network
- Configure Your Machine for a Wireless Network Using the One Push Method of Wi-Fi Protected Setup™ (WPS)
- Configure Your Machine for a Wireless Network Using the PIN Method of Wi-Fi Protected Setup™ (WPS)
- Configure Your Machine for a Wireless Network Using the Machine's Control Panel Setup Wizard
- Configure Your Machine for a Wireless Network When the SSID Is Not Broadcast
- Use Wi-Fi Direct®
- Print or Scan from Your Mobile Device Using Wi-Fi Direct
- Configure Your Wi-Fi Direct Network
- Wi-Fi Direct Network Configuration Overview
- Configure Your Wi-Fi Direct Network Using the One-Push Method
- Configure Your Wi-Fi Direct Network Using the One-Push Method of Wi-Fi Protected Setup™ (WPS)
- Configure Your Wi-Fi Direct Network Using the PIN Method
- Configure Your Wi-Fi Direct Network Using the PIN Method of Wi-Fi Protected Setup™ (WPS)
- Configure Your Wi-Fi Direct Network Manually
- Advanced Network Features
- Technical Information for Advanced Users
- Lock the Machine Settings
- Network Security Features
- Before Using Network Security Features
- Secure Function Lock 3.0
- Manage Your Network Machine Securely Using SSL/TLS
- Introduction to SSL/TLS
- Certificates and Web Based Management
- Supported Security Certificate Features
- Create and Install a Certificate
- Manage Multiple Certificates
- Manage Your Network Machine Securely Using Web Based Management
- Manage Your Network Machine Securely Using BRAdmin Professional (Windows)
- Print Documents Securely Using SSL/TLS
- Send an Email Securely
- AirPrint
- Mobile Printing for Windows
- Mopria® Print Service
- Brother iPrint&Scan for Mobile Devices
- Error and Maintenance Messages
- Document Jams
- Paper Jams
- Printing Problems
- Improve the Print Quality
- Telephone and Fax Problems
- Network Problems
- AirPrint Problems
- Other Problems
- Transfer Your Faxes or Fax Journal Report
- Machine Information
- Change Machine Settings from the Control Panel
- In the Event of Power Failure (Memory Storage)
- General Settings
- Change the Default Mode
- Set the Mode Timer
- Adjust the Machine's Volume
- Set Sleep Mode Countdown
- About Deep Sleep Mode
- Set Auto Power Off Mode
- Set the Date and Time
- Set the Time Zone
- Set Your Station ID
- Set Tone or Pulse Dialling Mode
- Reduce Toner Consumption
- Add a Prefix to Every Fax Number
- Prevent Dialling a Wrong Number (Dial Restriction)
- Reduce Printing Noise
- Change the Language on the LCD
- Print Reports
- Settings and Features Tables
- Change Machine Settings from Your Computer
Some features are not available depending on the model.


Home > Routine Maintenance > Clean the Machine > Clean the Scanner


Clean the Scanner
- Press and hold
 to turn the machine off.
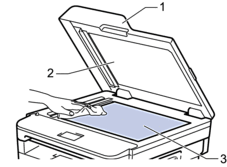
 - Lift the document cover (1). Clean the white plastic surface (2) and scanner glass (3) underneath it with a soft lint-free cloth moistened with water.
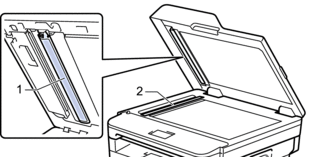
- In the ADF unit, clean the white bar (1) and the scanner glass strip (2) underneath it with a soft lint-free cloth moistened with water.
- Close the document cover.
- Press to turn the machine on.
- Related Information
Was this page helpful?
Thank you for your feedback.