(For more information, see the Help text in the printer driver.)

Note
| • | The screens in this section are on based Windows® XP. The screens on your computer will vary depending on your operating system. |
| • | You can access the Printing Preferences dialog box by clicking Printing Preferences... in the General tab of the Printer Properties dialog box. |
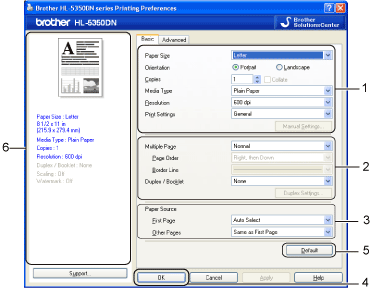
Basic tab
You can also change settings by clicking the illustration on the left side of the Basic tab.
| 1 | Choose the Paper Size, Orientation, Copies, Media Type , Resolution and Print Settings(1). |
| 2 | Choose the Multiple Page and Duplex / Booklet setting (2). |
| 3 | Choose the Paper Source(3). |
| 4 | Click OK(4) to apply your chosen settings. To return to the default settings, click Default(5), then OK. (4) |
Note
This area
(6) shows the current settings.
Paper Size
From the drop-down list choose the Paper Size you are using.
Orientation
Orientation selects the position of how your document will be printed (Portrait or Landscape).
Copies
The copies selection sets the number of copies that will be printed.
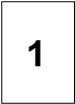
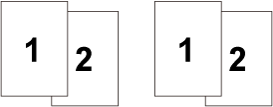
| • | Collate With the Collate check box selected, one complete copy of your document will be printed and then repeated for the number of copies you selected. If the Collate check box is not selected, then each page will be printed for all the copies selected before the next page of the document is printed.
|
Collate checked |
|
|
|
Collate non-checked |
|
|
|
|
Media Type
You can use the following types of media in your printer. For the best print quality, select the type of media that you wish to use.
Plain Paper | Thin Paper | Thick Paper | Thicker Paper | Bond Paper |
Env. Thick | Env. Thin | Recycled Paper | Envelopes | Transparencies |
Note
| • | When using ordinary plain paper (20 to 28 lb) choose Plain Paper. When using heavier weight paper or rough paper choose Thick Paper or Thicker Paper. For bond paper, choose Bond Paper. |
| • | When you use envelopes, choose Envelopes. If the toner is not fixed to the envelope correctly when Envelopes has been selected, choose Env. Thick. If the envelope is crumpled when Envelopes has been selected, choose Env. Thin. |
You can choose the resolution as follows.
| • | 300 dpi |
| • | 600 dpi |
| • | HQ 1200 |
| • | 1200 dpi |
Note
If you use the high quality 1200 dpi setting (1200 x 1200 dpi) the print speed will be slower.
Print Setting
You can manually change the print setting.
| • | General This is a printing mode for general printing of documents. |
| • | Graphics This is the best mode for printing documents that contain graphics. |
| • | Office Document This is the best mode for printing office documents. |
| • | Text This is the best mode for printing text documents. |
| • | Manual You can change the settings manually by choosing Manual and clicking the Manual Settings... button. You can set brightness, contrast and other settings. |
Multiple Page
The Multiple Page selection can reduce the image size of a page allowing multiple pages to be printed on one sheet of paper or enlarging the image size for printing one page on multiple sheets of paper.
| • | Page Order When N in 1 option is selected, the page order can be selected from the drop-down list. |
| • | Border Line When printing multiple pages on one sheet with the Multiple Page feature you can choose to have a solid border, dash border or no border around each page on the sheet. |
Duplex / Booklet
When you want to print a booklet or do duplex printing, use this function, and then from the
Basic tab, choose a
Duplex / Booklet (See
Duplex printing).
| • | None Disable duplex printing. |
| • | Duplex When you want to do duplex printing, use this function. If you choose Duplex and click Duplex Settings... button. You can set the following settings. | • | Duplex Mode | • | Use Duplex Unit In this mode, the printer prints on both sides of the paper automatically. |
| • | Manual Duplex In this mode, the printer prints all the even numbered page first. Then the printer driver will stop and show the instructions required to re-install the paper. When you click OK the odd numbered pages will be printed. |
| | • | Duplex Type There are six types of duplex binding directions available for each orientation. | | • | Binding Offset If you check the Binding Offset option, you can also specify the offset for binding in inches or millimeters. |
|
| • | Booklet When you want to print a booklet, use this function. To make the Booklet, fold the printed pages down the middle. If you choose Booklet and click Duplex Settings... button. You can set the following settings. | • | Duplex Mode | • | Use Duplex Unit In this mode, the printer prints on both sides of the paper automatically. |
| • | Manual Duplex In this mode, the printer prints all the even numbered page first. Then the printer driver will stop and show the instructions required to re-install the paper. When you click OK the odd numbered pages will be printed. |
| | • | Duplex Type There are two types of duplex binding directions available for each orientation. | | • | Binding Offset If you check the Binding Offset option, you can also specify the offset for binding in inches or millimeters. |
|
Paper Source
You can choose
Auto Select,
Tray1,
Tray21,
Tray31,
MP Tray or
Manual and specify separate trays for printing the first page and for printing from the second page onwards.
Advanced tab
You can set the following in Printer Function:
Scaling
You can change the print image scaling.
Reverse Print
Check Reverse Print to reverse the data from up to down.
Use Watermark
You can put a logo or text into your documents as a watermark.
You can choose one of the preset watermarks, or you can use a bitmap file or text that you have created.
When you use a bitmap file as a watermark, you can change the size of the watermark and put it anywhere you like on the page.
When you use text as a watermark, you can change the Text, Font, Style, Size and Darkness settings.
Header-Footer Print
When this feature is enabled, it will print the date and time on your document from your computer’s system clock and the PC login user name or the text you entered. By clicking Settings... you can customize the information.
If you select Login User Name, your PC login user name will print. If you select Custom and enter the text in the Custom edit box, the text you entered will print.
Toner Save Mode
You can save running costs by turning on the Toner Save Mode, which reduces the print density.
Note
| • | We do not recommend Toner Save for printing Photo or Gray Scale images. |
| • | Toner Save Mode is not available for 1200 dpi or HQ 1200 resolution. |
Administrator
Administrators have the authority to limit the number of copies, scaling setting and watermark setting functions.
| • | Password Enter the password into this box. |
| • | Set Password... Click here to change the password. |
| • | Set Click here current password. Then you can change the settings. |
| • | Copies Lock Lock the copy pages selection to prevent multiple copy printing. |
| • | Multiple Page & Scaling Lock Lock the current settings of the Multiple Page and Scaling options to prevent changes being made. |
| • | Watermark Lock Lock the current settings of the Watermark option to prevent changes being made. |
| • | Header-Footer Print Lock Lock the current settings of the Header-Footer Print option to prevent changes being made. |
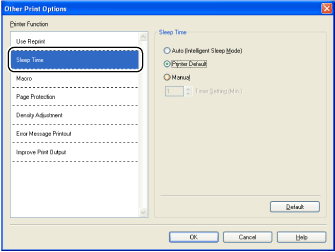
Other Print Options...
You can set the following in Printer Function:
| • | Use Reprint |
| • | Sleep Time |
| • | Macro |
| • | Page Protection |
| • | Density Adjustment |
| • | Error Message Printout |
| • | Improve Print Output |
Use Reprint
The printer keeps the last print job sent to it in memory.
To reprint the last document, press Go and hold it down for about 4 seconds until all the LEDs light up, and then release Go.
Within 2 seconds press Go the number of times you want to reprint.
If you don’t press Go within 2 seconds, a single copy will be printed.
Note
If you want to prevent other people from printing your data using the reprint function, uncheck the Use Reprint check box in the Other Print Options....
When the printer does not receive data for a certain period of time, it enters sleep mode. In sleep mode, the printer acts as though it were turned off. When you choose Printer Default the timeout setting will be 1 minute. Intelligent Sleep Mode automatically adjusts to the most suitable timeout setting depending on the frequency of your printer use.
While the printer is in sleep mode, all the LEDs are off, the Status LED lights up slightly, but the printer can still receive data. Receiving a print file or document or pressing Go will automatically wake up the printer to start printing.
Macro
You can save a page of a document as a macro to printer memory. You can also execute the saved macro (you can use the saved macro as an overlay on any documents). This will save time and increase printing speed for often used information such as forms, company logos, letterhead formats or invoices.
Page Protection
Page Protection refers to a setting that reserves extra memory for the creation of full-page images.
Selections are Auto, Off and Printer Default.
The page protection feature allows the printer to create the full-page image to be printed in memory before physically moving the paper through the printer. Use this function when the image is complicated and the printer has to wait to process the image before printing.
Density Adjustment
Increase or decrease the print density.
Note
The Density Adjustment is not available when you set the Resolution to HQ 1200.
Error Message Printout
You can choose whether the printer reports problems by printing an error page. For details, see
Error message printout.
Selections are Printer Default, On and Off.
Improve Print Output
This feature allows you to improve a print quality problem.
| • | Reduce Paper Curl If you choose this setting, the paper curl may be reduced. If you are printing only a few pages, you do not need to choose this setting. We recommend that you change the printer driver setting in Media Type to a Thin Paper setting. |
| • | Improve Toner Fixing If you choose this setting, the toner fixing on paper may be improved. If this selection does not provide enough improvement, select Thicker Paper in Media Type settings. |
Note
From the
Start menu, select
Control Panel and then
Printers and Faxes1. Right-click the
Brother HL-5340D/HL-5350DN/HL-5370DW series icon and select
Properties to access the
Accessories tab.
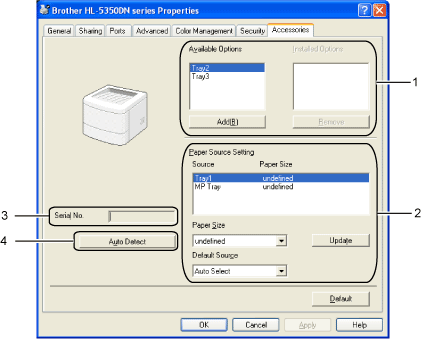
When you install the optional accessories, you can add and choose their settings in the Accessories tab as follows.
| • | You can manually add and remove the options that are installed on the printer. Tray settings will match the installed options. |
| • | This feature identifies the paper size defined for each paper tray. | • | Paper Size This setting allows you to define which paper size is used for each tray. Highlight the tray you want to define and then choose the paper size from the pull-down menu. Click Update to apply the setting to the tray. When using more than one paper size you must define the paper size for each tray so the paper is pulled from the correct tray. | | • | Default Source This setting allows you to choose the default paper source that your document will be printed from. Choose the Default Source from the pull-down menu and click Update to save your setting. The Auto Select setting will automatically pull paper from any tray that has a defined paper size that matches your document. |
|
| • | By clicking Auto Detect, the printer driver will probe the printer and display its serial number. If it fails to receive the information, the screen will display "---------". |
| • | The Auto Detect function finds the currently installed optional devices and shows the available settings in the printer driver. When you click Auto Detect, options that are installed on the printer will be listed in Installed Options(1). You can manually add or remove the options by choosing an optional device you want to add or remove, and then clicking Add or Remove. Note The Auto Detect function is not available under the following printer conditions: | • | The printer power switch is off. | | • | The printer is in an error state. | | • | The printer is in a network shared environment. | | • | The cable is not connected to the printer correctly. |
|
Support
Note
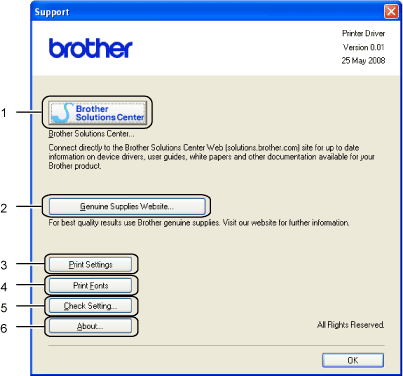
You can access the Support dialog box by clicking Support... in the Printing Preferences dialog box.
| • | Brother Solutions Center (1) The Brother Solutions Center ( http://solutions.brother.com/) is a website offering information about your Brother product including FAQs (Frequently Asked Questions), User’s Guides, driver updates and tips for using your printer. |
| • | Genuine Supplies Website...(2) You can visit our website for original/genuine Brother supplies by clicking this button. |
| • | This will print the pages that show how the internal settings of the printer have been configured. |
| • | This will print the pages that show all the internal fonts of the printer. |
| • | You can check the current driver settings. |
| • | This will show the list of the printer driver files and version information. |
Status Monitor
This reports the printer status (any errors that may happen with the printer) when printing. If you would like to turn the status monitor on, follow these steps:
Click the
Start button,
All Programs1,
Brother, your printer (e.g. Brother HL-5370DW), and then
Status Monitor.