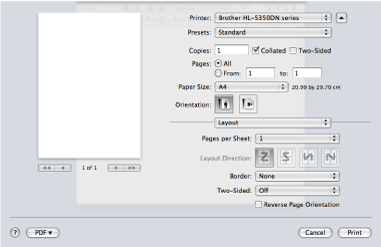
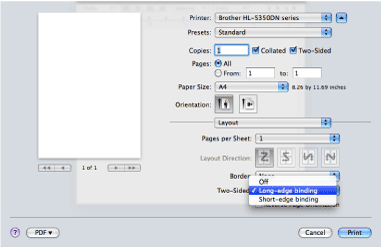
Features in the printer driver (for Macintosh)

This printer supports Mac OS X 10.3.9 or greater.
Note Note
The screens in this section are based on Mac OS X 10.5. The screens on your Macintosh will vary depending on your operating system.
Choosing page setup options
You can set the Paper Size, Orientation and Scale.
1
From an application such as Apple TextEdit, click File, then Page Setup. Make sure HL-XXXX (where XXXX is your model name.) is chosen in the Format for pop-up menu. You can change the settings for Paper Size, Orientation and Scale, then click OK.
Screen
2
From an application such as Apple TextEdit, click File, then Print to start printing.
• 
For Mac OS X 10.3 and 10.4
Screen
• 
For Mac OS X 10.5
For more page setup options, click the disclosure triangle beside the Printer pop-up menu.
Screen
Screen
Choosing printing options
To control special printing features, choose the options in the Print dialog box.
Screen
Cover Page
You can make the following cover page settings:
Screen
• 
Print Cover Page
If you want to add a cover page to your document, use this function.
• 
Cover Page Type
Choose a template for the cover page.
• 
Billing Info
If you want to add the billing information to the cover page, enter text in the Billing Info box.
Paper Feed
Screen
You can choose Auto Select, Tray1, Tray21, Tray31, MP Tray2 or Manual, and specify separate trays for printing the first page and for printing from the second page onwards.
1
Tray2 and Tray3 are options.
2
The printer automatically turns on the Manual Feed mode when you put paper in the Multi-purpose Tray.
Layout
Screen
• 
Pages per Sheet
Choose how many pages will appear on each side of the paper.
• 
Layout Direction
When you specify the pages per sheet, you can also specify the direction of the layout.
• 
Border
If you want to add a border, use this function.
• 
Two-sided
• 
Reverse Page Orientation (For Mac OS X 10.5)
Check Reverse Page Orientation to reverse the data from up to down.
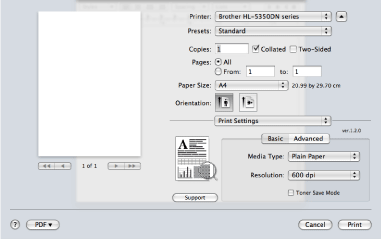
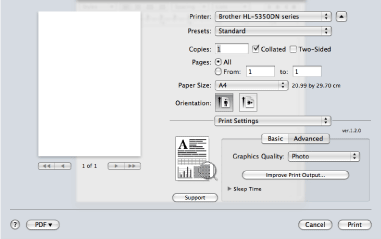
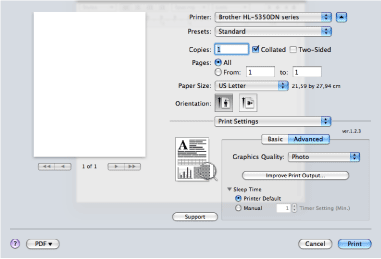
Print Settings
You can change settings by choosing a setting in the Print Settings list:
Basic tab
Screen
• 
Media Type
You can change the media type to one of the following:
• 
Plain Paper
• 
Thin Paper
• 
Thick Paper
• 
Thicker Paper
• 
Bond Paper
• 
Transparencies
• 
Envelopes
• 
Env. Thick
• 
Env. Thin
• 
Recycled Paper
• 
Resolution
You can choose the resolution as follows:
• 
300 dpi
• 
600 dpi
• 
HQ 1200
• 
1200 dpi
• 
Toner Save Mode
You can conserve toner use with this feature. When you set Toner Save Mode to On, print appears lighter. The default setting is Off.
Note Note
• 
We do not recommend Toner Save for printing Photo or Gray Scale images.
• 
Toner Save Mode is not available for 1200 dpi or HQ 1200 resolution.
• 
Reverse Print (For Mac OS X 10.3 and 10.4)
Check Reverse Print to reverse the data from up to down.
Advanced tab
Screen
• 
Graphics Quality
You can change the print quality as follows:
• 
Photo
This is a photograph mode (gradation priority). Choose this setting for printing photographs that have continuous gradation. You can represent soft contrasts between various shades of gray.
• 
Graphics
This is a graphics mode (contrast priority). Choose this setting for printing text and figures, such as business and presentation documents. You can represent sharp contrasts between shaded areas.
• 
Chart/Graph
This is the best dither pattern for business documents such as presentations, that include words, graphs or charts. It is particularly suitable for solid colors.
• 
Text
This is the best mode for printing text documents.
• 
Improve Print Output...
This feature allows you to improve a print quality problem.
• 
Reduce Paper Curl
If you choose this setting, the paper curl may be reduced. If you are printing only a few pages, you do not need to choose this setting. We recommend that you change the printer driver setting in Media Type to a thin setting.
• 
Improve Toner Fixing
If you choose this setting, the toner fixing on paper may be improved. If this selection does not provide enough improvement, select Thicker Paper in Media Type settings.
• 
Sleep Time
When the printer does not receive data for a certain period of time, it enters sleep mode. In sleep mode, the printer acts as though it were turned off. The default setting for timeout is 1 minute. If you want to change the sleep time, choose Manual and then enter the time in the text box on the driver.
While the printer is in sleep mode, all the LEDs are off, the Status LED lights up slightly, but the printer can still receive data. Receiving a print file or document or pressing Go will automatically wake up the printer to start printing.
For more information about Sleep Time setting change, please visit the product page at http://solutions.brother.com/ and see "Information".
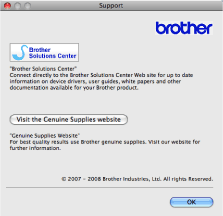
Screen
• 
Support
Screen
• 
Brother Solutions Center
The Brother Solutions Center (http://solutions.brother.com/) is a website offering information about your Brother product including FAQs (Frequently Asked Questions), User’s Guides, driver updates and tips for using your printer.
• 
Genuine Supplies Website
You can visit our website for original/genuine Brother supplies by clicking this button.
Duplex Printing
• 
Use duplex unit.
Select Layout.
Choose Long-edge binding or Short-edge binding in Two-Sided.
Screen
• 
Manual duplex
Select Paper Handling.
• 
For Mac OS X 10.3 and 10.4
Choose Odd numbered pages and print. Turn the paper over and reload it in the tray, and then choose Even numbered pages and print.
Screen
• 
For Mac OS X 10.5
Choose Odd Only and print. Turn the paper over and reload it in the tray, and then choose Even Only and print.
Screen
Status Monitor
This reports the printer status (any errors that may happen with the printer) when printing. If you would like to turn the status monitor on, follow these steps:
• 
For Mac OS X 10.3 and 10.4
1
Run the Printer Setup Utility (from the Go menu, choose Applications, Utilities), then choose the printer.
2
Click the Utility, then Status Monitor will start up.
• 
For Mac OS X 10.5
1
Run the System Preferences, select Print & Fax, then choose the printer.
2
Click the Open Print Queue..., then click the Utility. The Status Monitor will start up.