- Brother support website
- Brother Support for IT Administrators
- I want to apply customized device settings across my entire printer fleet and be able to restore specific device settings on a regular schedule.
I want to apply customized device settings across my entire printer fleet and be able to restore specific device settings on a regular schedule.
Use the Brother Auto Pull Configuration function to customize and maintain device settings based on your organizational requirements.
Create a settings file (EDPK file)
-
To create a settings file, use BRAdmin Professional 4 or Mass Deployment Tool. Go to your product's Downloads page on the Brother support website to download one of these management tools.
-
Click one of the following links to download the User's Guide for the tool you selected. See the Back Up Settings section in either User's Guide for information on creating the settings file (EDPK file).
 View the user's guide for BRAdmin Professional 4 (1.10MB).
View the user's guide for Mass Deployment Tool (1.70MB).
Share the network folder and save the EDPK settings file to it
-
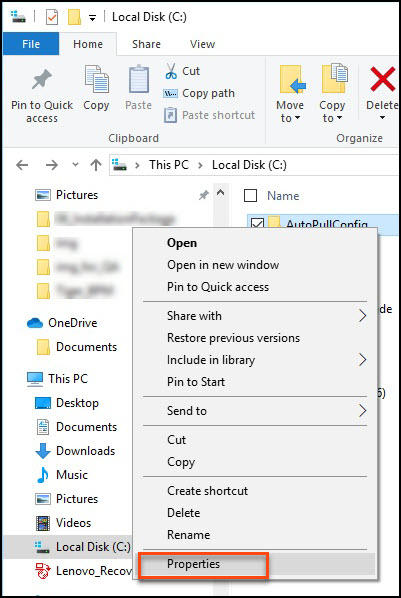
Create a shared folder. In this example, the shared folder is created in the C: drive and named AutoPullConfig.

-
Right-click the folder, and then select Properties.
 .
.
-
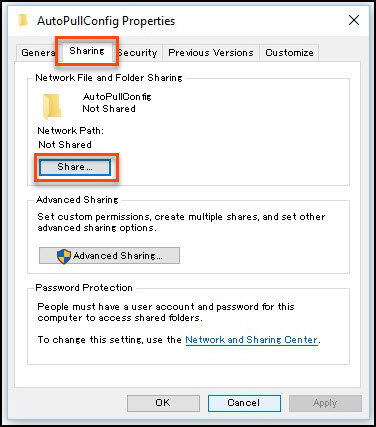
Click the Sharing tab, and then click Share….
-
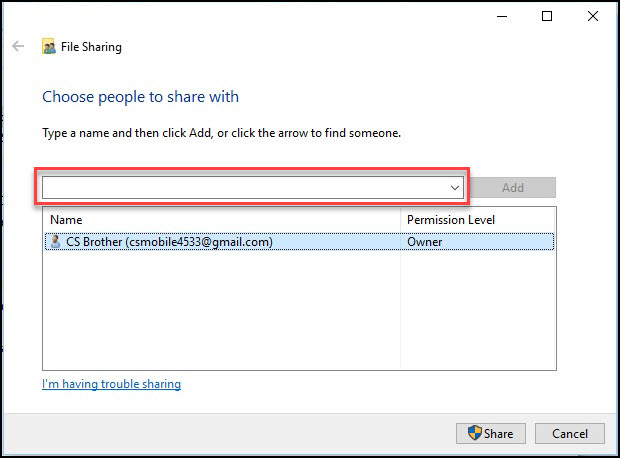
Using the drop-down field, find the user who needs to access the shared folder.
HINT:
-
-
To access a shared folder from the device, use the account of a user who has access to that folder.
-
If you want your Brother device to access the shared folder using the folder creator's account, select "Owner" in the Permission Level column.
-
-
Click the user name to select it, and confirm the permission level in the Permission Level column. If necessary, you can change the permission level by clicking it.
-
Click Share, and then click Done.
-
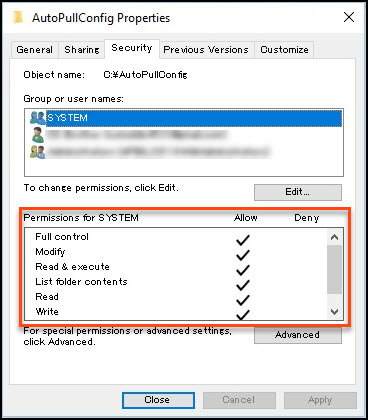
Click the Security tab, and set Read and Write permissions for the user you just selected.
NOTE:
-
Any users with access to this shared folder and read/write permissions can make updates to and save the settings file to it.
-
When finished, click Close.
Configure a network profile using Web Based Management
-
Start your web browser and make sure your Brother device is powered on.
-
Type "https://device's IP address" in your browser's address bar, for example: https://192.168.1.2.
-
In the Login field, type the password, and then click  .
.
HINT:
-
The default login password to manage device settings is one of the following:
- initpass
OR
- the password located on the back or bottom of the device and marked "Pwd".
-
If you previously changed the password, type the updated password.
-
Depending on the device you are using, you may not have to enter a password.
-
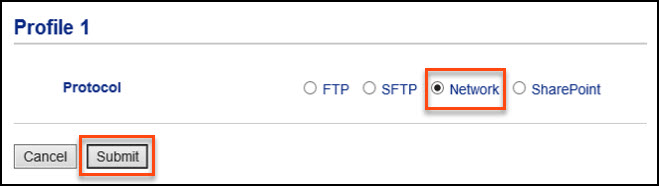
Click the Administrator tab, and then select an unassigned network profile.
To identify an unassigned network profile, confirm that FTP is selected as the default network profile and that the profile is not configured.

-
Select the Network radio button, and then click Submit.
-
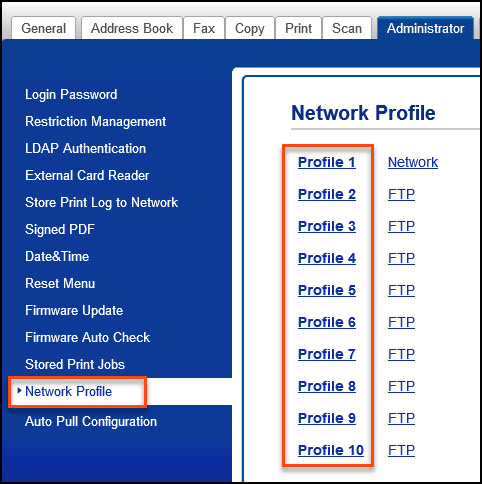
Click the Administrator tab, and then click Network Profile in the left navigation bar. Click the profile that you selected and configured in the previous step. In this example, select Profile 1.
-
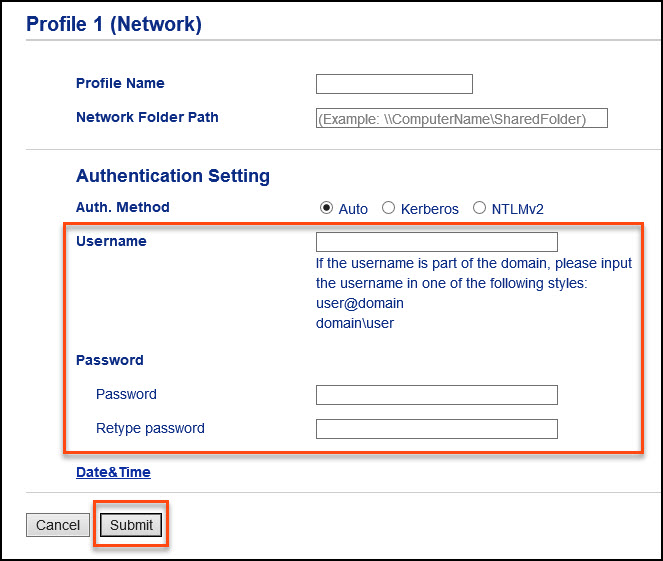
In the Username and Password fields, type the Microsoft account username and password of the user who has been granted access to the shared folder.
When finished, click Submit.
Configure Auto Pull Configuration settings
HINT:
If the Brother model you are configuring does not display the date and time on the LCD, you must set up the SNTP Protocol (network time server) in Web Based Management.
To configure the date and time:
- Click the Network tab
- Click Protocol in the left navigation bar
- Update SNTP
-
Click the Administrator tab, and then click Auto Pull Configuration in the left navigation bar.
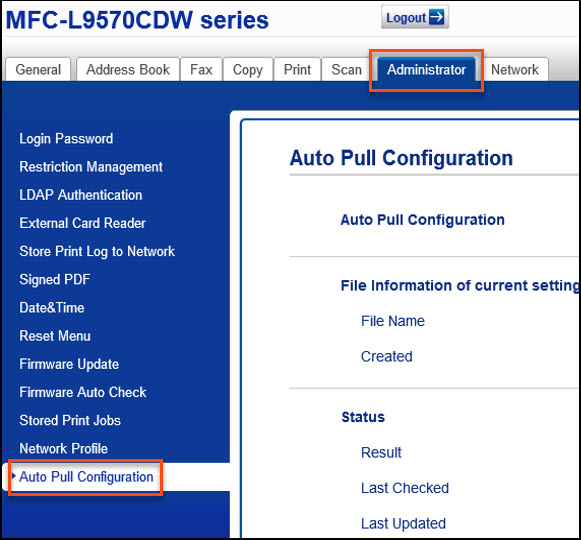
-
Configure the Auto Pull Configuration settings:
(Display options may vary based on the Brother model.)
-
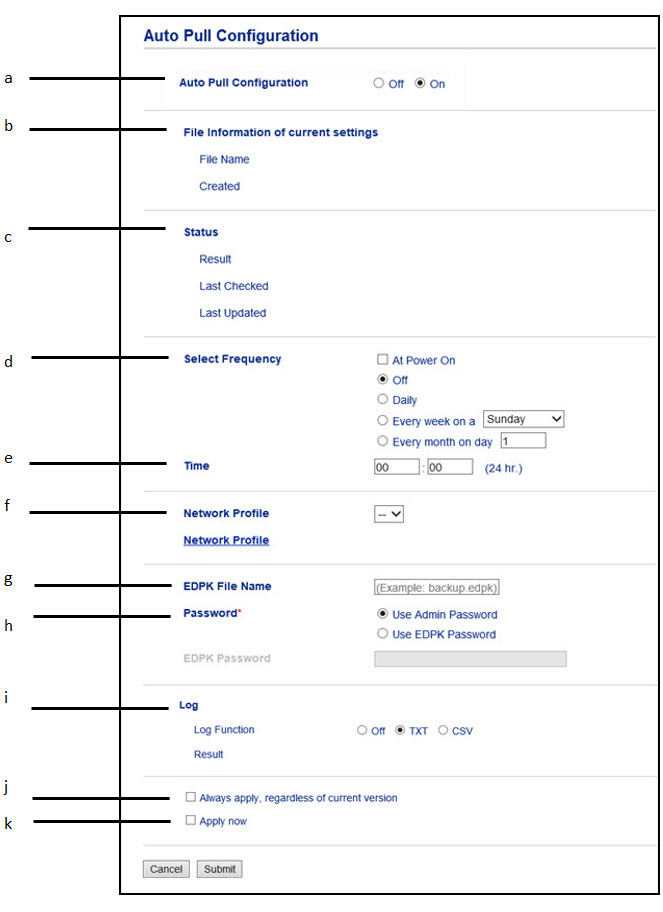
Auto Pull Configuration
Select the Auto Pull Configuration radio button to ensure this function is turned On.
-
File Information of current settings
File Name: displays the EDPK file name.
Created: displays the date when the EDPK file was created.
-
Status
Result: displays the results of the most recent Auto Pull Configuration command.
See the Status Report column in the Results and Status Information table.
-
Select Frequency
Specify how often you want Auto Pull Configuration to run.
-
Time
Specify the time you want Auto Pull Configuration to run.
-
Network Profile
Select the Profile number that you selected in step 16.
-
EDPK File Name
Type the settings file name.
-
Password
Specify whether to use your administrator password or set a new EDPK password to access the settings file. Type the new password if you choose Use EDPK Password.
-
Log
Log Function: the output Log contains a Result number. See the Results Log column in the Results and Status Information table.
Result: output Log results appear here: (Successful/ Unsuccessful).
-
Always apply, regardless of current version
Select the Always apply, regardless of current version check box to restore device settings at regular intervals. We recommend turning this option off (clearing this check box), if you want to reduce unnecessary server load when the settings file is updated.
-
Apply now
Select this check box if you want to run the Auto Pull Configuration function as soon as you click the Submit button on this screen.
Results and Status Information
Results Log
Message
Status Report
Description
0
Successful (Updated)
Success
Settings applied successfully.
1
Successful (No change)
Success
Settings not changed.
-
Connecting...
In progress
Currently executing settings change.
-1
Unsuccessful (Incorrect setting file in backup file)
Fail
Incorrect settings file.
Make sure that the settings file on the network server is an EDPK file.
-2
Unsuccessful (Missing settings file in backup file)
Fail
Missing settings file: the specified settings file does not exist on the network server.
Make sure that the folder path and the settings file's name are correct.
-3
Unsuccessful (Server timeout - check network connection)
Fail
The network server timed out.
Check your network connection and make sure that the network profile setting is correct.
-5
Unsuccessful (Incorrect backup file password)
Fail
Incorrect settings file password.
Make sure that the Admin password set in Auto Pull Configuration or the EDPK password entered matches the password in the settings file.
-6
Unsuccessful (Cannot connect - try again later)
Fail
Cannot connect due to network-related authentication/timeout or similar errors.
Turn off your Brother device and then turn it on again. If the error is not resolved, contact Brother Customer Service or your local Brother dealership.
-7
Unsuccessful (Authentication error - check username and password)
Fail
Authentication error.
Make sure that the specified user has permissions to the network shared folder.
-8
Unsuccessful (Check device date and time)
Fail
Approval error due to incorrect date or time.
For Brother models without date and time display on the LCD., check the device's date and time settings and make sure that the SNTP protocol is configured correctly.
For models that display the date and time on the LCD, make sure that the date, time, and time zone are set correctly. The time must match the time used by the Kerberos Server and CIFS Server.
-100
Unsuccessful
Fail
Unexpected errors.
Contact Brother Customer Service or your local Brother dealership.
-
Click Submit.
Create a settings file (EDPK file)
-
To create a settings file, use BRAdmin Professional 4 or Mass Deployment Tool. Go to your product's Downloads page on the Brother support website to download one of these management tools.
Click one of the following links to download the User's Guide for the tool you selected. See the Back Up Settings section in either User's Guide for information on creating the settings file (EDPK file).
View the user's guide for BRAdmin Professional 4 (1.10MB). View the user's guide for Mass Deployment Tool (1.70MB). Share the network folder and save the EDPK settings file to it
Create a shared folder. In this example, the shared folder is created in the C: drive and named AutoPullConfig.
Right-click the folder, and then select Properties.
. Click the Sharing tab, and then click Share….
Using the drop-down field, find the user who needs to access the shared folder.
HINT:
To access a shared folder from the device, use the account of a user who has access to that folder.
If you want your Brother device to access the shared folder using the folder creator's account, select "Owner" in the Permission Level column.
-
Click the user name to select it, and confirm the permission level in the Permission Level column. If necessary, you can change the permission level by clicking it.
Click Share, and then click Done.
Click the Security tab, and set Read and Write permissions for the user you just selected.
NOTE:
Any users with access to this shared folder and read/write permissions can make updates to and save the settings file to it.
When finished, click Close.
Configure a network profile using Web Based Management
-
Start your web browser and make sure your Brother device is powered on.
-
Type "https://device's IP address" in your browser's address bar, for example: https://192.168.1.2.
-
In the Login field, type the password, and then click
. -
The default login password to manage device settings is one of the following:
- initpass
OR
- the password located on the back or bottom of the device and marked "Pwd". -
If you previously changed the password, type the updated password.
-
Depending on the device you are using, you may not have to enter a password.
-
Click the Administrator tab, and then select an unassigned network profile. To identify an unassigned network profile, confirm that FTP is selected as the default network profile and that the profile is not configured.
-
Select the Network radio button, and then click Submit.
-
Click the Administrator tab, and then click Network Profile in the left navigation bar. Click the profile that you selected and configured in the previous step. In this example, select Profile 1.
-
In the Username and Password fields, type the Microsoft account username and password of the user who has been granted access to the shared folder.
When finished, click Submit. -
Click the Administrator tab, and then click Auto Pull Configuration in the left navigation bar.
-
Configure the Auto Pull Configuration settings:
(Display options may vary based on the Brother model.)
-
Auto Pull Configuration
Select the Auto Pull Configuration radio button to ensure this function is turned On. -
File Information of current settings
File Name: displays the EDPK file name.
Created: displays the date when the EDPK file was created. -
Status
See the Status Report column in the Results and Status Information table.
Result: displays the results of the most recent Auto Pull Configuration command. -
Select Frequency
Specify how often you want Auto Pull Configuration to run. -
Time
Specify the time you want Auto Pull Configuration to run. -
Network Profile
Select the Profile number that you selected in step 16. -
EDPK File Name
Type the settings file name. -
Password
Specify whether to use your administrator password or set a new EDPK password to access the settings file. Type the new password if you choose Use EDPK Password. -
Log
Log Function: the output Log contains a Result number. See the Results Log column in the Results and Status Information table.
Result: output Log results appear here: (Successful/ Unsuccessful). -
Always apply, regardless of current version
Select the Always apply, regardless of current version check box to restore device settings at regular intervals. We recommend turning this option off (clearing this check box), if you want to reduce unnecessary server load when the settings file is updated. -
Apply now
Select this check box if you want to run the Auto Pull Configuration function as soon as you click the Submit button on this screen.
-
-
Click Submit.
HINT:
Configure Auto Pull Configuration settings
HINT:
If the Brother model you are configuring does not display the date and time on the LCD, you must set up the SNTP Protocol (network time server) in Web Based Management.
To configure the date and time:
- Click the Network tab
- Click Protocol in the left navigation bar
- Update SNTP
Results and Status Information
Results Log Message Status Report Description 0 Successful (Updated) Success Settings applied successfully. 1 Successful (No change) Success Settings not changed. - Connecting... In progress Currently executing settings change. -1 Unsuccessful (Incorrect setting file in backup file) Fail Incorrect settings file.
Make sure that the settings file on the network server is an EDPK file.-2 Unsuccessful (Missing settings file in backup file) Fail Missing settings file: the specified settings file does not exist on the network server.
Make sure that the folder path and the settings file's name are correct.-3 Unsuccessful (Server timeout - check network connection) Fail The network server timed out.
Check your network connection and make sure that the network profile setting is correct.-5 Unsuccessful (Incorrect backup file password) Fail Incorrect settings file password.
Make sure that the Admin password set in Auto Pull Configuration or the EDPK password entered matches the password in the settings file.-6 Unsuccessful (Cannot connect - try again later) Fail Cannot connect due to network-related authentication/timeout or similar errors.
Turn off your Brother device and then turn it on again. If the error is not resolved, contact Brother Customer Service or your local Brother dealership.-7 Unsuccessful (Authentication error - check username and password) Fail Authentication error.
Make sure that the specified user has permissions to the network shared folder.-8 Unsuccessful (Check device date and time) Fail Approval error due to incorrect date or time.
For Brother models without date and time display on the LCD., check the device's date and time settings and make sure that the SNTP protocol is configured correctly.
For models that display the date and time on the LCD, make sure that the date, time, and time zone are set correctly. The time must match the time used by the Kerberos Server and CIFS Server.-100 Unsuccessful Fail Unexpected errors.
Contact Brother Customer Service or your local Brother dealership.