Home > Routine Maintenance > Clean the Machine > Clean the Drum Unit


Clean the Drum Unit
If your printout has black or white dots or other repeating marks at 3.7 in. (94 mm) intervals, the drum may have foreign material, such as glue from a label, stuck on the drum surface.
HL-L3210CW/HL-L3230CDN/HL-L3230CDW
- Make sure the machine is in Ready Mode.
- Press
 or
or  to display the [Print Reports] option, and then press OK.
 - Press or to select the [Drum Dot Print] option, and then press OK.
- Press Go.The machine prints the Drum Dot Check Sheet.
- Press and hold
 to turn off the machine.
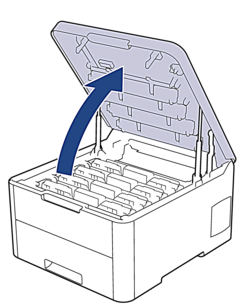
 - Open the top cover until it locks in the open position.
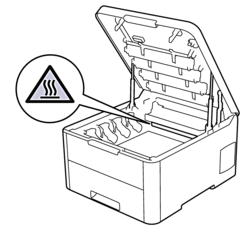
- WARNING
- HOT SURFACE
The machine's internal parts will be extremely hot. Wait for the machine to cool down before touching them.
- The color of printed dots on the Drum Dot Check Sheet is the color of the drum you should clean. Remove the toner cartridge and drum unit assembly that matches the color causing the problem.
- CAUTION
-
We recommend placing the toner cartridge and drum unit assemblies on a clean, flat surface with disposable paper underneath it in case you accidentally spill or scatter toner.
- IMPORTANT
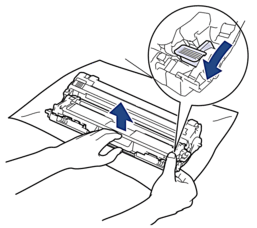
-
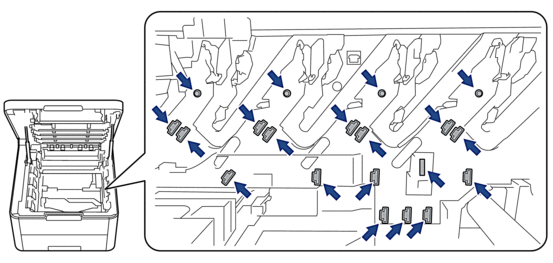
To prevent damage to the machine from static electricity, DO NOT touch the electrodes shown in the illustration.
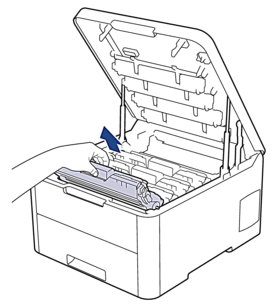
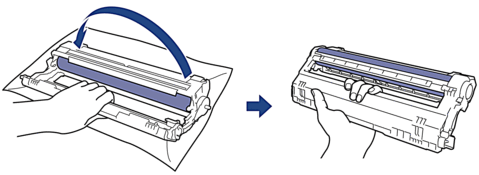
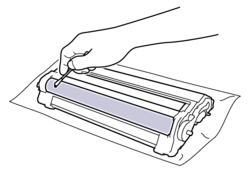
- Push down the green lock lever and remove the toner cartridge from the drum unit.
 To avoid print quality problems, DO NOT touch any surface of the drum unit except the drum unit gear.
 - Lift the drum unit frame by the handle and rotate it counterclockwise, as shown.
- Loosen your grip so the frame drops forward, and then use your right hand to locate the drum unit gear inside the right side of the frame.
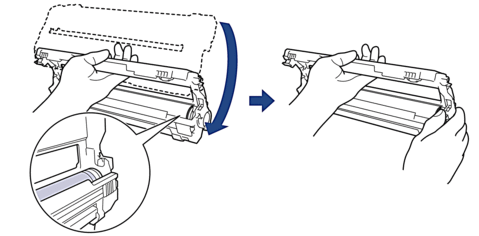 To avoid print quality problems, DO NOT touch any surface of the drum unit except the drum unit gear.
 - Tilt your left hand up to lift the frame so the numbered grid is visible, as shown. Use your right hand to rotate the drum while you look for marks or debris on the drum surface.
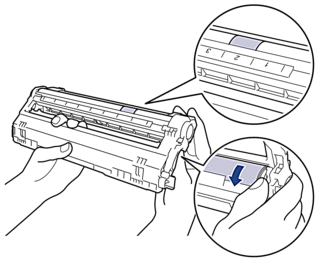 Use the column numbers next to the drum roller to find the mark. For example, a dot in column 2 on the Drum Dot Check Sheet would mean that there is a mark in the “2” region of the drum.
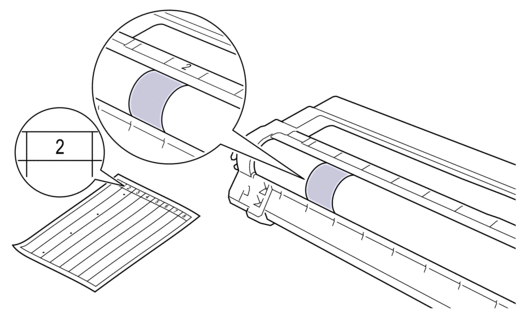
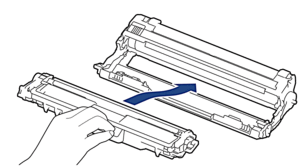
- Wipe the surface of the drum gently with a dry cotton swab until the mark on the surface comes off.
- NOTE
- DO NOT clean the surface of the photosensitive drum with a sharp object or any liquids.
- Reinsert the toner cartridge firmly into the drum unit until you hear it lock into place.
 Make sure you put the toner cartridge in correctly or it may separate from the drum unit.
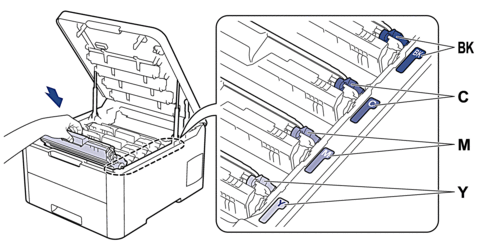
 - Slide the toner cartridge and drum unit assemblies into the machine. Make sure that you match the toner cartridge color to the same color label on the machine.
- Close the machine's top cover.
- Press to turn on the machine.
HL-L3270CDW
- Make sure the machine is in Ready Mode.
- Press
 .
. - Press [Yes].The machine prints the Drum Dot Check Sheet.
- Press and hold to turn off the machine.
- Open the top cover until it locks in the open position.
- WARNING
- HOT SURFACE
The machine's internal parts will be extremely hot. Wait for the machine to cool down before touching them.
- The color of printed dots on the Drum Dot Check Sheet is the color of the drum you should clean. Remove the toner cartridge and drum unit assembly that matches the color causing the problem.
- CAUTION
-
We recommend placing the toner cartridge and drum unit assemblies on a clean, flat surface with disposable paper underneath it in case you accidentally spill or scatter toner.
- IMPORTANT
-
To prevent damage to the machine from static electricity, DO NOT touch the electrodes shown in the illustration.
- Push down the green lock lever and remove the toner cartridge from the drum unit.To avoid print quality problems, DO NOT touch any surface of the drum unit except the drum unit gear.
- Lift the drum unit frame by the handle and rotate it counterclockwise, as shown.
- Loosen your grip so the frame drops forward, and then use your right hand to locate the drum unit gear inside the right side of the frame.To avoid print quality problems, DO NOT touch any surface of the drum unit except the drum unit gear.
- Tilt your left hand up to lift the frame so the numbered grid is visible, as shown. Use your right hand to rotate the drum while you look for marks or debris on the drum surface.Use the column numbers next to the drum roller to find the mark. For example, a dot in column 2 on the Drum Dot Check Sheet would mean that there is a mark in the “2” region of the drum.
- Wipe the surface of the drum gently with a dry cotton swab until the mark on the surface comes off.
- NOTE
- DO NOT clean the surface of the photosensitive drum with a sharp object or any liquids.
- Reinsert the toner cartridge firmly into the drum unit until you hear it lock into place.Make sure you put the toner cartridge in correctly or it may separate from the drum unit.
- Slide the toner cartridge and drum unit assemblies into the machine. Make sure that you match the toner cartridge color to the same color label on the machine.
- Close the machine's top cover.
- Press to turn on the machine.