| | |
| 1 | Press any of the Menu buttons (+, -, OK or Back) on the control panel of your printer to take the printer off-line.
| |||||||
| 2 | Press the + or - button to select LAN.
| |||||||
| 3 | Press OK to move to the next menu level.
| |||||||
| 4 | Press the + or - button to select WLAN.
| |||||||
| 5 | Press OK to move to the next level.
| |||||||
| 6 | Press the + or - button to select Setup WLAN.
| |||||||
| 7 | Press OK to move to select the next level.
| |||||||
| 8 | Press the + or - button to select Setup Wizard, then press OK.
| |||||||
| 9 | Press OK to enable the wireless LAN interface.
| |||||||
| 10 | The printer will search for your network. It will take a few of seconds to display a list of available SSIDs.
| |||||||
| 11 | Select the SSIDs from the list using the + or - button. Press OK to select the SSID. If the displayed SSID you selected is in infrastructure mode, go to step 15. If the displayed SSID you selected is in ad-hoc mode, go to step 16. If you want to add a new SSID, go to step 12.
| |||||||
| 12 |
| |||||||
| 13 |
| |||||||
| 14 | If you select Ad-hoc, go to step 16.
| |||||||
| 15 | Select the Authentication method using the + or - button, and press OK. If you select Open System, go to step 16. If you select Shared Key, go to step 17. If you select WPA/WPA2-PSK, go to step 20. If you select LEAP, go to step 21.
| |||||||
| 16 | Select the Encryption Type, None or WEP using the + or - button, and press OK. If you select None, go to step 23. If you select WEP, go to step 17.
| |||||||
| 17 | Select the key option; KEY1, KEY2, KEY3, KEY4 using the + or - button, and press OK. If you select the key which shows **********, go to step 18 If you select a blank key, go to step 19.
| |||||||
| 18 | If you want to change the key you selected in step 17, select Change using the + or - button, press OK. Go to step 19. If you want to keep the key you selected in step 17, select Keep using the + or - button, press OK. Go to step 23.
| |||||||
| 19 |
| |||||||
| 20 |
| |||||||
| 21 |
| |||||||
| 22 | Enter the password and press OK. Go to step 23.
| |||||||
| 23 | The following will be displayed.
| |||||||
| 24 | The printer starts to connect the wireless device you have selected.
| |||||||
| 25 | If your connection to the wireless network is connected successfully, the display shows Connected for 2 seconds and configuration is completed.
|
| 1 | Turn on your computer. (You must be logged on with Administrator rights.) Close any applications running before configuration. |
| 2 | Put the supplied CD-ROM into your CD-ROM drive. The opening screen will appear automatically. Select your printer and the language. |
| 3 | Click Install Printer Driver.  |
| 4 | Click Wireless Network users. 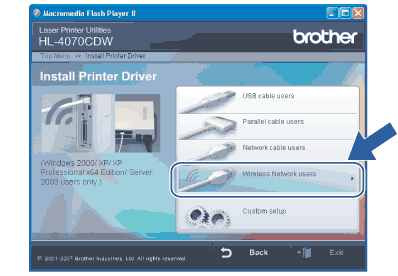 |
| 5 | Choose Driver Install Only, and then click Next. 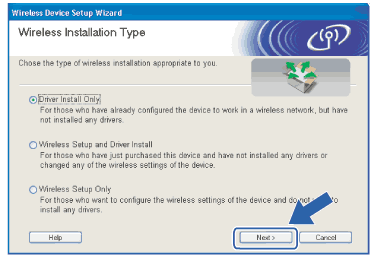 |
| 6 | Go to Installing the printer driver, for the rest of the instructions. |
| 1 | Turn on your Macintosh®. |
| 2 | Put the supplied CD-ROM into your CD-ROM drive. Double-click the HL4040_4050_4070 icon on your desktop. Double-click the Start Here icon. Select your printer and the language. 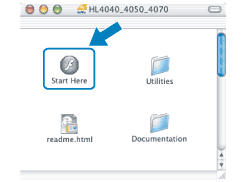 |
| 3 | Click Install Printer Driver. 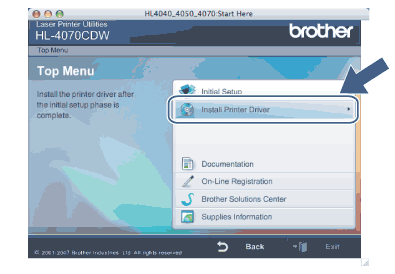 |
| 4 | Click Wireless Network users. 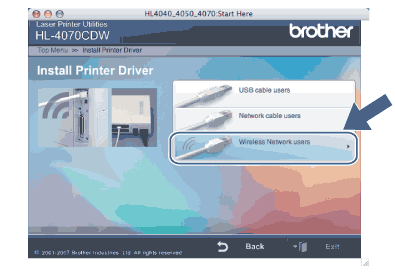 |
| 5 | Choose Driver Install Only, and then click Next. 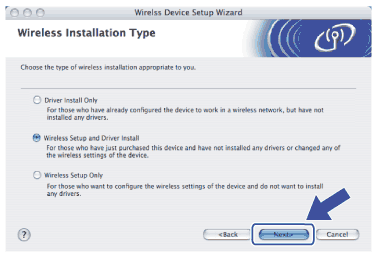 |
| 6 | Go to Installing the printer driver, for the rest of the instructions. |
| | |