Model Name: DR-270CL 4 pc. Drum set or single drums DR-270CL-BK, DR-270CL-CMY
A new drum unit can print approximately 15,000 A4 or Letter size single-sided pages.
DR-270CL Drum set contains 4 drum units 1 Black (DR-270CL-BK) and 3 Color (DR-270CL-CMY). DR-270CL-BK contains 1 Black drum. DR-270CL-CMY contains 1 Color drum.
Drum wear and tear occurs due to use and rotation of the drum and interaction with paper, toner and other materials in the paper path. In designing this product, Brother decided to use the number of rotations of the drum as a reasonable determinant of the drum life. When a drum reaches the factory-established rotation limit corresponding the rated page yield, the product LCD display will advise you to replace the applicable drum(s). The product will continue to function, however, print quality may not be optimal.
As the drums rotate in unison during the various stages of operation (regardless of whether toner is deposited on the page) and because damage to a single drum unit is not likely, you will need to replace all of the drums at once (unless you have replaced an individual drum [DR-270CL-BK for black and DR-270CL-CMY for Color] for reasons other than reaching its rated life). For your convenience, Brother sells the drum units as a set of four (DR-270CL).

Note
| • | There are many factors that determine the actual drum life, such as the temperature, humidity, type of paper, type of toner used and so on. Under ideal conditions, the average drum life is estimated at approximately 15,000 pages. The actual number of pages that your drum will print may be significantly less than this estimate. Because we have no control over the many factors that determine the actual drum life, we cannot guarantee a minimum number of pages that will be printed by your drum. |
| • | For best performance, use only genuine Brother toner. The printer should be used only in a clean, dust-free environment with adequate ventilation. |
| • | Printing with a third-party drum unit may reduce not only the print quality but also the quality and life of the printer itself. Warranty coverage does not apply to problems caused by the use of a third-party drum unit. |
Drum End Soon messages
Drums End Soon  |
If the LCD shows
Drums End Soon, it means the 4 drum units are near the end of their life. Buy a new drum unit set (DR-270CL) and have it ready before you get a
Replace Drums message. To replace the drum units, see
Replacing the drum units.
Drum End Soon(X)  |
If only a specified drum is near the end of its life, the LCD shows the
Drum End Soon(X) message. (X) indicates the drum unit color that is near the end of its life. ((K) =Black, (Y)=Yellow, (M)=Magenta, (C)=Cyan). Buy a new drum unit DR-270CL-BK (for Black) or a DR-270CL-CMY (for either Y, M, C colors) and have it ready before you get a
Replace Drums message. To replace the drum units, see
Replacing the drum units.
The Drum End Soon(X) message appears for one minute after each print job.
Replace Drum messages
When the following message appears on the LCD, you need to replace the drum units:
Replace Drums  |
If only the specified drum needs to be replaced, the LCD shows the Replace Drum(X) message. (X) indicates the drum unit color that you need to replace. ((K)=Black, (Y)=Yellow, (M)=Magenta, (C)=Cyan).
Drum Error  |
<Scrolling message>
Replace the Drum Unit. Black (K)/ Cyan (C)/ Magenta (M)/ Yellow (Y). Refer to the User’s Guide.1The
Drum Error message has two cases: If the scrolling message shows
Replace the Drum Unit. you will need to replace the drum unit. If the scrolling message shows
Slide the Green tab on Drum Unit. you do not need to replace the drum unit, you just need to clean the corona wires. (See
Cleaning the corona wires.)
Replacing the drum units


IMPORTANT
| • | While removing the drum unit, handle it carefully because it may contain toner. |
| • | We recommend that you clean the printer when you replace the drum unit. See Cleaning. |

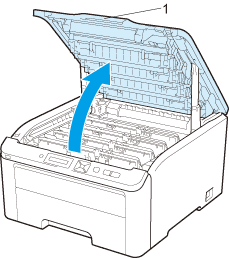
| 1 | Turn off the printer power switch. Fully open the top cover by lifting up on the handle (1). |
| 2 | Take out the drum unit and toner cartridge assembly for the color shown on the LCD. |
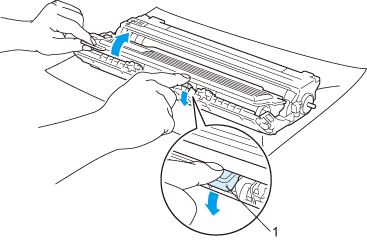
| 3 | Push down the green-labeled lock lever (1) and take the toner cartridge out of the drum unit.   WARNING | | DO NOT put a toner cartridge into a fire. It could explode, resulting in injuries. | | | DO NOT use flammable substances, any type of spray or any organic solvent/liquids containing alcohol or ammonia to clean the inside or outside of the printer. Doing this may cause a fire or electrical shock. See Cleaning for how to clean the printer. | | | Be careful not to inhale toner. |
  IMPORTANT | • | We recommend that you place the drum unit and toner cartridge assembly on a clean, flat surface with a sheet of disposable paper or cloth underneath it in case you accidentally spill or scatter toner. | | • | To prevent damage to the printer from static electricity, DO NOT touch the electrodes shown in the illustration. | | • | Handle the toner cartridge carefully. If toner scatters on your hands or clothes, wipe or wash it off with cold water at once. | | • | To avoid print quality problems, DO NOT touch the shaded parts shown in the illustrations. |
 Note | • | Be sure to seal up the drum unit tightly in a suitable bag so that toner powder does not spill out of the cartridge. | | • | Discard the used drum unit according to local regulations, keeping it separate from domestic waste. If you have questions, call your local waste disposal office. |
|
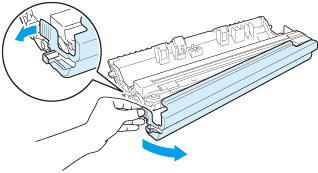
| 4 | Unpack the new drum unit and pull off the protective cover.   IMPORTANT | | Wait to unpack a drum unit until immediately before you put it in the printer. Exposure to direct sunlight or room light may damage the drum unit. |
|
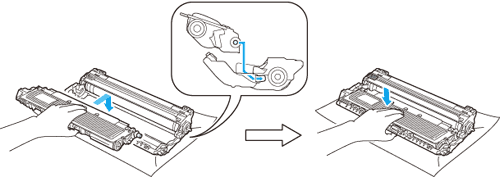
| 5 | Put the toner cartridge firmly into the new drum unit until you hear it lock into place.   IMPORTANT | | Make sure that you re-install the toner cartridge properly, or it may separate from the drum unit. |
|
| 6 | Slide the drum unit and toner cartridge assembly into the printer. Make sure that you match the toner cartridge color to the same color label on the printer.
| | | | C - Cyan M - Magenta | Y - Yellow K - Black | |
|
| 7 | Close the top cover of the printer. |
When you replace a drum unit with a new one, you need to reset the drum counter by completing the following steps:
| 1 | Turn the printer power switch back on. |
| 2 | Press + or - to choose Machine Info.. |
| 3 | Press OK to proceed to the next menu level, and then press + or - to choose Reset Parts Life. |
| 4 | Press OK, and then press + to choose Drum Unit. |
| 5 | Press OK, and then press + or - to choose the color that you replaced. |
| 6 | Press OK two times. |


