Replacing the consumable items
You will need to replace the consumable items regularly.
 Note Note |
|
Consumables
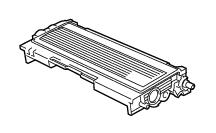
Toner cartridge
The life of the original toner cartridge that came with the printer may be either a starter
*1 or standard
*2 toner cartridge, and depends on the model and country you bought the printer in.
*1 The starter toner cartridge will print up to 1,500 A4 or Letter-size single-sided pages at 5% coverage.
*2 Standard and replacement toner cartridges print up to 2,500 A4 or Letter-size single-sided pages at 5% coverage.
| Note |
|
• The amount of toner used varies according to what is printed on the page and the print density setting.
• If you change the print density setting for lighter or darker printing, the amount of toner that is used will change.
• Wait to unpack the toner cartridge until immediately before you install it in the printer.
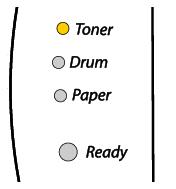
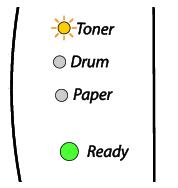
Toner Low message
The
Toner LED alternates turning on for 2 seconds and off for 3 seconds.
If the LED shows this message, the toner cartridge has nearly run out of toner. Buy a new toner cartridge and have it ready before you get a Toner Life End message. To put in the toner cartridge,
Replacing the toner cartridge.
| Note |
|
The Toner LED will blink continuously if the toner cartridge is nearly empty.
Toner Life End message
If the LED shows the message below, the printer has run out of toner or the toner is not evenly distributed inside the cartridge.
Replacing the toner cartridge
| Note |
|
• To ensure high quality printing, make sure you use quality Brother toner cartridges. When you want to buy toner cartridges, call the dealer you bought the printer from or Brother Customer Service.
• We recommend that you clean the printer when you replace the toner cartridge.
Cleaning.
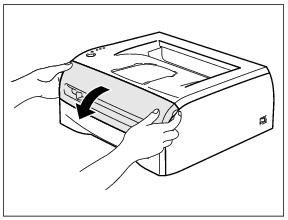
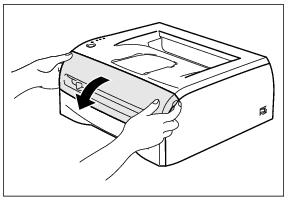
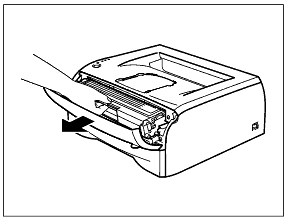
- Open the front cover of the printer.
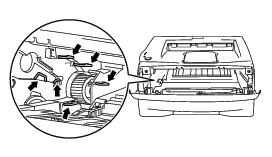
- Pull out the drum unit and toner cartridge assembly.
 CAUTION
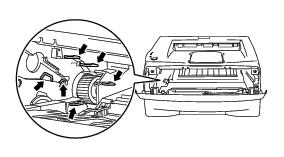
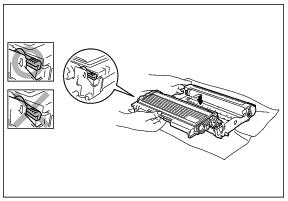
• We recommend that you place the drum unit and toner cartridge assembly on a piece of disposable paper or cloth in case you accidentally spill or scatter toner.
• To prevent damage to the printer from static electricity, do not touch the electrodes shown in the illustrations.
|
|
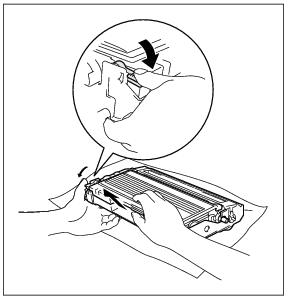
- Push down the blue lock lever and take the toner cartridge out of the drum unit.
CAUTION
Handle the toner cartridge carefully. If toner scatters on your hands or clothes, immediately wipe or wash it off with cold water.
|
| Note |
|
• Be sure to seal up the toner cartridge tightly in a bag so that toner powder does not spill out of the cartridge.
• Discard the used toner cartridge according to local regulations, keeping it separate from domestic waste. If you have questions, call your local waste disposal office.
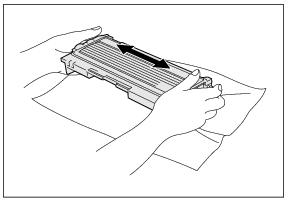
- Unpack the new toner cartridge. Hold the cartridge level with both hands and gently rock it from side to side five or six times to spread the toner evenly inside the cartridge.
CAUTION
• Wait to unpack the toner cartridge until immediately before you put it in the printer. If toner cartridges are left unpacked for a long time the toner life will be shortened.
• If an unpacked drum unit is put in direct sunlight or room light, the unit may be damaged.
• Brother strongly recommends that you do not refill the toner cartridge provided with your printer. We also strongly recommend that you continue to use only Genuine Brother Brand replacement toner cartridges. Using or attempting to use potentially incompatible toner and/or toner cartridges in your printer may cause damage to the printer itself and/or it may result in unsatisfactory print quality. Our warranty coverage does not apply to any problem that was caused by the use of unauthorized third party toner and toner cartridges. To protect your investment and guarantee your print quality please continue to replace consumed toner cartridges with only Genuine Brother Branded Supplies.
• Printing with a third-party toner or third-party toner cartridge may reduce not only the print quality but also the quality and life of the printer itself. It may also cause serious damage to the performance and life of a drum unit. Warranty coverage does not apply to problems caused by the use of third-party toner or third-party toner cartridges.
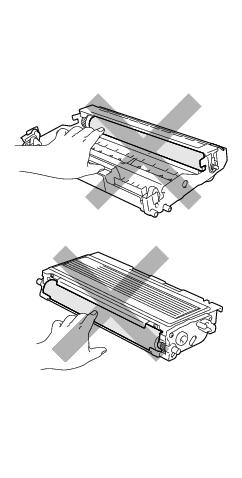
• Put the toner cartridge in the drum unit immediately after you have removed the protective cover. Do not touch the shaded parts shown in the illustrations to prevent any degradation to the print quality.
|
|
- Pull off the protective cover.
- Put the new toner cartridge firmly into the drum unit until you hear it lock into place. If you put it in properly, the lock lever will lift automatically.
CAUTION
Make sure you insert the toner cartridge properly or it may separate from the drum unit.
|
- Clean the primary corona wire inside the drum unit by gently sliding the blue tab from right to left and left to right several times. Return the tab to the home position (
 ) before you put the drum unit back in the printer. If you do not, printed pages may have a vertical stripe.
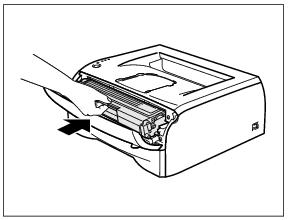
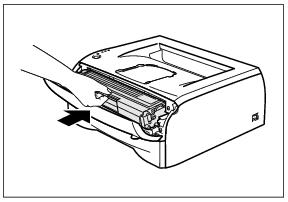
- Put the drum unit and toner cartridge assembly back in the printer. Close the front cover of the printer.
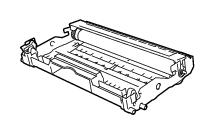
Drum unit
This printer can print up to 12,000 pages
* with one drum unit.
* At 5% print coverage (A4 or Letter size). The actual number of printed pages will vary depending on the average type of print job and paper.
| Note |
|
• There are many factors that determine the actual drum life, such as the temperature, humidity, type of paper, type of toner used, number of pages per print job and so on. Under ideal conditions, the average drum life is estimated at up to 12,000 pages. The actual number of pages that your drum will print may be significantly less than this estimate. Because we have no control over the many factors that determine the actual drum life, we cannot guarantee a minimum number of pages that will be printed by your drum.
• For best performance, use only genuine Brother toner. The printer should be used only in a clean, dust-free environment with adequate ventilation.
• Printing with a third-party drum unit may reduce not only the print quality but also the quality and life of the printer itself. Warranty coverage does not apply to problems caused by the use of third-party drum unit.
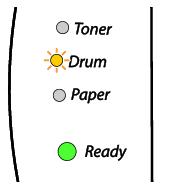
Change Drum message
If the LED shows the message below, it means the drum unit is near the end of its life. We recommend that you replace the drum unit with a new one before there is a noticeable deterioration in the print quality.
CAUTION
• While removing the drum unit, handle it carefully because it may contain toner.
• Every time you replace the drum unit, you should clean the inside of the printer. Cleaning.
|
Replacing the drum unit
| Note |
|
We recommend that you clean the printer when you replace the drum unit.
Cleaning.
Follow these steps to replace the drum unit.
- Make sure that the printer is turned on and the Drum LED is blinking. Open the front cover of the printer.
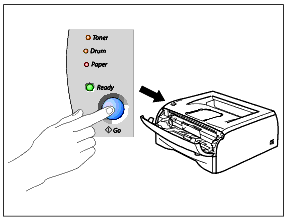
- Press and hold down the Go button for about 4 seconds until all the LEDs light up. Once all four LEDs are lit, release the Go button.
 IMPROPER SETUP
Do not reset the drum counter when you replace only the toner cartridge.
|
- Pull out the drum unit and toner cartridge assembly.
CAUTION
• We recommend that you place the drum unit and toner cartridge assembly on a piece of disposable paper or cloth in case you accidentally spill or scatter toner.
• To prevent damage to the printer from static electricity, do not touch the electrodes shown in the illustrations.
|
|
- Push down the blue lock lever and take the toner cartridge out of the drum unit.
CAUTION
Handle the toner cartridge carefully. If toner scatters on your hands or clothes, immediately wipe or wash it off with cold water.
|
| Note |
|
• Be sure to seal up the drum unit tightly in a bag so that toner powder does not spill out of the unit.
• Discard the used drum unit according to local regulations, keeping it separate from domestic waste. If you have questions, call your local waste disposal office.
- Unpack the new drum unit.
CAUTION
Wait to unpack a drum unit until immediately before you put it in the printer. Exposure to direct sunlight or room light may damage the drum unit.
|
- Put the toner cartridge firmly into the new drum unit until you hear it lock into place. If you put the cartridge in properly, the blue lock lever will lift automatically.
CAUTION
Make sure you insert the toner cartridge properly, or it may separate from the drum unit.
|
- Put the drum unit and toner cartridge assembly in the printer.
- Close the front cover.
- Make sure that the Drum LED is now off.


 If the LED shows this message, the toner cartridge has nearly run out of toner. Buy a new toner cartridge and have it ready before you get a Toner Life End message. To put in the toner cartridge, Replacing the toner cartridge.