Printing methods
Printing on plain paper, bond paper and transparencies
You can print on plain paper, bond paper or transparencies from the paper tray or manual feed slot. For the paper you want to use,
What kind of paper can I use?.
Printing on plain paper, bond paper or transparencies from the paper tray
 Note Note |
|
Do not put more than 10 transparencies in the paper tray, if you print on transparencies.
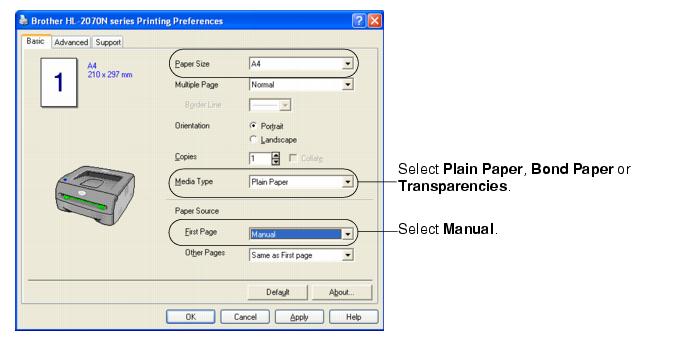
- Select the Paper Size, Media Type, Paper Source and other settings in the printer driver.
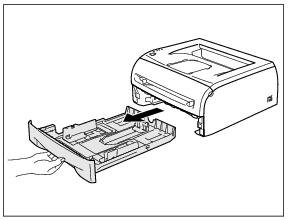
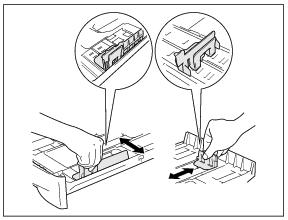
- Pull the paper tray completely out of the printer.
- While pressing the blue paper-guide release lever, slide the paper guides to fit the paper size. Check that the guides are firmly in the slots.
- Put paper in the tray.
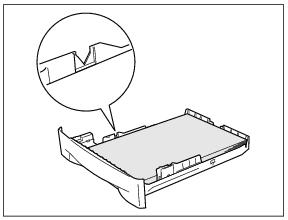
- Check that the paper is below the maximum paper mark (
 ).
).
| Note |
|
• Paper jams may occur if you put more than 250 sheets (80 g/m
2 or 21 lb) of plain or bond paper in the paper tray at any one time.
• Paper jams may occur if you put more than 10 transparencies in the paper tray at any one time.
• When you use pre-printed paper, put the side that is going to be printed on (blank side) face down, with the top of the paper at the front of the tray.
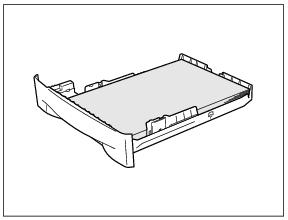
- Put the paper tray firmly back in the printer. Check that it is completely in the printer.
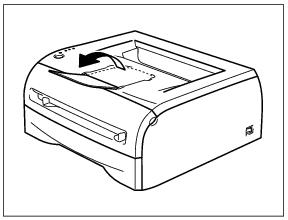
- Lift up the support flap to prevent paper from sliding off the face-down output tray.
| Note |
|
If you choose not to lift up the output tray support flap, we recommend that you remove printed pages immediately after they come out of the printer.
- Send the print data to the printer.
| Note |
|
If you print on transparencies, remove each transparency immediately. Stacking the printed transparencies may cause a paper jam or the transparency to curl.
Printing on plain paper, bond paper or transparencies from the manual feed slot
| Note |
|
The printer automatically turns on the Manual Feed mode when you put paper in the manual feed slot.
- Select the Paper Size, Media Type, Paper Source and other settings in the printer driver.
- Send the print data to the printer.
| Note |
|
A
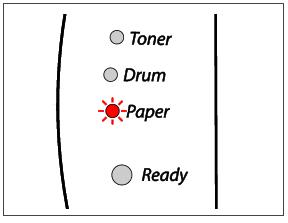
No paper fed manual feed slot status is shown by the control panel LEDs until you put a sheet of paper or a transparency in the manual feed slot.
- Lift up the support flap to prevent paper from sliding off the face-down output tray.
| Note |
|
If you choose not to lift up the output tray support flap, we recommend that you remove printed pages as soon as they come out of the printer.
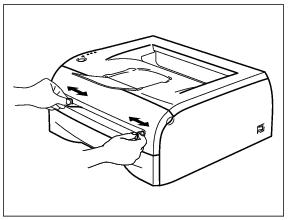
- Using both hands, slide the manual feed slot paper guides to the width of the paper that you are going to use.
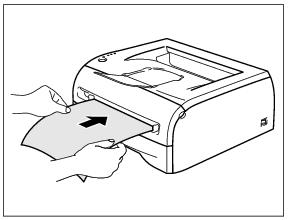
- Using both hands, put one piece of paper or one envelope in the manual feed slot until the front edge of the paper or envelope touches the paper feed roller. When you feel the machine pull in the paper, let go.
| Note |
|
• Put the paper into the manual feed slot with the side to be printed face up.
• Make sure that the paper or transparency is straight and in the proper position on the manual feed slot. If it is not, the paper or the transparency may not be fed properly, resulting in a skewed printout or a paper jam.
• Do not put more than one piece of paper in the manual feed slot at any one time, as it may cause a jam.
• If you put any Media (paper, transparency and so on) in the manual feed slot before the printer is in the Ready state, the media may be ejected without being printed on.
- After the printed page comes out of the printer, put in the next sheet of paper or the transparency as in Step 5 above. Repeat for each page that you want to print.
| Note |
|
If you print on transparencies, remove each transparency immediately after printing. Stacking the printed transparencies may cause a paper jam or the transparency to curl.
Printing on thick paper, labels and envelopes
| Note |
|
The printer automatically turns on the Manual Feed mode when you put paper in the manual feed slot.
Printing on thick paper, labels and envelopes from the manual feed slot
- Select the Paper Size, Media Type, Paper Source and other settings in the printer driver.
| Note |
|
• When you use Envelope #10, select
Com-10 from Paper Size in the printer driver.
• For other envelopes which are not in the selection of the printer driver, such as Envelope #9 or Envelope C6, use
User Defined... Size. For more information on the envelope size,
Paper size.
- Send the print data to the printer.
| Note |
|
A
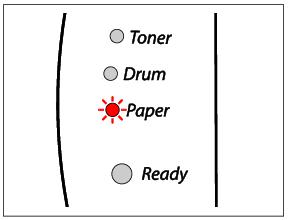
No paper fed manual feed slot status is shown by the control panel LEDs until you put a sheet of paper or an envelope in the manual feed slot.
- Lift up the support flap to prevent paper from sliding off the face-down output tray.
| Note |
|
If you choose not to lift up the output tray support flap, we recommend that you remove printed pages as soon as they come out of the printer.
- Using both hands, slide the manual feed slot paper guides to the width of the paper that you are going to use.
- Using both hands, put one piece of paper or one envelope in the manual feed slot until the front edge of the paper or envelope touches the paper feed roller. When you feel the machine pull in the paper, let go.
| Note |
|
• Put the paper into the manual feed slot with the side to be printed face up.
• Make sure that the paper or the envelope is straight and in the proper position in the manual feed slot. If it is not, the paper or envelope may not be fed properly, resulting in a skewed printout or a paper jam.
• Do not put more than one piece of paper or one envelope in the manual feed slot at any one time, as it may cause a jam.
• If you put any Media (paper, envelope and so on) in the manual feed slot before the printer is in the Ready state, the media may be ejected without being printed on.
- After the printed page comes out of the printer, put in the next sheet of paper or the envelope as in Step 5 above. Repeat for each page that you want to print.
| Note |
|
• Envelope joints that are sealed by the manufacturer should be secure.
• All sides of the envelope should be properly folded without wrinkles or creases.
• Remove each sheet or envelope immediately after printing. Stacking the sheets or envelopes may cause the paper to jam or curl.
Types of envelopes to avoid
- that are damaged, curled, wrinkled, or unusual shape
- that are extremely shiny or textured
- with clasps, snaps or tie strings
- with self-adhesive closures
- that are of a baggy construction
- that are not sharply creased
- that are embossed (have raised writing on them)
- that were previously printed by a laser printer
- that are pre-printed on the inside
- that cannot be arranged when put in a pile
- that are made of paper that weighs more than the paper weight specifications for the printer
- that have been badly made, with edges that are not straight or consistently square
- with windows, holes, cutouts or perforations
IF YOU USE ANY OF THE TYPES OF ENVELOPES LISTED ABOVE, THEY MAY DAMAGE YOUR PRINTER. THIS DAMAGE IS NOT COVERED UNDER ANY BROTHER WARRANTY OR SERVICE AGREEMENT.
| Note |
|
• Do not put different types of paper in the paper tray at the same time because it may cause paper jams or misfeeds.
• Do not print envelopes using duplex printing.
• For proper printing, you must choose the same paper size from your software application as the paper in the tray.
Most envelopes will be suitable for your printer. However, some envelopes will have feed and print-quality problems because of the way they have been made. A suitable envelope should have edges with straight, well-creased folds and the leading edge should not be thicker than two pieces of paper. The envelope should lie flat and not be of baggy or flimsy construction. You should buy quality envelopes from a supplier who understands that you will be using the envelopes in a laser printer. Before you print a lot of envelopes, test one to make sure that the print results are what you want.
| Note |
|
Brother will not recommend a particular envelope because envelope manufacturers may change the envelope specifications. You are responsible for the quality and performance of the envelopes you use.


 IF YOU USE ANY OF THE TYPES OF ENVELOPES LISTED ABOVE, THEY MAY DAMAGE YOUR PRINTER. THIS DAMAGE IS NOT COVERED UNDER ANY BROTHER WARRANTY OR SERVICE AGREEMENT.