Home > Introduction to Your Brother Machine > Touchscreen LCD Overview
Touchscreen LCD Overview
Home Screens
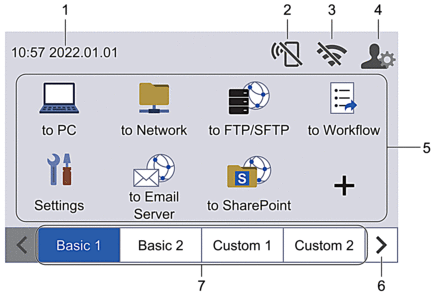
Your machine has eight tabbed screens (referred to as Home screens). Each Home screen can hold up to eight icons which can be used for functions, machine settings and shortcuts. A total of 57 icons can be placed on the Home screens as needed.
The Main Home screen can be selected from the Home screens.
Use the [Admin Settings] menu to group names on the tabs and rearrange the icons.

- Date & Time
Displays the date and time set on the machine.
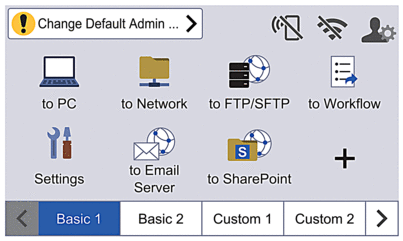
This area is also used to display error or maintenance messages.
 (Wi-Fi Direct Status)
 Press to configure Wi-Fi Direct settings.
The following icons show the Wi-Fi Direct status:

- Your machine is not connected to the Wi-Fi Direct network.
Press this icon to configure Wi-Fi Direct settings.
- The Wi-Fi Direct setting is disabled.

Your machine is connected to the Wi-Fi Direct network.

The Wi-Fi Direct network cannot be detected.
 (Wireless Status)
 Each icon in the following table shows the wireless network status:

- Your machine is not connected to the wireless access point/router.
Press this icon to configure wireless settings. For more detailed information, see the Quick Setup Guide.
- The wireless setting is disabled.

The wireless network is connected.
A three-level indicator in each of the Home screens displays the current wireless signal strength.

The wireless access point/router cannot be detected.

You can configure wireless settings by pressing the Wireless Status button.
 (Admin Settings)
 Press to access the [Admin Settings] menu.
- NOTE
- If required, enter the password you use to manage this machine in Web Based Management, and then press [OK].
Function Icons, Setting Icons and Shortcut Icons
The following descriptions explain basic icons and features. The available features vary depending on your model.
 ([Settings])
 Press to access the Settings menu.
 ([to PC])
 Press to access the Scan to PC function.
 ([to Network])
 Press to access the Scan to Network function.
 ([to FTP/SFTP])
 Press to access the Scan to FTP/SFTP function.
 ([to Workflow])
 Press to access the Scan to Workflow function.
 Settings must be configured in iPrint&Scan in advance.
 ([to Email Server])
 Press to access the Scan to Email Server function.
 ([to SharePoint])
 Press to access the Scan to SharePoint function.
 ([to USB])
 Press to access the Scan to USB function.
 ([to Web])
 Press to connect your machine to an Internet service.
 ([Apps])
 Press to connect your machine to the Brother Apps service.
 (Shortcuts)
 Press to create Shortcuts for frequently used operations such as Scan to PC, Scan to Email Server, Scan to USB, or other functions.
You can quickly scan using the options set as Shortcuts.
- Tabs Scroll Buttons
Press to display and access all the tabs.
- Home Tabs
Press to display the Home screen.
- If an error message or notification appears in the information bar, press the message area to view the details.

- The warning icon
 appears when there is an error or maintenance message.
 - The information icon
 appears when there are helpful hints or supplementary information available.
- This product adopts the font of ARPHIC TECHNOLOGY CO., LTD.
Auto Start Scan
The Auto Start Scan feature allows you to start scanning automatically as soon a document is placed in the ADF.
To use Auto Start Scan, you must first create an Auto Start Scan Shortcut and then enable the Auto Start Scan setting in General Setup:
- Press
 to display the [Custom 6] tab, and press it.
 - Press
 to add the Auto Start Scan Shortcut.
 - Select the Shortcut function (for example, Scan to PC).
- Press [Save as Shortcut]. When the LCD displays [These settings will be saved as a shortcut.], press [OK].
- Enter the Shortcut Name and press [OK]. When the LCD displays [Make this a One Touch Shortcut?], press [OK].
- Press
 ([Settings]) to access the Settings menu. Press and select [On].
- NOTE
- Only one Auto Start Scan profile can be saved at a time.
Settings Menu
Press  ([Settings]) to check and access all the machine’s settings.
- [General Setup]
Press to access the General Settings menu.
- [Shortcut Settings]
Press to set Shortcuts. This option is unavailable and cannot be selected if you have not added Shortcuts.
- [Network]
Press to access Network settings.
- [Machine Info.]
Press to check the machine’s information.
- [Initial Setup]
Press to access the [Date & Time], [Reset], and [Local Language] menus.


