Meeting record files and shared files can be published, and histories and details of meetings that have been held can be checked as reports.
You can play/delete the meeting record files or the files that were shared during the meeting, and save them in your local computer. The files can be published by setting individual passwords. You can also check the amount of storage that is being used.
 Did you know? Did you know? My Meeting Files contains the following two folders: |
Meeting record files that were saved to OmniJoin storage, or that were shared in "File Transfer," "Share a Document," or "Share a PowerPoint" (including other attendees' files).
NOTE: Files that were shared in "Share a Document" or "Share a PowerPoint" are saved in PDF format. |
Files that you saved in My Meeting Files can be viewed using the following steps:
1.Login to My Account
2.Click My Meeting Files
3.Click Meetings or My files
The files can be viewed by downloading or playing them.
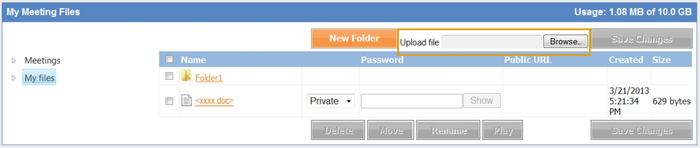
You can upload files to any folder in the "My files" folder.
NOTE: You cannot upload files into the "Meetings" folder. |
1.Login to My Account
2.Click My files
3.Upload the files from Browse
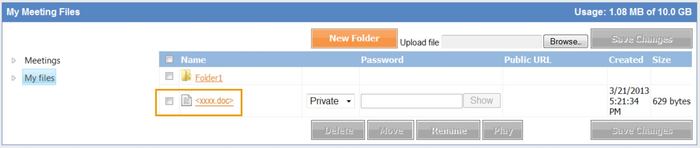
You can click the file names in the "Meetings" or "My files" folders to download them.
1.Login to My Account
2.Click Meetings/My files
3.Click a file name to download it
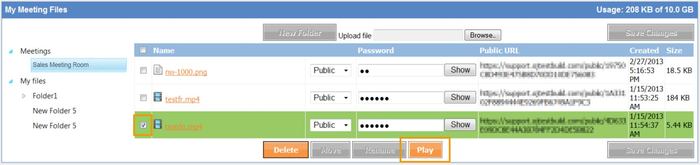
You can use this feature to play any video media files saved in My Meeting Files on your browser.
1.Login to My Account
2.Click Meetings/My files
3.Select a file that you want to play
4.Click Play
NOTE: Some browsers may not be able to play files. |
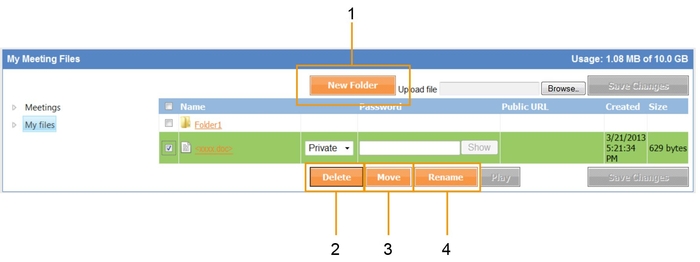
You can manage all the folders/files saved in My Meeting Files.
1.Login to My Account
2.Click Meetings/My files
3.Select a folder or a file
In the folder/file management, you can edit the following:
(1)Create New Folders
Open the folder first to create a new folder within it.
(2)Delete Files/Folders
Tick the check box next to a file/folder, and then click this button to delete it.
(3)Move Files
Tick the check box next to a file, and then click this button to select the destination.
(4)Rename Folders/Files
Tick the check box next to a file/folder, and then click this button to rename it.
NOTE:Within the Meetings folder, you can delete files only. If you want to delete a folder, you should empty it first. |
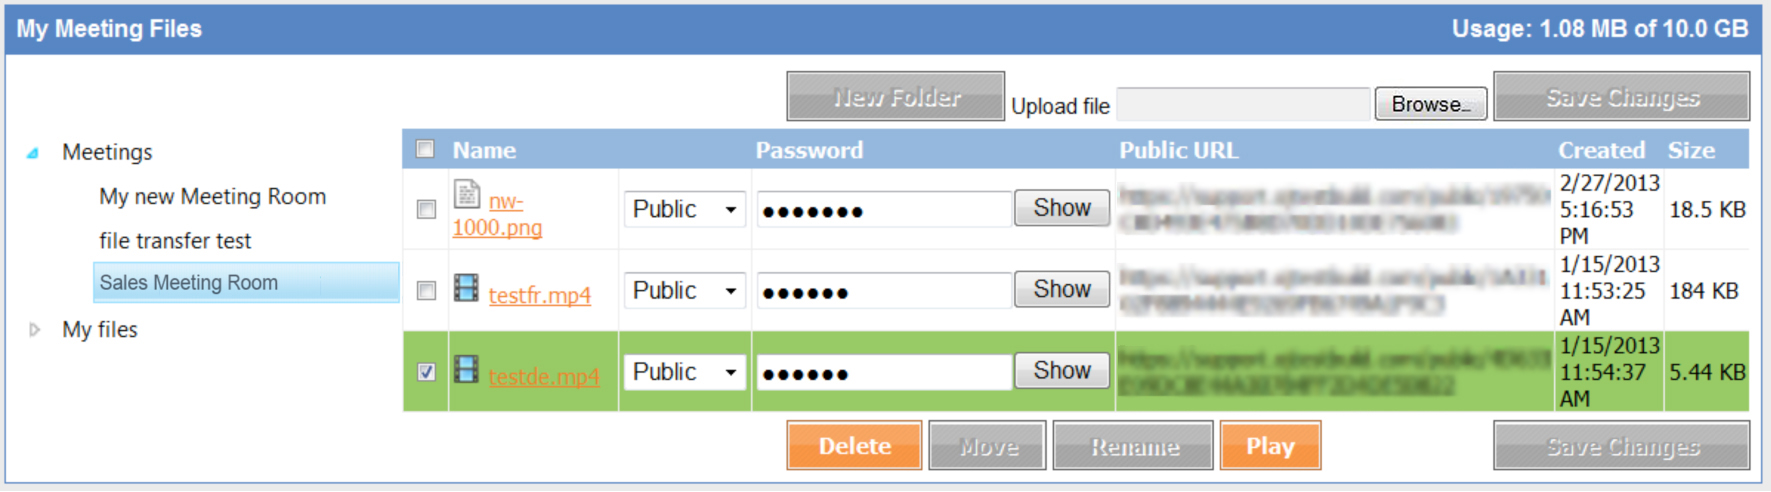
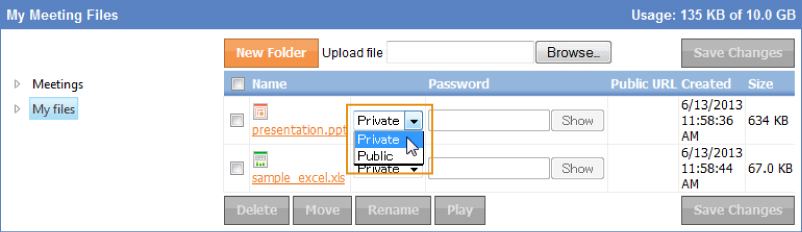
Set the Files' Public Property
You can share the saved files through a public URL.
1.Login to My Account
2.Click Meetings/My files
3.Select a file, and then select "Public" or "Private" from the public property
4.If you select "Public," set the password for viewing
5.Click Save Changes
・Public
Files can be accessed only by users who are given passwords and public URLs by the owner.
・Private
Files can be accessed only by the owner.
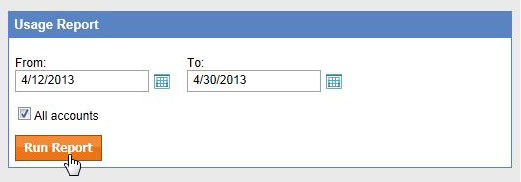
You can run reports to show usage statistics for your account. This report shows the time each meeting started, the duration, and the number of attendees. This report can be exported to CSV file to be used according to your purpose.
Administrators can run reports for the accounts that they have created.
1.Login to My Account
2.Click My Reports
3.Click on the type of reports
4.Select the period of reports that you want to display and click Run Report
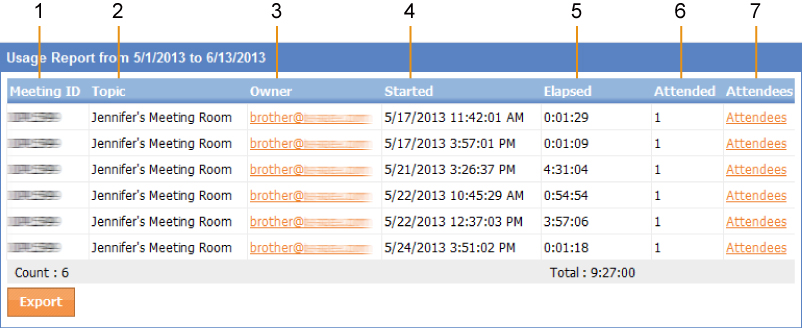
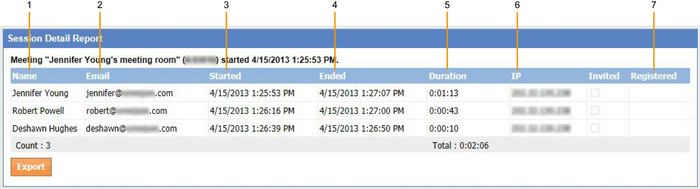
In the meeting history list, the following meeting information can be viewed in a tableform.
(1)Meeting ID
The ID of the meeting.
(2)Topic
The topic of the meeting.
(3)Owner
The email address of the user who created the meeting.
(4)Started
The time when the meeting was started.
(5)Elapsed
The elapsed time of the meeting.
(6)Attended
The number of users who joined the meeting.
(7)Attendees
The link to display Attendees of the meeting.
5.To display attendance information of a specific meeting, click Topic.
(1)Name
The screen name of the attendee.
(2)Email
The email address of the attendee. This field is blank for users who do not have an account.
(3)Started
The time that the attendee joined the meeting.
(4)Ended
The time that the attendee left the meeting.
(5)Duration
The duration that the attendee joined the meeting for.
(6)IP
The IP address of the device used by the attendee to join the meeting.
(7)Registered
The time when invited attendees registered (for meetings require registration).
6.To store your reports in CSV format, click Export.
Alternatively...You can also display your reports by performing the steps below. |
1.Login to My Account
2.Click My Profile (tab)
3.Click My Profile (button)
4.Click My Account
5.Click Usage Report
6.Select the period of reports that you want to display and click Run Report
Related Meeting Articles...
You can perform various operations such as creating scheduled meetings, edit contents of meetings, or join meetings. The following contents will guide you through how to create or join meetings, and manage them.
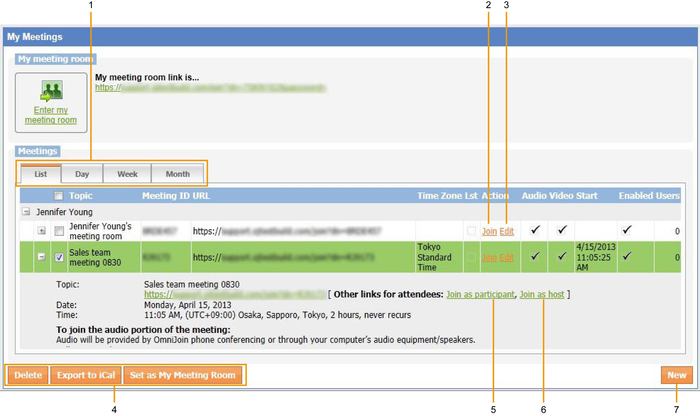
Show my Meetings allows you to make various operations such as creating, joining or deleting meetings.
The meeting room in bold letters is your default meeting room. |
1.Login to My Account
2.Click Show My Meetings
3.This will display all of your meetings and related options (sample below)
(1)Tabs
Switch the period of the meetings displayed in a list by clicking these tabs. You can view meetings in the list by day, week, or by month.
(2)Join
Join the meeting.
(3)Edit
Edit the meeting information. You can edit detailed information by clicking Advanced at the bottom-left corner of the screen.
(4)Meeting options
Manage the meetings by clicking these buttons after you tick the check box next to the meeting topic.
(5)Join as participant
Only allowed features active based upon meeting settings.
(6)Join as host
All allowed features active based upon meeting settings.
(7)New
Create a new meeting.
Related Meeting Articles...
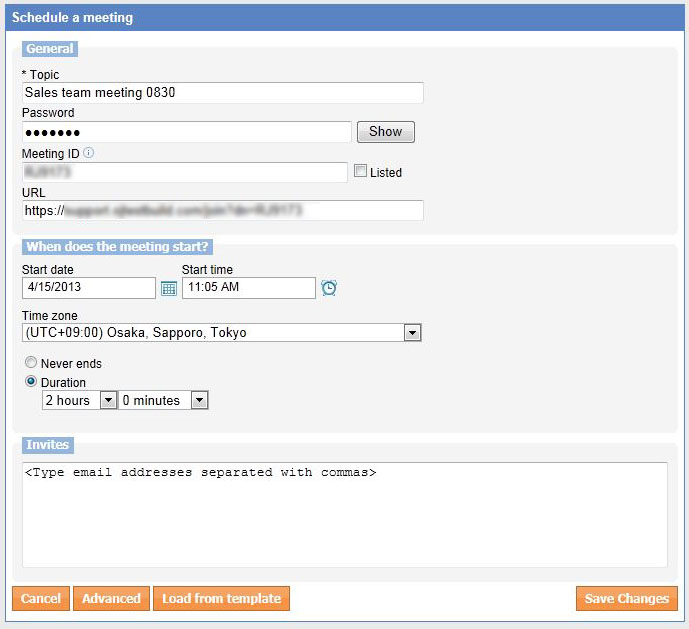
Meetings can be scheduled in advance and meeting invitations will be emailed to the attendees.
1.Login to My Account
2.Click Schedule a meeting
3.Enter Topic and Password
4.Specify the meeting schedule, time zone, and duration
5.Enter email addresses (separated by commas) of the attendees
Entering the meeting topic is required. If you do not enter the topic, the message prompting you to enter the topic will be displayed on the top-right of the screen. |
If you do not set the detailed information for the meeting, step 6 need not be performed. Proceed to step 7.
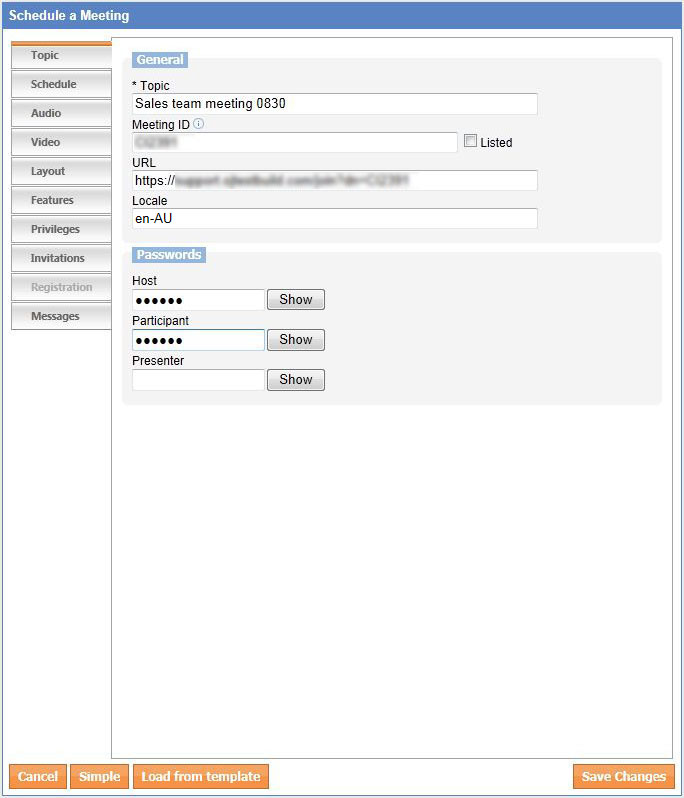
6.Click Advanced to edit detailed information for the meeting such as video settings or specific privileges given to the attendees
To return to the previous screen, click Simple.
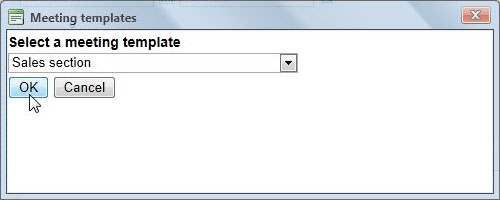
To save the template, click Load from template on the bottom-left of the screen. When you click OK after selecting the template, the template is read.
7.Click Save Changes on the bottom-right of the screen
Alternatively... You can also display Schedule a meeting screen by performing the steps below. (1) Login to My Account (2) Click Show my Meetings(3) Click New on the bottom-right of the screen |
Related Meeting Articles...
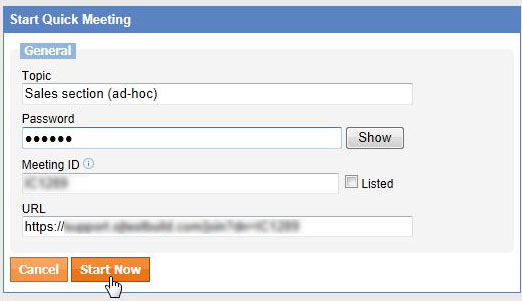
Start Quick Meeting is used to have an instant ad-hoc meeting. This meeting is automatically deleted 15 minutes after the meeting ending.
Did you know? To hold a meeting repeatedly, click Schedule a meeting |
1.Login to My Account
2.Click Start Quick Meeting
3.Enter Topic
4.Enter Password
5.Enter a Meeting ID (An ID should be generated automatically)
6.To display the meeting ID on your web portal, tick the check box of Listed
7.Click Start Now
Once a meeting is created, attendees can join the meeting by simply entering the password (if necessary) and the meeting ID.
Related Meeting Articles...
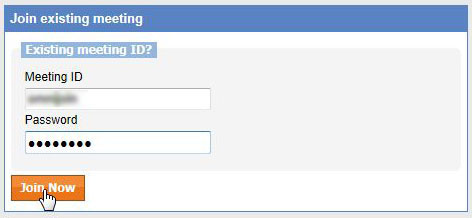
Both scheduled and quick meetings are joined by entering the meeting ID and the password.
1.Login to My Account
2.Click Join existing meeting
3.Enter Meeting ID
4.Enter Password
5.Click Join Now
Related Meeting Articles...
You can enter your own personal meeting room by clicking Enter my meeting room.
1.Login to My Account
2.Click Enter my meeting room
3.Follow the instruction displayed on your browser and enter your meeting room
The screen indicated above is an example. It varies depending on the browser you are using. |
4.OmniJoin Conference Client starts up, then you can invite other people, share documents or applications, and change the various settings for the meeting
Related Meeting Articles...
Administrators can create accounts. In addition to that, administrators can restrict the functions of the accounts, and check the usage of the accounts. Meeting hosts must have an OmniJoin account, but online attendees can join the meeting without accounts just by clicking on a web link.
The following contents will guide you through how to create or delete accounts, and put restrictions on them.
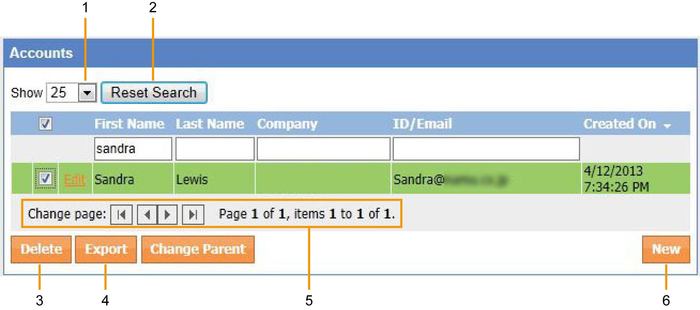
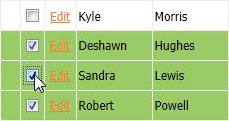
All accounts created until now can be viewed in a list. From among the created accounts you can search for accounts that meet specific conditions.
1.Login to My Account
2.Click Show accounts
3.The list of accounts created by the administrator is displayed
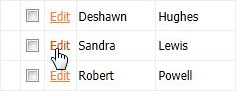
Did you know? Click Edit to display account details. |
4.Enter the text to be used in the search in the text field on the top of the list
5.Press the Enter key on the keyboard
For the search conditions, items such as the first name, last name, company name, or ID (mail address) can be set. By entering multiple search conditions, you can search for accounts that meet all the search conditions.
NOTE: Searches are not case sensitive. |
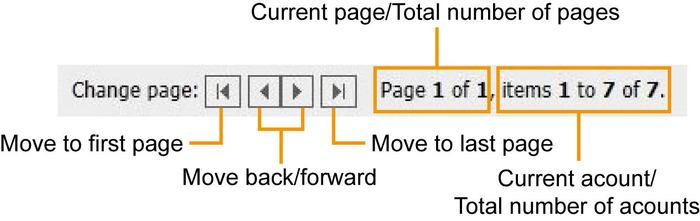
6.When the green gauge disappears, a list of the accounts that meet the search conditions is displayed
(1)Display range
Select how many accounts to display on a page.
(2)Reset Search
Reset the search results and display a list of all the accounts again.
(3)Delete
Delete the selected account.
(4)Export
Save the selected account information in CSV format.
(5)Change page
(6)New
Create a new account.
Related Meeting Articles...
Administrators can create new OmniJoin accounts within the range of the contracted license. Accounts created by the administrator can be displayed on Live Contact List/OmniJoin IM, which allows easier operations such as invitation to meetings.
NOTE: Meeting hosts must have an OmniJoin account, but online attendees can join the meeting without accounts just by clicking on a web link. |
NOTE: Before adding accounts, click Show accounts to check that no account exists. |
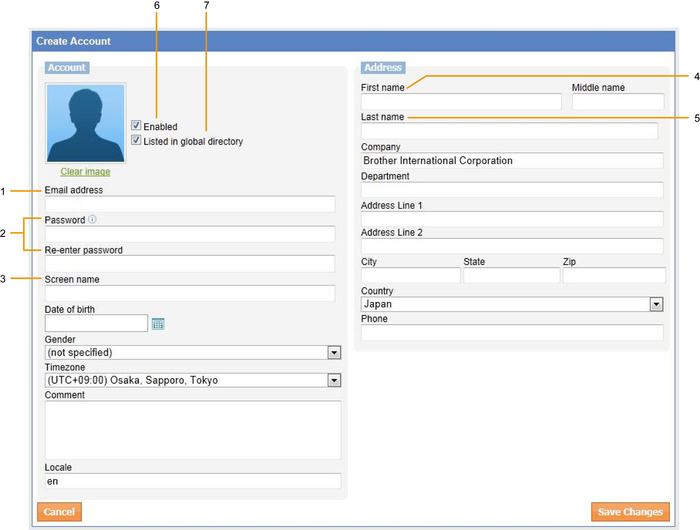
1.Login to My Account
2.Click Add account
3.Enter the registration information of the account
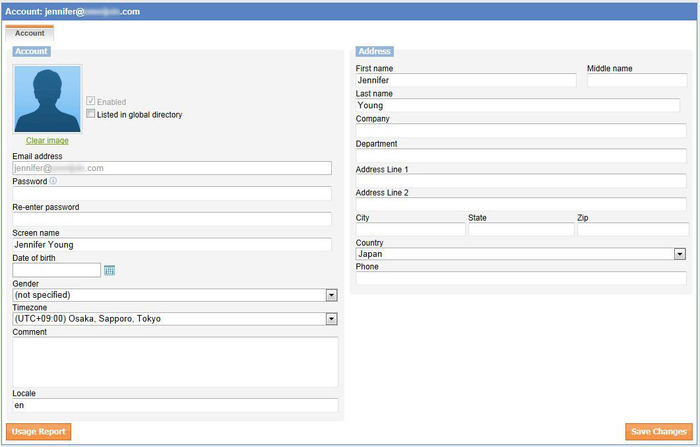
(1)Email address
The email address of the account. Email addresses used by other accounts cannot be used.
(2)Password/Re-enter password
The password used by the account. Min. 8 characters, at least 1 number or special character & at least one upper and lowercase are required.
(3)Screen name
The name displayed in Live Contact List/OmniJoin IM and OmniJoin meeting. This name is displayed when the account is used.
(4)First name
The first name of the account.
(5)Last name
The last name of the account.
(6)Enabled
Check to activate the account immediately. The account cannot be used if it is not checked.
(7)Listed in global directory
Check to make the account visible when searched for in a contact list addition search. However, if the account belongs to a group, regardless of whether "Listed" is checked or not, the account will be displayed when the group that it belongs to is displayed in the contact list.
NOTE: You must enter the items 1 to 5. Item 6, 7, or the other fields that are not indicated above will be ticked or entered as necessary. |
4.Click Save Changes on the bottom-right of the screen
5.The following message is displayed
6.To add the account to an existing group, click OK and proceed to step 7
If you do not add the account to a group, click Cancel. Now, addition of the account is completed.
NOTE: Even when Cancel is selected here, the account can still be added to a group at a later time. If you want to change the group that the account belongs to later, see Change the Groups that the Account belongs to (For Administrator Only). |
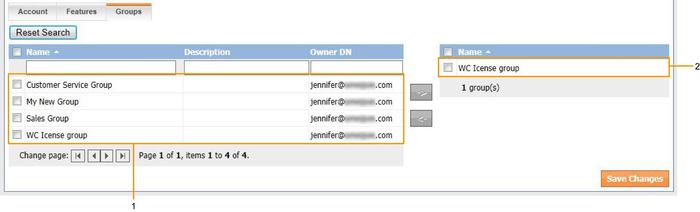
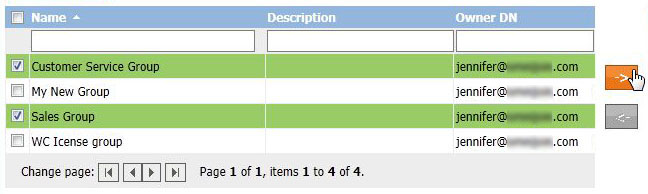
7.Group editing screen is displayed
(1)Group list that the administrator owns
(2)Group list that the account belongs to
8.From the group list (1), select the groups that you want the account to belong to
Multiple groups can be selected.
9.Click → in the center of the screen
10.When account editing is completed, click Save Changes on the bottom-right of the screen
Related Meeting Articles...
Administrators can delete unnecessary accounts.
NOTE: Deleted accounts cannot be restored. |
1.Login to My Account
2.Click Show accounts
3.Select the accounts that you want to delete from the list
Multiple accounts can also be selected at the same time as shown in the following.
4.Click Delete on the bottom-left of the screen
5.A confirmation screen is displayed
6.To delete accounts, click Yes
NOTE: When accounts are deleted, the meeting rooms that the account owns are also deleted. The deleted account is also removed from any groups that it belonged to. |
Related Meeting Articles...
Administrators can change the registered account information.
NOTE: The registered email address cannot be changed. If you want to change the email address, you must delete the current account and then create a new account with the new email address. |
1.Login to My Account
2.Click Show accounts
3.From the list, click Edit for the account whose registered contents you will change
4.Enter the registration information
NOTE: The password will be reset. Set a new password. |
5.When you have finished changing the registered information, click Save Changes on the bottom-right of the screen
Did you know? Apart from the above procedure, using CSV files is another way to change registered information. By using CSV files it is possible to change the registered information for multiple accounts at the same time. For more detailed information, see Add or change multiple Accounts simultaneously (For Administrator Only). |
Related Meeting Articles...
Administrators can change the group that the account belongs to.
1.Login to My Account
2.Click Show accounts
3.From the list, click Edit for the account whose registered contents you will change
4.Click the Groups tab
5.Group editing screen is displayed
(1)Group list that the administrator owns
(2)Group list that the account belongs to
6.From the group list (1), select the groups that you want the account to belong to
Multiple groups can be selected.
7.Click → in the center of the screen
8.When account editing is completed, click Save Changes on the bottom-right of the screen
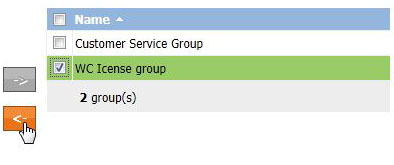
Remove groups that the account belongs to
1.From the list of groups that the account belongs to, tick a check box for the group to remove
Multiple groups can be selected.
2.Click → in the center of the screen
3.Click Save Changes on the bottom-right of the screen
Related Meeting Articles...
To protect security, an account's Contact List function and the functions of the meetings created by the account can be restricted. In accordance with a company's security policy or for other reasons, the advanced function such as Remote File Access for each account can be prohibited.
1.Login to My Account
2.Click Show accounts
3.From the list, click Edit for the account whose registered contents you will change
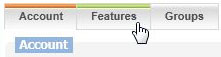
4.Click the Features tab
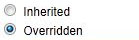
5.To restrict functions, select Inherited or Overridden
Inherited:
Configures the account to have the same function restrictions as the administrator. When Inherited is selected, the steps 6 to 8 cannot be performed. Proceed to step 9.
Overridden:
Configures the account to have custom settings. When Overridden is selected, proceed to step 6.
NOTE: Because administrator accounts can only be configured for custom function restrictions, when editing administrator accounts this selection screen is not displayed. |
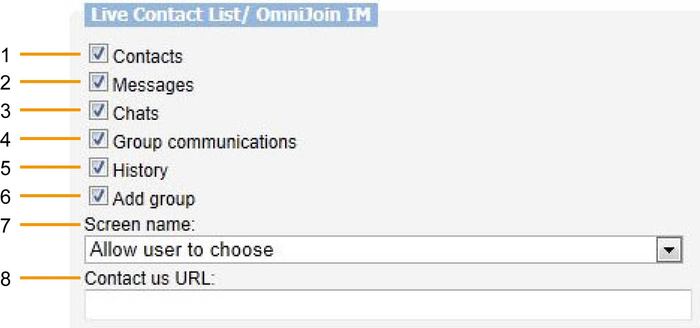
6.Configure the Live Contact List/OmniJoin IM function restrictions
(1)Contacts
Add the ability to add contacts.
(2)Messages
Add the ability to use messages in Live Contact List/OmniJoin IM.
(3)Chats
Add the ability for chat communications.
(4)Group communications
Add the ability to chat with multiple contacts simultaneously.
(5)History
Add the ability to view history.
(6)Add a group
Add the ability to organize contacts by groups.
(7)Screen name
Add the ability to set and modify the name shown in OmniJoin.
(8)Contact us URL
Add the ability to set a reference link as a method of contacting the account.
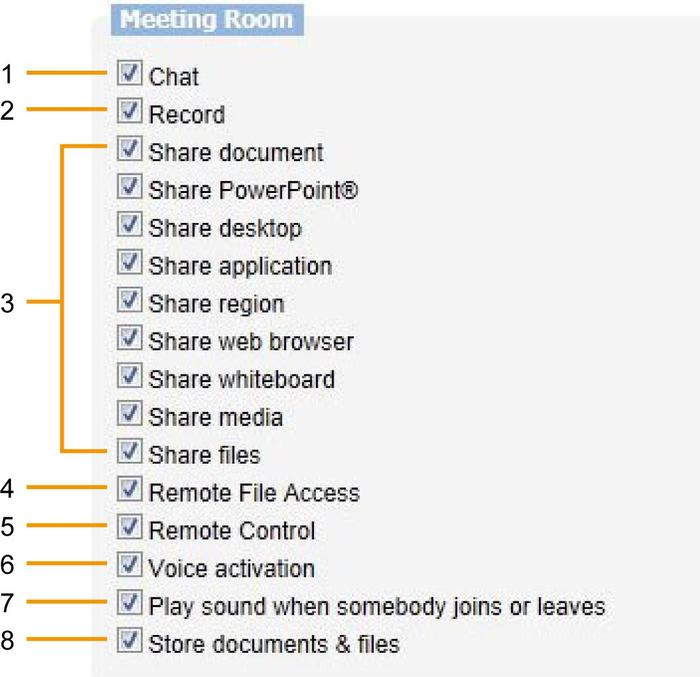
7.Configure function restrictions for the meetings created by the account.
NOTE: These function restrictions only apply to meetings hosted by the selected account. If users join a meeting created by a different account, you have the function restrictions that are configured for that meeting. |
(1)Chats
Add the ability to open up a chat box within the OmniJoin meeting.
(2)Record
Add the ability to record the OmniJoin meeting.
(3)Share
Add the ability to share document, PowerPoint®, desktop, application, region, web browser, whiteboard, media or files.
(4)Remote File Access
Add the ability to access files directly to a specific attendee.
(5)Remote Control
Add the ability to remotely control an attendee's system.
(6)Voice activation
Add the ability to enable voice when talking. If not activated, attendees must use Push-To-Talk for voice activation.
(7)Play sounds when somebody joins or leaves
Play a sound any time an attendee enters or leaves a meeting.
(8)Store documents & files
Add the ability to keep documents and files that are shared within meeting room to stay in the room after everyone has left. However, if a Host ends the meeting, everything will be deleted.
(9)Maximum bit rate
Add the ability to set the maximum bit rate of an attendee's video.
8.Configure the methods available to launch OmniJoin meeting from a browser
9.When editing for account restriction is completed, click Save Changes on the bottom-right of the screen
Related Meeting Articles...
By using CSV files, multiple accounts can be added together (account import function), and registered information can be changed.
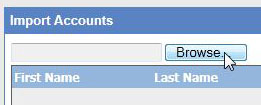
1.Login to My Account
2.Click Import accounts
3.Click Browse to select a CSV file
4.The results are displayed on the right edge of the screen
Edit:
When a used email account is specified for an existing account, the contents of the existing account will be overwritten. In this case, make sure to change the contents.
New:
When an unused email address is specified for an existing account, a new account will be added.
5.Confirm that there are no problems with file's contents, and then click Save Changes on the bottom-right of the screen
NOTE: When adding new accounts or changing existing accounts with CSV files, the same required items for when adding or changing accounts without CSV files must be entered in the CSV files. |
Related Meeting Articles...
Created account information can be exported to CSV files (account export function). The current account list can be recorded to a file. By using this file together with the account import function, the status of the account can be recorded and regenerated.
1.Login to My Account
2.Click Show accounts
3.Select the accounts that you want to export to a CSV file from the list
Multiple accounts can be selected at the same time as shown in the following.
4.Click Export on the bottom-left of the screen
5.Select where to save the CSV file
NOTE: For security reasons, the account export function does not export account passwords.
Related Meeting Articles...
The history report of meetings hosted by specified accounts can be viewed. When and what type of meetings were joined by accounts belonging to specified groups can be viewed in a list.
1.Login to My Account
2.Click Show accounts
3.From the list, click Edit for the account whose meeting report you will display
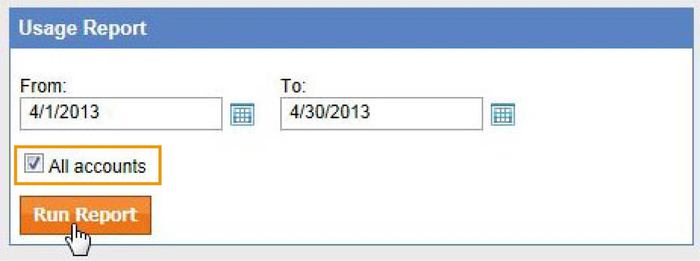
4.Click Usage Report on the bottom-left of the screen
5.Select the period of reports that you want to display and click Run Report
Did you know?The reports of all accounts can be displayed from the items of the report (For Administrator Only). |
6.Click a topic to see detailed attendance information for that particular meeting
7.To store your report in CSV format, click Export
For descriptions of Usage Report and Session Details Report, see My Reports.
Related Meeting Articles...
Administrators can create groups. Because groups separate Live Contact List/ OmniJoin IM list user displays into groups, they make it easier to manage users from different organizations and locations.
The following contents will guide you through how to create or delete groups, and manage them.
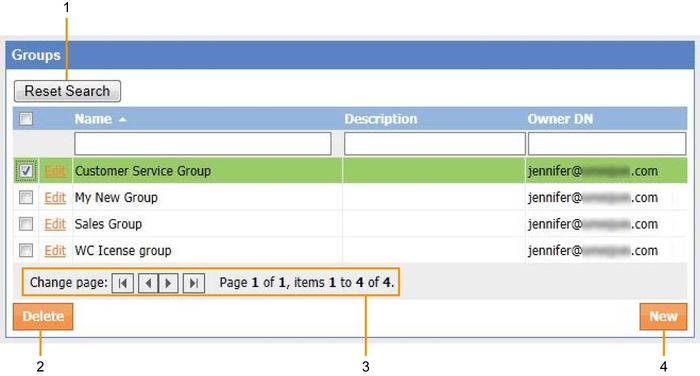
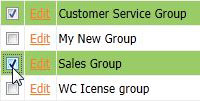
All groups created until now can be viewed in a list. From among the created accounts you can search for groups that meet specific conditions.
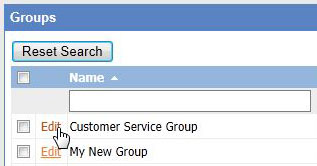
1.Login to My Account
2.Click Show Groups
3.The list of groups created by the administrator will appear
Did you know?Click Edit to display group details. |
4.Set conditions to search, and then press the Enter key on the keyboard
For search conditions, items such as Name, Description, and Owner DN of the group can be specified in the search condition. By entering search conditions for multiple items, you can search for groups that meet all the search conditions.
NOTE: Searches are not case sensitive. |
5.When the green gauge disappears, a list of the groups that meet the search conditions is displayed
(1)Reset Search
Reset the search results and display a list of all the accounts again.
(2)Delete
Delete the selected group.
(3)Change page
(4)New
Create a new group.
Related Meeting Articles...
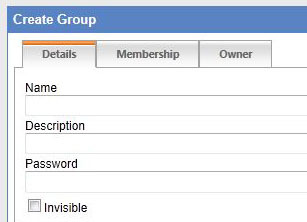
Administrators can add new groups.
1.Login to My Account
2.Click Show groups
3.Click New on the bottom-right of the list
4.Enter the group's information
Enter the detailed information for the group.
Name and Password must be entered. You can hide the group from members' contact lists by ticking Invisible check box.
Edit the accounts that belong to the group.
The accounts that belong to the group are highlighted in green. If you want to add an account newly to the group membership, click Add on the right of the account's ID/Email. To delete an account from the group, click Remove.
Owner:
The owner of the group is displayed.
NOTE: Even administrator cannot change the owner. |
5.When group editing is completed, click Save Changes on the bottom-right of the screen
Related Meeting Articles...
Administrators can delete unnecessary groups.
NOTE: Deleted groups cannot be restored. |
1.Login to My Account
2.Click Show groups
3.Select the groups that you want to delete from the list
Multiple groups can be selected at the same time as shown in the following.
Related Meeting Articles...
The group information can be changed.
1.Login to My Account
2.Click Show groups
3.From the list, click Edit for the group whose registered contents you will change
4.Click the Membership tab
5.Enter the registration information and add or remove memberships
6.When editing is completed, click Save Changes on the bottom-right of the screen
Related Meeting Articles...
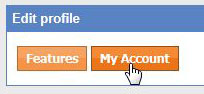
Modifications can be made to the logged in account through My profile.
1.Login to My Account
2.Click My Profile (tab)
3.Click My Profile (button)
4.Account editing screen is displayed
5.Edit the information that you want to change
For the description of each item, see Add Accounts (For Administrator Only).
6.When account editing is completed, click Save Changes on the bottom-right of the screen
Related Meeting Articles...
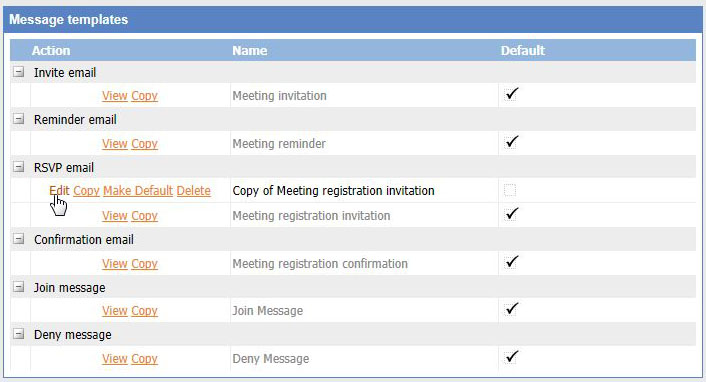
Message templates allow you to set up the default email messages relating to scheduled meetings. The message template has been unified between the Live Contact List/OmniJoin IM and My Account.
NOTE: The default template appears in gray text assigned to every meeting as the system template. System template cannot be modified in any way. If you want to use a different template for a particular meeting, make a copy of the original system template and edit it, then assign the new template. |
1.Login to My Account
2.Click My message templates
The template contains the verbiage of Invite mail, Reminder email, RSVP email, Confirmation email, Join message and Deny message.
3.Click Copy of the template to be changed
4.Click Edit to edit a message
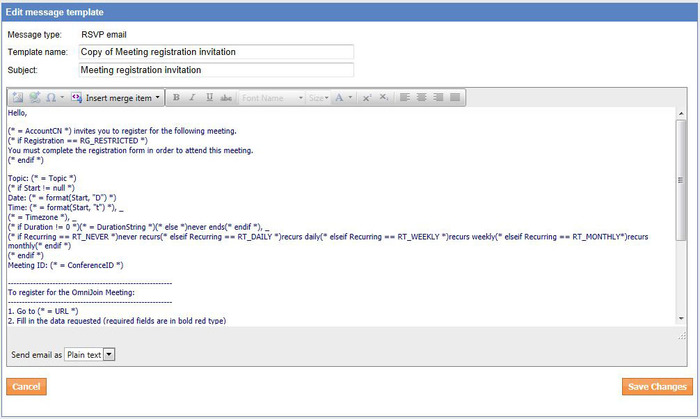
5.Template editing screen is displayed
1.Edit the template name, subject and body
The body must be modified with this text editor that includes codes. Be careful when modifying message templates.
2.Click Save Changes on the bottom-right of the screen
Did you know?You can make new message template as default by clicking Make Default. In addition, you can select the new template when creating a meeting. |
Did you know?Message templates can be also created by clicking Copy. To change, click Edit to display account details. There is also an option to delete a template once Copy is chosen. |
Apply the message template
NOTE: You cannot edit the message template when applying a message template to a meeting. If you want to edit the template, you must switch back to the My message templates view. |
1.Login to My Account
2.Click Schedule a meeting
3.Click Advanced
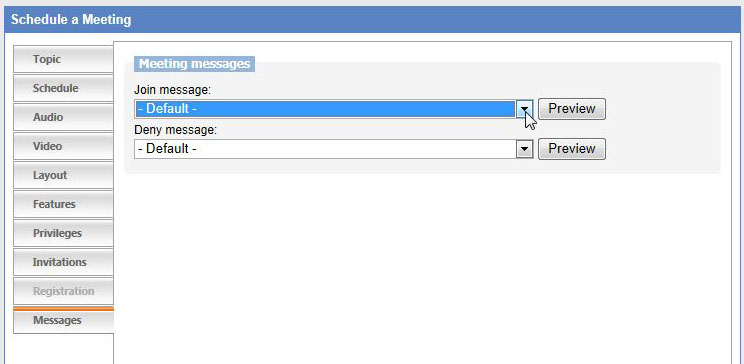
4.Click the Invitations tab to apply the Invite email, Reminder email, RSVP email1 and Confirmation email1 template
Click the Messages tab to apply the Join message and Deny message template.
5.Select the preferred template from the drop-down list
6.Click Save Changes on the bottom-right of the screen
1 These options are displayed when you select Registration in the Invitations tab.
Related Meeting Articles...
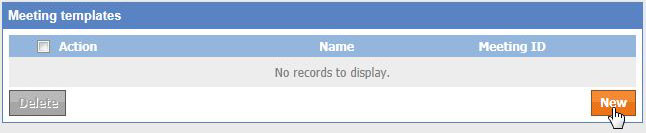
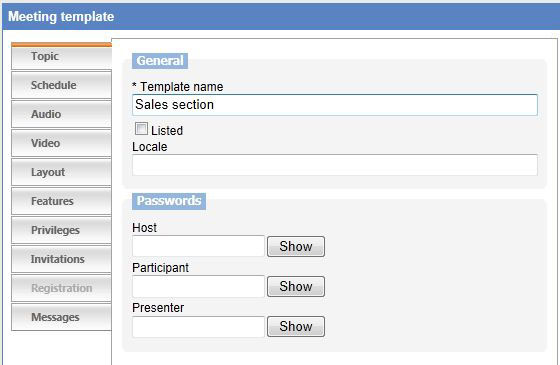
Meeting templates allow users to create a default template for newly created meetings. All aspects of a meeting can be set using the template feature.
1.Login to My Account
2.Click My meeting templates
3.Click New
4.Click respective tabs, then edit the information for the template
NOTE: Entering a Template name is required. |
5.Click Save Changes on the bottom-right of the screen
6.Click OK on the confirmation screen the template is read
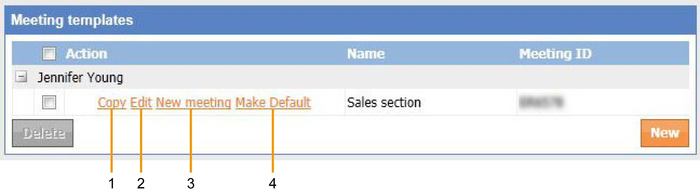
7.The template that you created will appear in the list
Did you know?By clicking each Action button next to the meeting name, you can do the following. |
(1)Copy
Copy the template and display it as a new one in the list.
(2)Edit
Edit the template.
(3)New
Schedule a new meeting using the selected template.
(4)Make default
Set the selected template as a default.
Delete the meeting template
After you check the box on the left side of the list, click Delete.
Related Meeting Articles...
The attendance status of other users can be checked
When clicked by the administrator, Active Usage shows which users are logged into the account and which meeting room they are using.
1.Login to My Account
2.Click Active Usage
CSV is a file format in which data are delimited by commas and is mainly used for data exchange between applications of different types. In My Account, usage of a CSV file is convenient to handle multiple pieces of account information at the same time. Account information can be managed easily by writing information about created accounts on the CSV file, editing it collectively by Excel® or a text editor and reading the data.
Garble may occur depending on the information written on the CSV file. In this case, change the character code to UTF-8 with a text editor (e.g. Notepad of Windows®) and read the information again. |
Account information written in a CSV file
First Name*
Last Name*
Company
E-Mail Address*
Display Name*
Password*
Timezone
Display
Address1
Address2
City
State
Zip
Country
Phone
Parent (the email address of the administrator who created this account)
Region
NOTE: The items with * must be entered. |