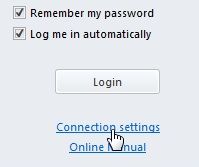
This section will help you get familiar with the Live Contact List/ OmniJoin IM interface.
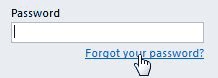
Should you ever forget your OmniJoin password, you can change it by clicking "Forgot your password?" on the login screen.
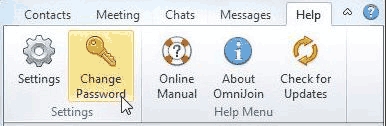
If you would like to change your password to something different or more memorable, you can use the change password option in the Help tab.
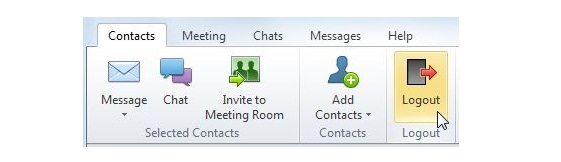
If for whatever reason, you wish to exit Live Contact List/ OmniJoin IM but also leave it running in the background, you can simply choose to logout.
If you want to logout and close OmniJoin completely, follow the steps in "Logout and exit".
Live Contact List/ OmniJoin IM will automatically change your status to "Away" if there is no mouse or keyboard activity after 10 minutes (by default). Your status will determine how you're alerted to messages, chats, file transfers and meeting invites from other contacts. You can easily change your status to "Online", "Busy", "Away" or "Appear offline"...
Take a look at
[State settings] to learn more about statuses and how to customize them.
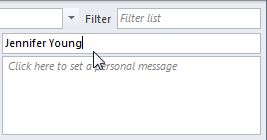
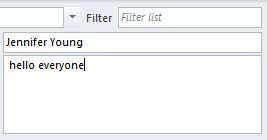
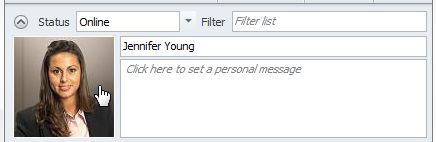
When you first create an OmniJoin account, you will be asked for a Display Name. This in most cases will be your first name and will be visible to other contacts in your list. Along with your display name, you can also choose to display a "personal message". This could be a simple "hello everyone" or something more thought provoking! Both of these can easily be changed...
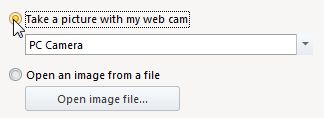
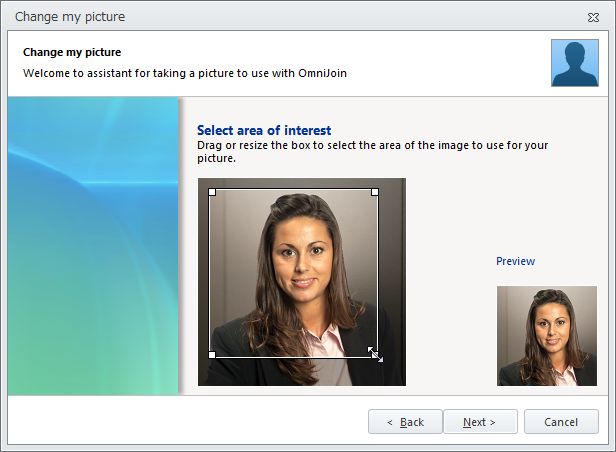
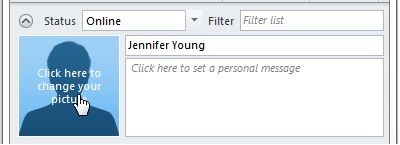
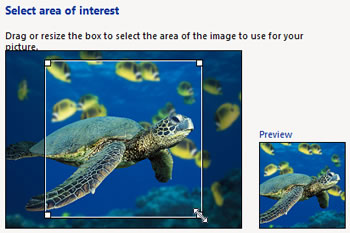
You can personalize your Live Contact List/ OmniJoin IM contact list display by adding a picture of yourself or indeed any picture you wish! This OmniJoin picture will be displayed to all of your contacts.
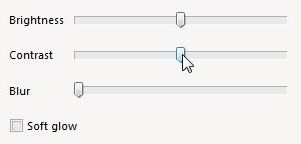
You can modify the brightness, contrast and sharpness of your existing OmniJoin picture by clicking on it and selecting the "Modify..." option. This picture will be displayed to all of your contacts.
Should you wish to remove your existing picture, you can do so by clicking on it and selecting the "Clear..." option.
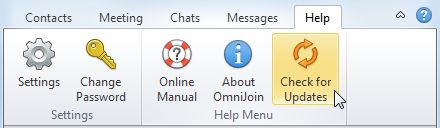
If you're keen to stay on top of any released updates, you can use the "check for updates" option to manually check for any new updates to OmniJoin.
There are many advanced settings in Live Contact List/ OmniJoin IM.
Includes various options for startup, look-and-feel, language, program updates, close confirmation and hotkeys.
(1)Automatically run on system startup
Selecting this option will start the Live Contact List/ OmniJoin IM when you start your computer.
(2)Minimize notification area on startup
Select this option to automatically minimize the Live Contact List/ OmniJoin IM when you start your computer.
(3)XML Logging
Ticking this option will allow the Live Contact List/ OmniJoin IM to log all communications to the OmniJoin cloud. This can be useful to help diagnose connection issues.
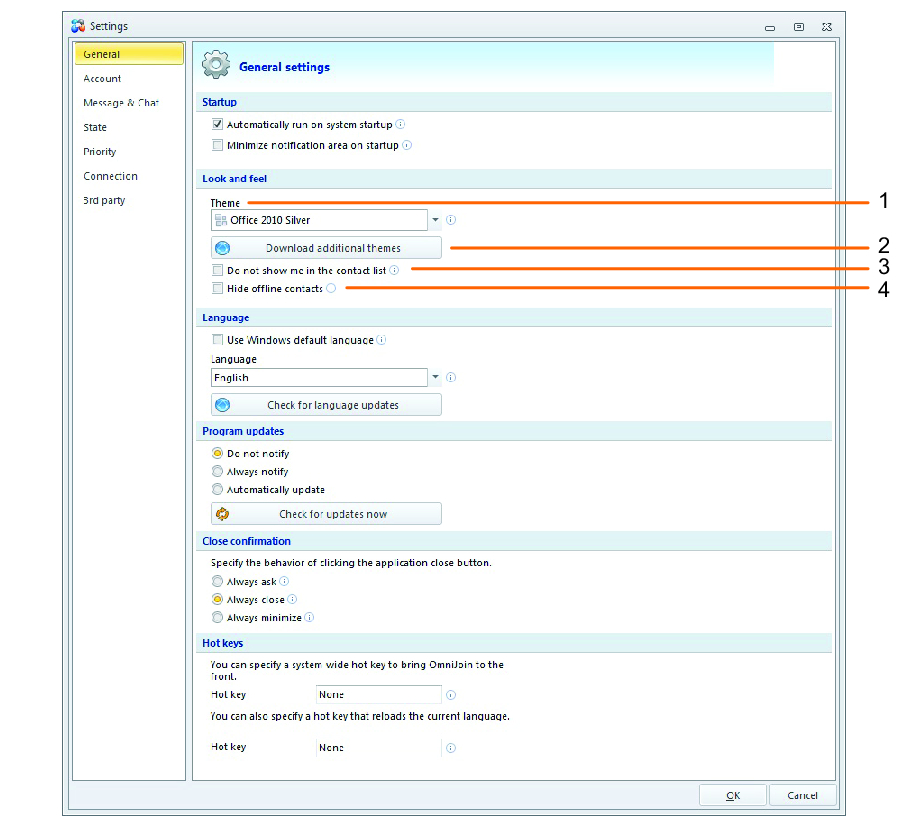
(1)Theme
Choose from either a blue, black or silver color scheme.
(2)Download additional themes
Downloads additional themes that can be used.
(3)Do not show me in the contact list
Tick this option of you want to hide yourself on the Live Contact List/ OmniJoin IM.
(4)Hide offline contacts
Tick this option to only display online or logged in contacts.
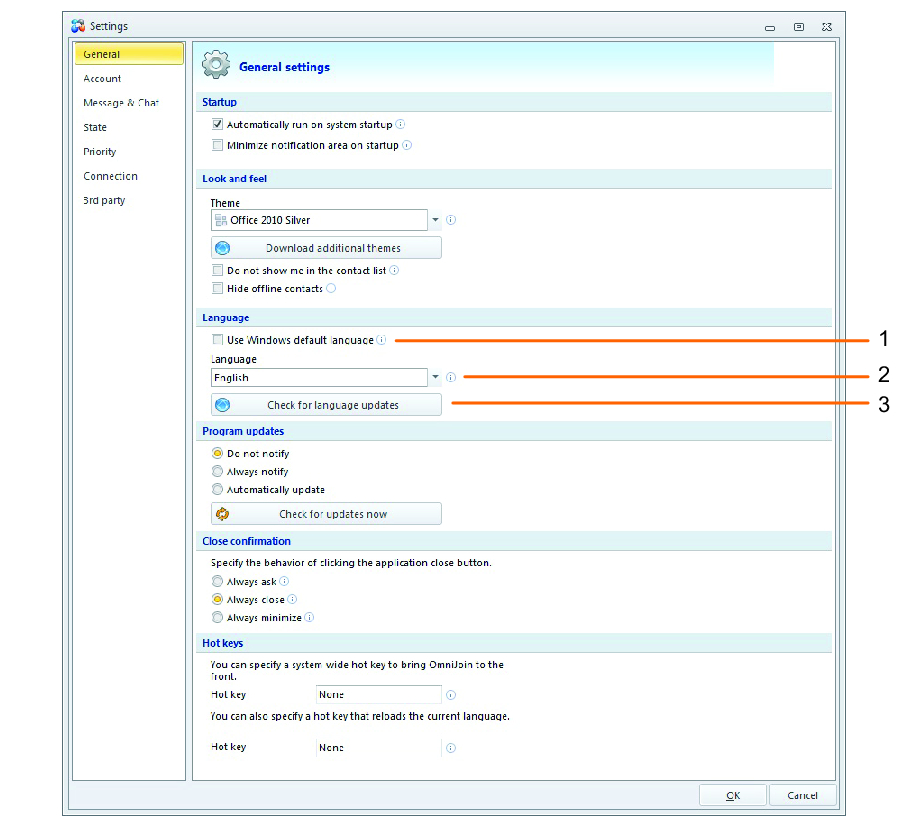
(1)Use Windows default language
Tick this option to use the same language as your computer.
(2)Manually choose language
To manually specify a language, untick the box and choose one from the list provided.
(3)Check for language updates
Allows you to dynamically update OmniJoin with new languages (when available).
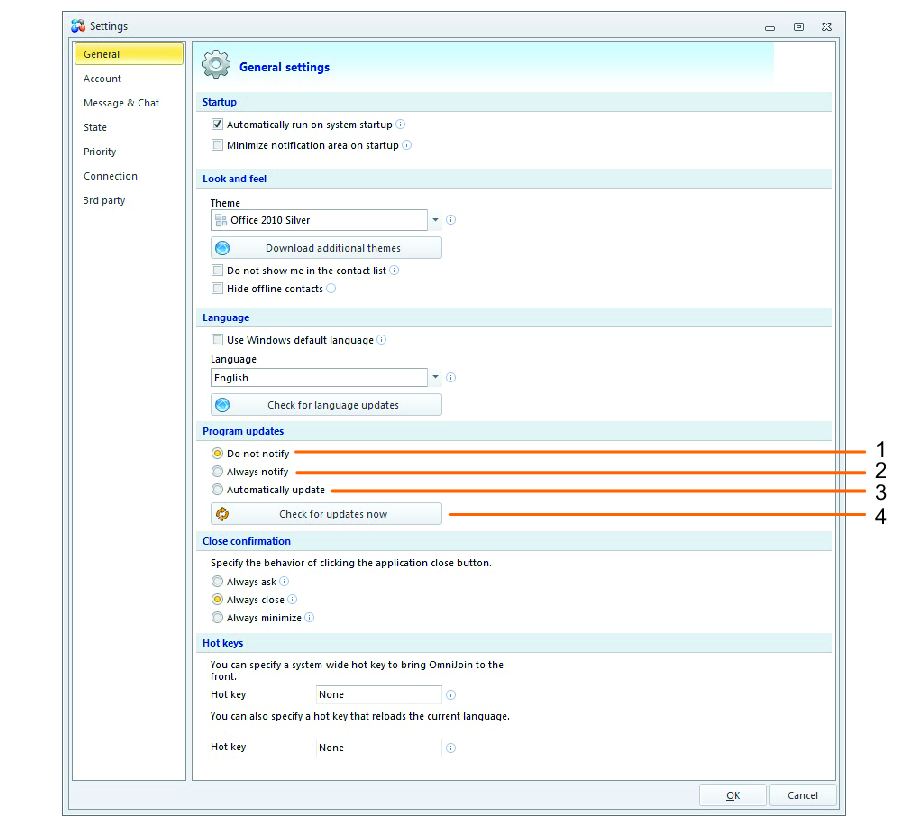
(1)Do not notify
Select this option to ignore any notices of available updates.
(2)Always notify
OmniJoin will alert you whenever updates are available.
(3)Automatically update
Selecting this option will allow OmniJoin to automatically update itself when new updates are released.
(4)Check for updates now
Click this button to manually check for any OmniJoin updates.
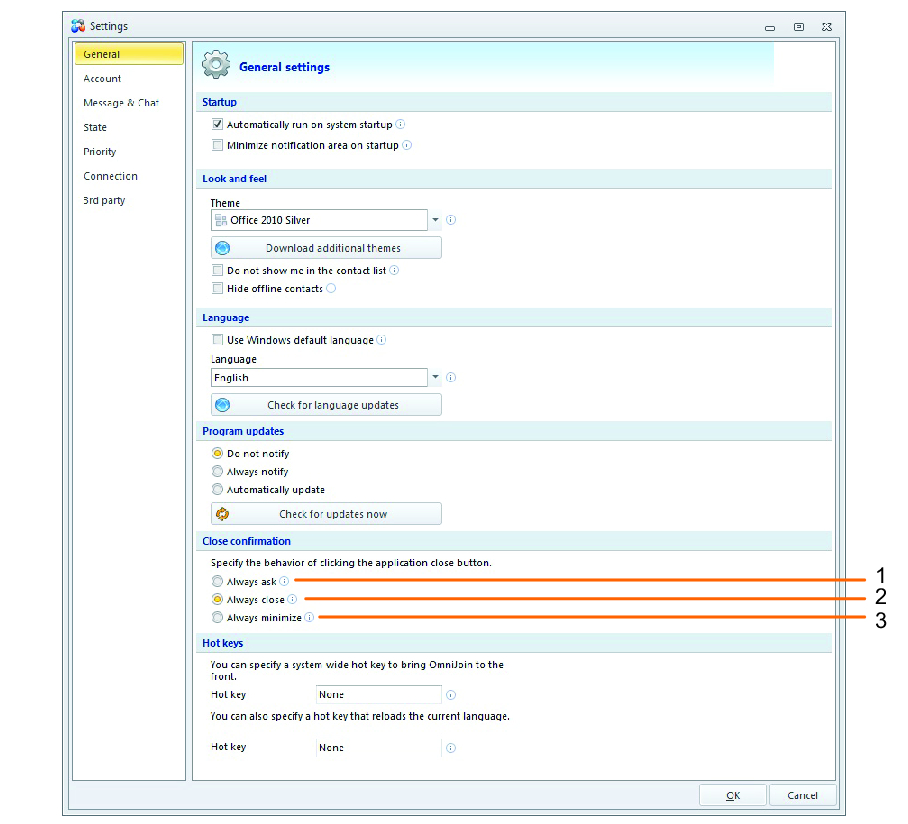
(1)Always askWill prompt you every time you click the

button - if you want to minimise or close the Live Contact List/ OmniJoin IM.
(2)Always close
Choosing this option will logout & exit the Live Contact List/ OmniJoin IM when clicking the close button.
(3)Always minimize
When clicking close, the Live Contact List/ OmniJoin IM will always minimise itself to your notification area / system tray and will remain logged in.
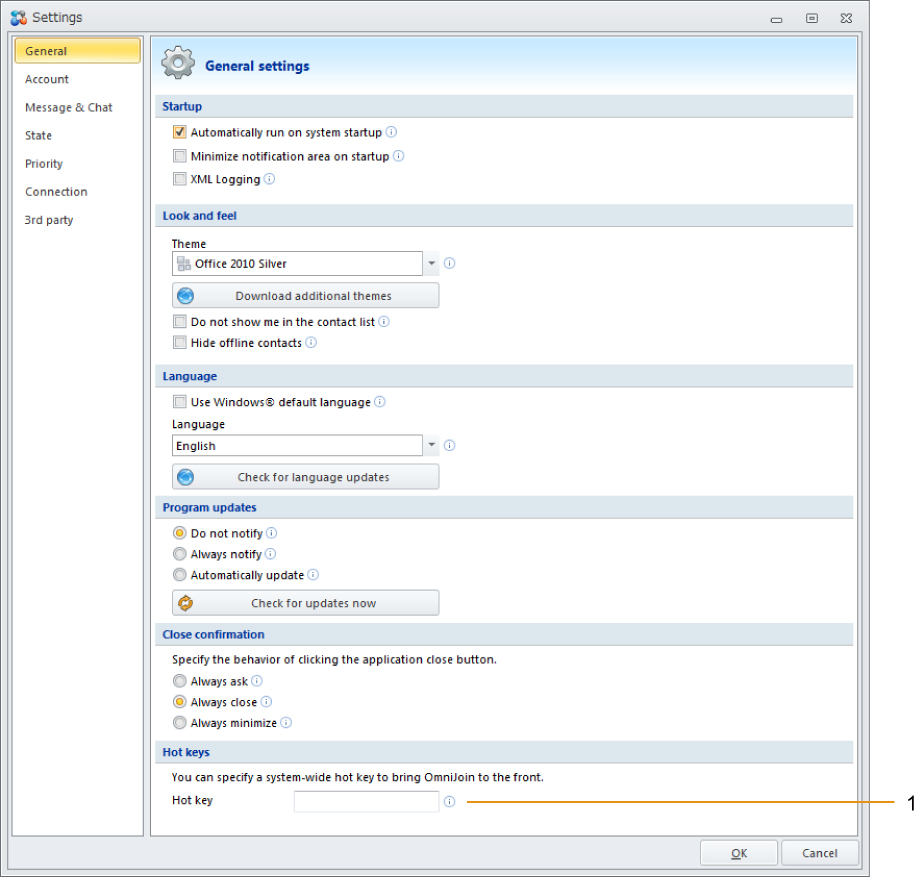
Specify convenient shortcut keys for using Live Contact List/ OmniJoin IM.
(1)Live Contact List/ OmniJoin IM HotKey
Specifying a unique key combination to use, will bring Live Contact List/ OmniJoin IM to the front of your screen.
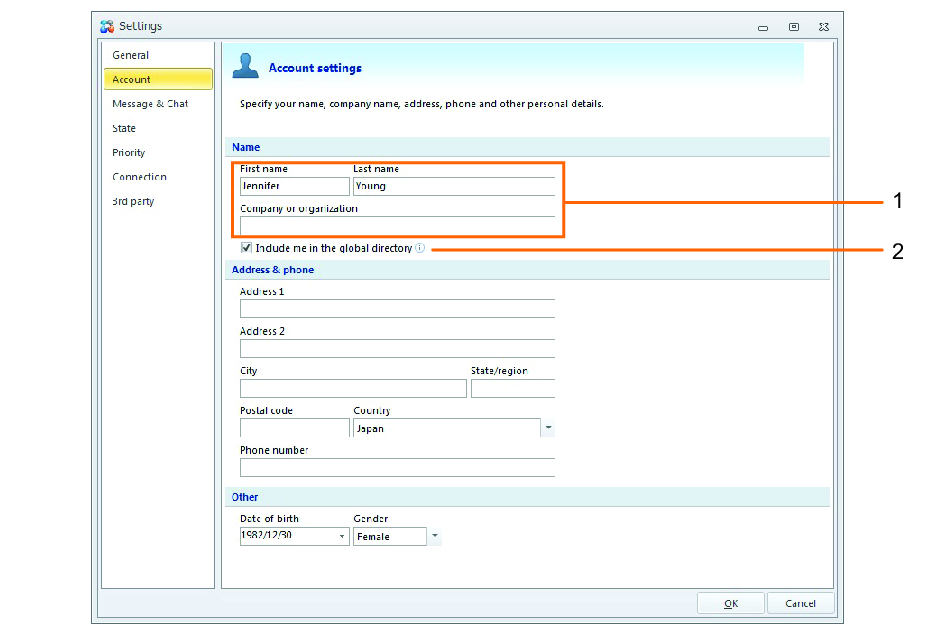
Specifies your OmniJoin profile information, such as name, company, address and whether or not you are publicly listed on the OmniJoin global directory, so that other OmniJoin users can search and find you.
(1)First name, Last name & Company
Provides you with the option to enter information such as your first name, last name and company.
(2)Include me in the global directory
By unticking this box, you can hide yourself from other OmniJoin users when they use the Add Contacts function.
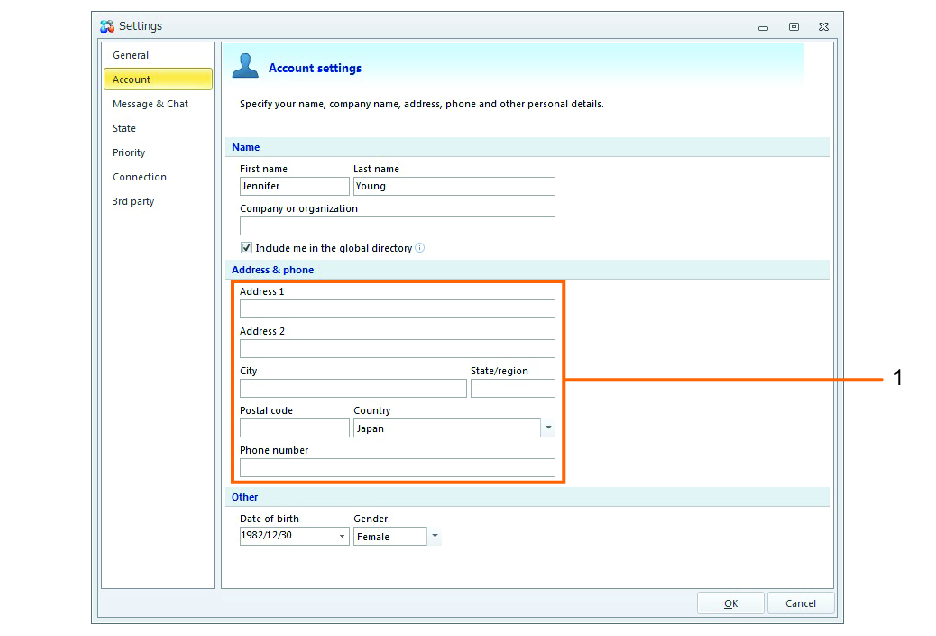
(1)Address & phone
Additional information can be supplied if you wish, such as your address, country and phone number.
This information (while not required) can be useful for other users who want to try and find and add you to their own contact list.
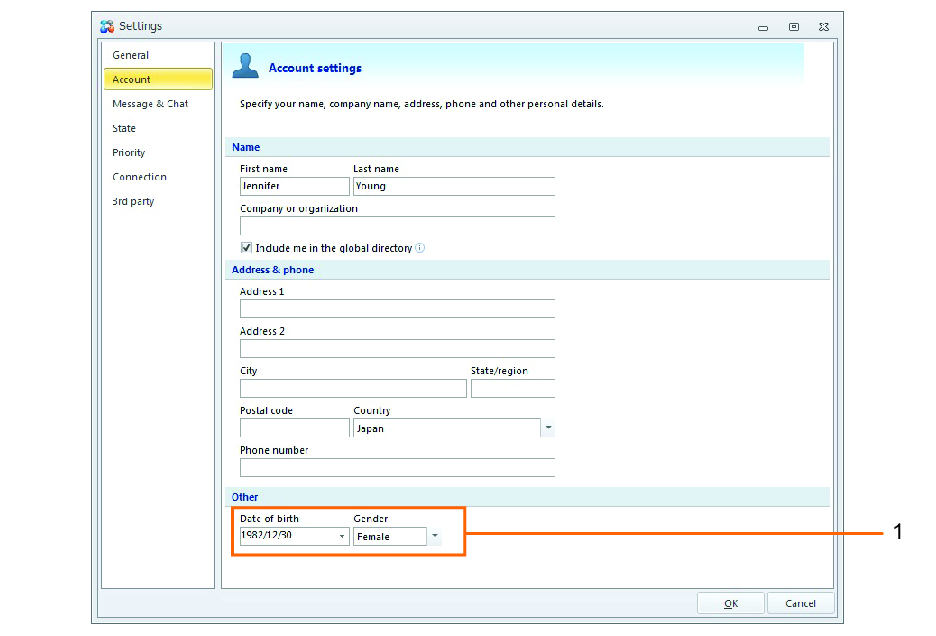
(1)Date of birth & Gender
You can also specify your date of birth and gender if you wish.
This information (while not required) can help with other users who are trying to find and add you to their own contact list.
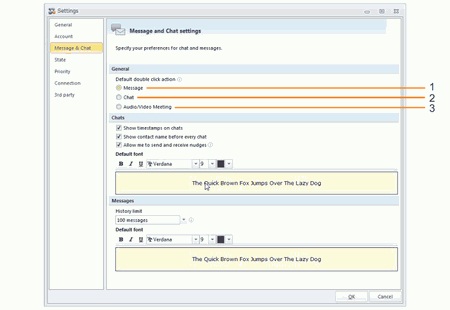
You can specify the operation that is performed when you double-click a member of your contact list. From here, you can also customize chat and message fonts and how many messages can be retained.
(1)Message
Allows you to create a new message whenever you double-click on a contact.
(2)Chat
Allows you to start a new chat whenever you double-click on a contact.
(3)Audio/ Video Meeting
Allows you to start a new meeting whenever you double-click on a contact.
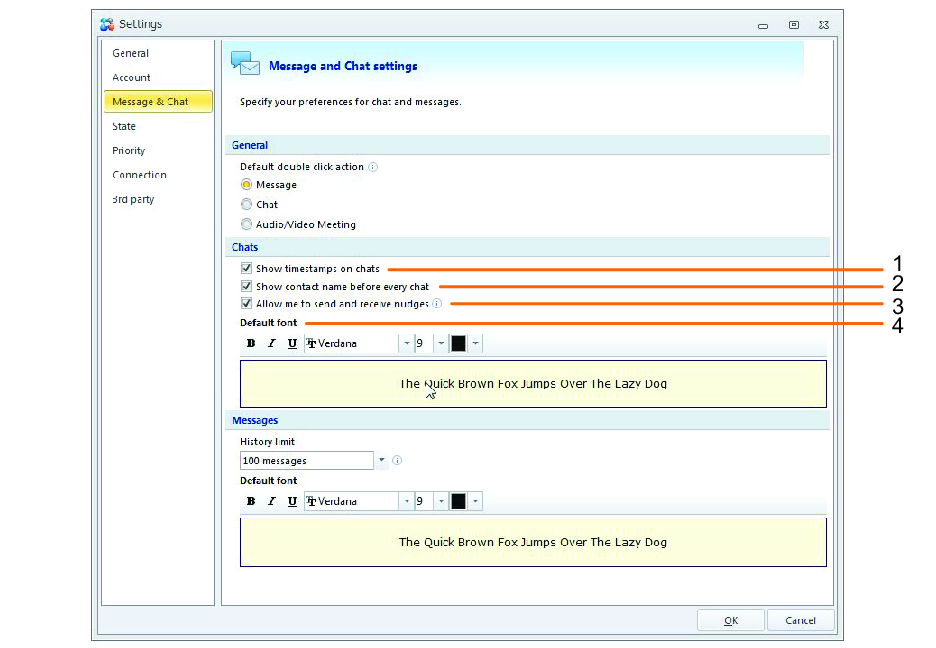
(1)Show timestamps on chats
When sending chats, the time of the message will be displayed next to it.
(2)Show contact name before every chat
When sending chats. your name and the time of the message will be displayed next to it.
(3)Allow me to send and receive nudges
Nudges are a way of grabbing a users attention when in a chat. With this option selected you can both send and receive nudges to contacts in a chat.
(4)Default font
You can customize the type. size and color of the font used.
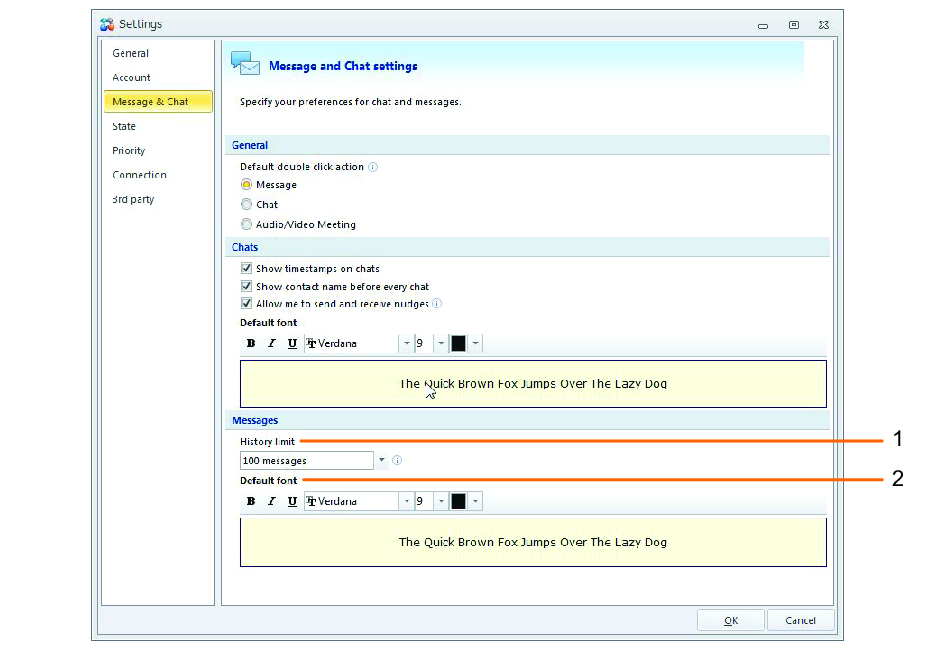
(1)History limit
You can choose how many messages are stored by your Live Contact List/ OmniJoin IM.
(2)Default font
You can customize the type, size and color of the form used.
Provides you with the ability to fine-tune how statuses and messages are displayed when your
[status] is either Online, Away or Busy.
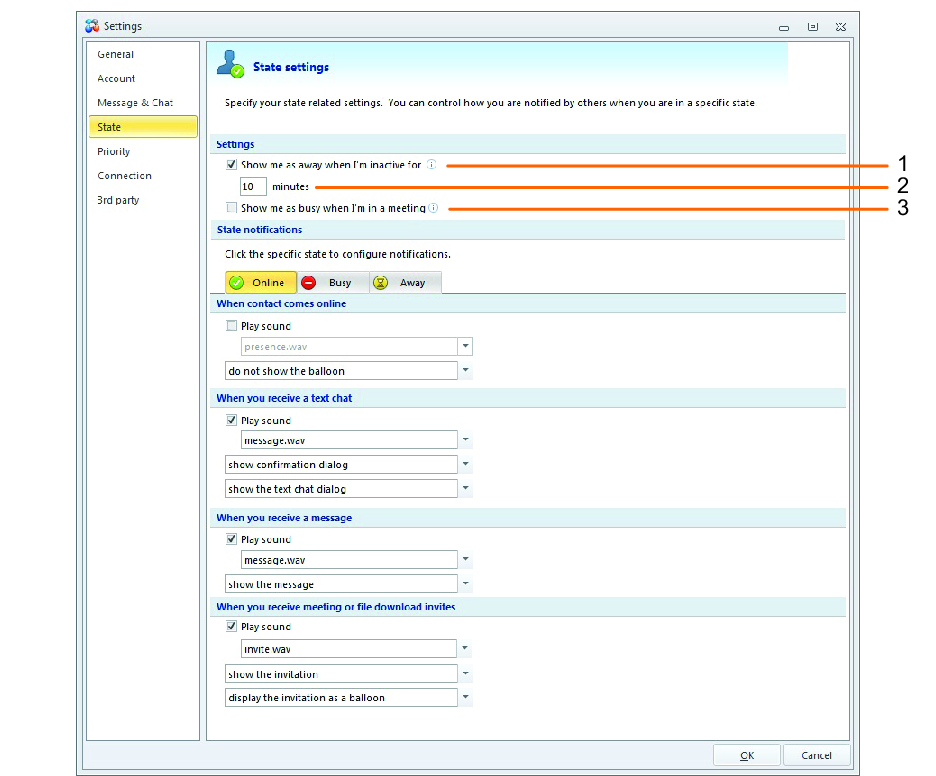
(1)Show me as "away"...
Automatically sets your status to "Away" if there is no mouse or keyboard activity within a specified amount of time.
(2)Minutes... (time until "Away" is displayed)
Specify the number of minutes before OmniJoin changes your status to "Away".
(3)Show me as "busy"...
Automatically sets your status to "Busy" when you're in the OmniJoin meeting.
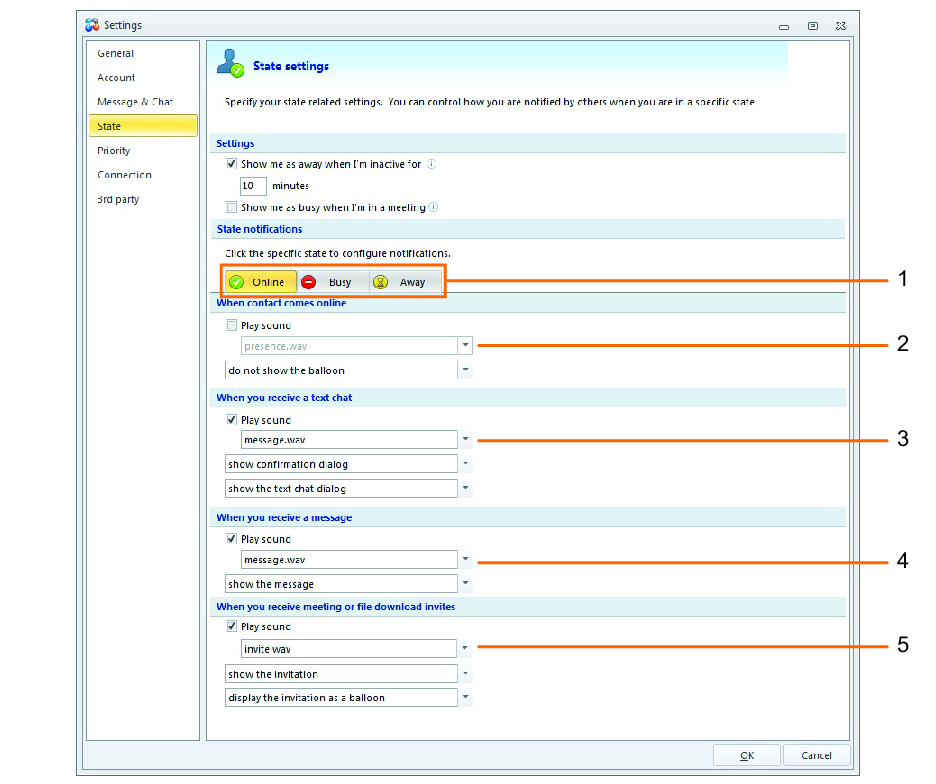
State notifications allow you to customize how you are notified when you receive a chat, message or meeting invitation.
These can be fine-tuned based on your
[status] (Online, Busy and Away).
(1)State notification
Select a state to change to customize it's notification options.
(2)Contact online / offline
You can specify a sound to be played and/or a balloon to be displayed for a defined number of seconds.
(3)Receive chats
You can choose to have a sound to be played and/or a balloon to be displayed for a period of time. Alternatively you can simply tell it to open up the chat immediately.
(4)Receive messages
You can choose to have a sound to be played and/or a balloon to be displayed for a period of time. Alternatively you can simply tell it to open up the message immediately.
(5)Meeting invitations
You can specify a sound to be played and/or a balloon to be displayed for a number of seconds.
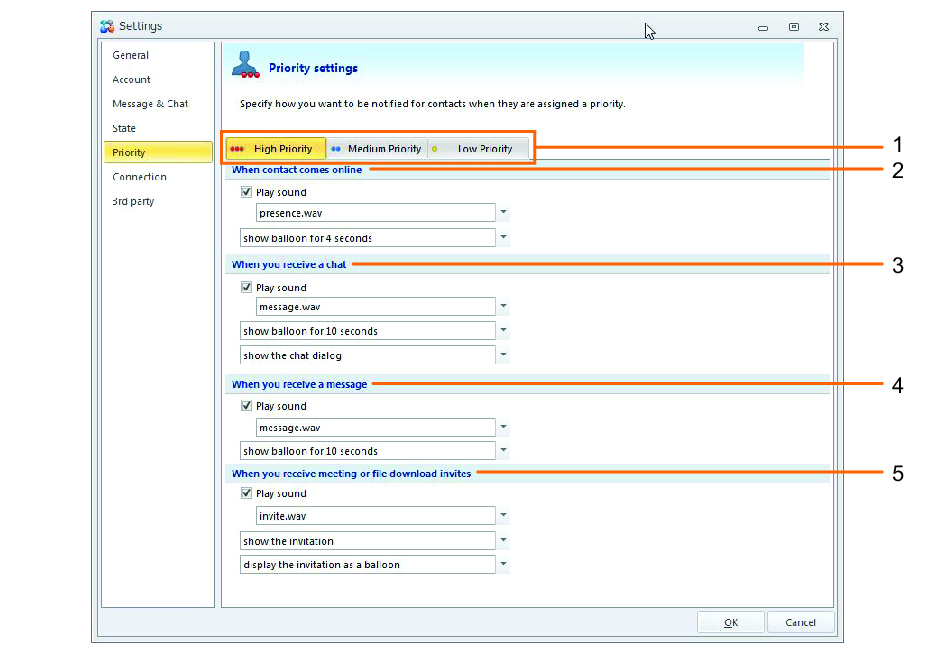
When you have set contacts with priorities, you can customize High, Medium, Low or Custom priority notifications here.
Similar to that of "state notifications", these allow you to customize how you are notified when you receive a chat, message or meeting invitation from a "prioritized contact".
These can be fine-tuned based on your
[status] (Online, Busy and Away).
(1)Priority notification
Select a priority to customize its notification options.
(2)Contact online / offline
You can specify a sound to be played and/or a balloon to be displayed for a defined number of seconds.
(3)Receive chats
You can choose to have a sound to be played and/or a balloon to be displayed for a period of time. Alternatively you can simply tell it to open up the chat immediately.
(4)Receive messages
You can choose to have a sound to be played and/or a balloon to be displayed for a period of time. Alternatively you can simply tell it to open up the message immediately.
(5)Meeting Invitations
You can specify a sound to be played and/or a balloon to be displayed for a number of seconds.
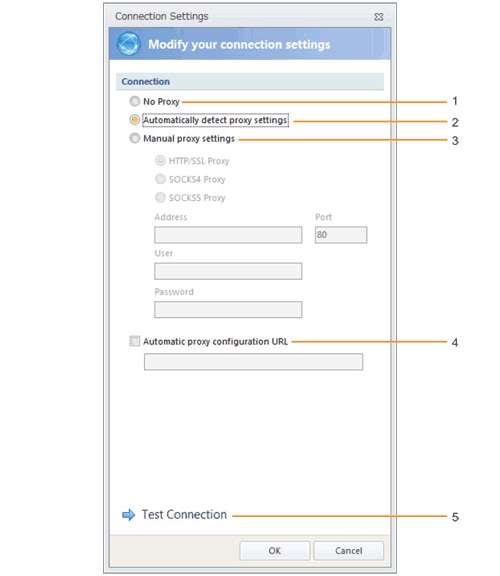
OmniJoin will attempt to connect to the Internet automatically. However, should you wish to manually specify a connection method (direct, HTTPS, proxy) - you can do so here.
(1)No Proxy
Instructs OmniJoin, not to use any proxy settings.
(2)Automatically detect proxy settings
Selected by default. OmniJoin will try and automatically use settings defined in your web browser.
(3)Manual proxy settings
You can manually enter specific proxy settings and authentication details to use when meeting.
(4)Automatic proxy configuration URL
Select this option to use any pre-existing proxy script on your network, such as a PAC file.
OmniJoin video meeting is compatible with most Microsoft® Office applications. OmniJoin allows you to integrate add-ins such as schedule meeting and quick meeting tool buttons with Office applications such as Outlook®, Word®, Excel®, PowerPoint®, Access®, Project®, Visio®, Publisher® and FrontPage®.
(1)Microsoft® Office Integration
Tick the applications that you want to integrate the add-ins with.
 NOTE: The integrated add-ins will be available the next time you start the corresponding Office application. NOTE: The integrated add-ins will be available the next time you start the corresponding Office application. |
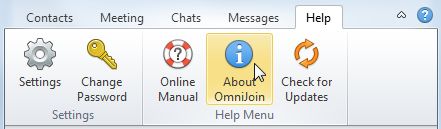
If you're ever asked what revision level or release number of OmniJoin you are using, click About OmniJoin.
If you experience problems logging in, it may be worthwhile checking the connection settings in OmniJoin. On many corporate networks, there are often security devices that can sometimes require authentication. OmniJoin allows you to specify these here.
1.No Proxy
Instructs OmniJoin, not to use any proxy settings.
2.Automatically detect proxy settings
Selected by default. OmniJoin will try and automatically use settings defined in your web browser.
3.Manual proxy settings
You can manually enter specific proxy settings and authentication details to use when meeting.
4.Automatic proxy configuration URL
Select this option to use any pre-existing proxy script on your network, such as a PAC file.
5.Test Connection
You can click "Test Connection" to test your connection settings.
Live Contact List/ OmniJoin IM provides three ways to view your contacts. The "Regular view" will show a simplified list of all your contacts. The "Picture view" will show each contacts' picture next to their name in the Contact List. These two views are described in detail below.
Live Contact List/ OmniJoin IM will display a simplified list without displaying contacts' pictures (example below).
Live Contact List/ OmniJoin IM will display a list with contacts' pictures and shortcuts to send a message or chat (example below).
Contacts are people listed in your Live Contact List/ OmniJoin IM. Once a person has been added as a contact (and they've approved you!) you can start communicating with them by chat, message or even a web meeting!
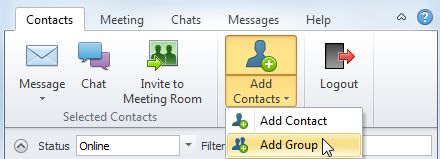
The following contents will guide you through how to add, set priority levels and remove contacts.
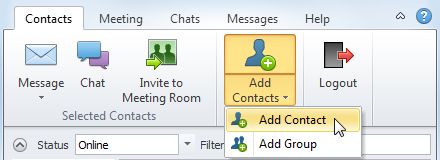
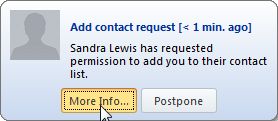
Adding contacts is the way to build up a list of people in OmniJoin. Once a person has been added as a contact (and they've approved you!) you can start communicating with them by chat, message or even a web meeting!
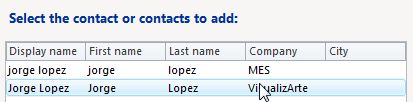
Only user who checked Include me in the global directory in Account Settings will be subject to search. |
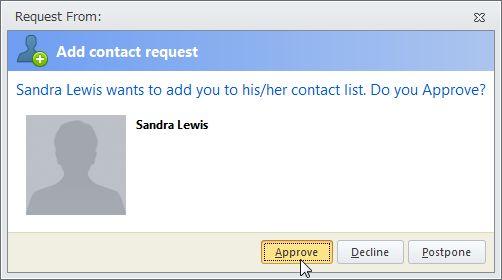
They can click on "More Info..." to then either Approve, Decline or Postpone your add contact request (sample below).
If they click on Approve, they'll be added to your Live Contact List/ OmniJoin IM.
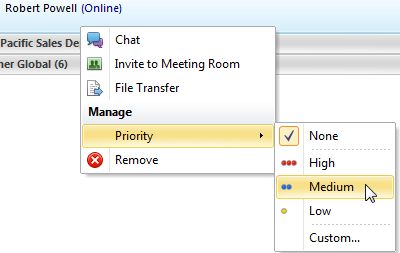
Setting a higher priority is useful for ensuring that you're alerted to a message from your manager, team leader or any other important contact.
NOTE: By default, when your status is set to "busy", you will not be alerted to any messages, chats, file transfers or meeting invites.Any [unread messages] or [old file transfer requests] can be viewed by selecting the Meeting tab. |
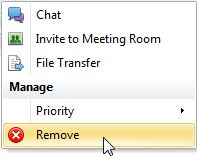
Should you ever need to remove a contact, you can choose to by right-clicking on their name.
NOTE: You can only remove a contact if they are not listed in a group. |
For those who prefer a contact list which just displays online or logged in contacts, you can choose to enable "Hide offline contacts".
Groups allow you to keep your contact list organized. Groups can be useful to manage different departments, different sites and offices, even different customers. Groups are also password protected so that only authorized people can join them.
The following contents will guide you through how to add, set priorities, remove and manage groups.
Groups allow you to keep your Live Contact List/ OmniJoin IM organized. Groups can be useful to manage different departments, different sites and offices, even different customers. Groups are also password protected so that only authorized people can join them.
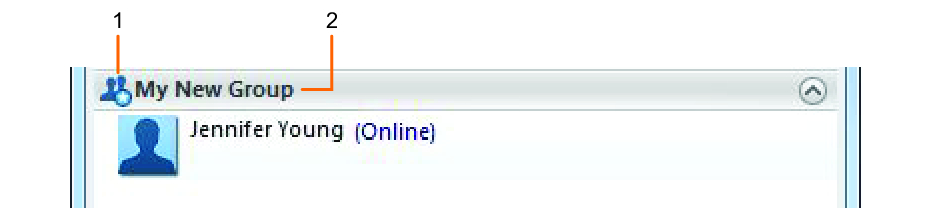
(1)Star icon
The "star" icon denotes that you are the owner of the group.
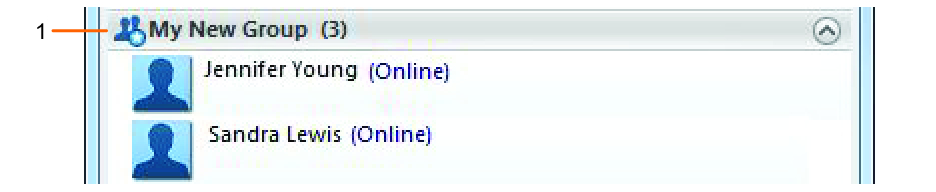
(2)Group name
The title or name of the group and the number of contacts within it.
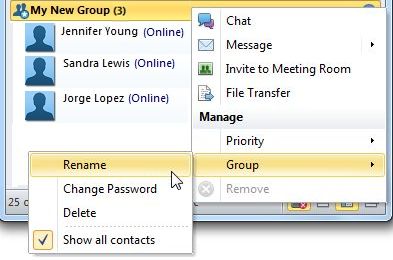
Should you wish to rename a group that you've already created, you can do so by following the steps below.
NOTE: You can only rename a group if you're the owner of it (or person who created it). |
(1)Ownership of a group is denoted by a "star" icon...
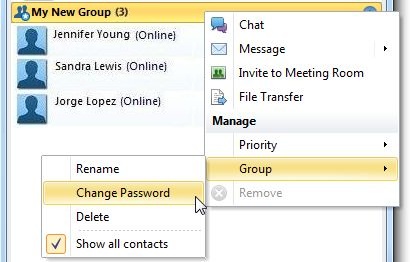
If at any stage you wish to change a password for a group you've created, you can easily do so by right-clicking on the group header.
NOTE: You can only change a group's password if you're the owner of it (or person who created it). |
(1)Ownership of a group is denoted by a "star" icon...
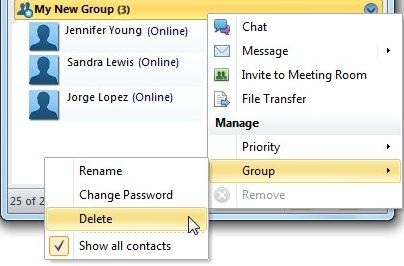
If at any stage you wish to delete a group from your Live Contact List/ OmniJoin IM, you can easily do so by right-clicking on the group header.
NOTE: You can only permenantly delete a group if you're the owner of it (or person who created it). |
(1)Ownership of a group is denoted by a "star" icon...
NOTE: Deleting a group will permenantly delete it from OmniJoin! The group will be deleted from your own Live Contact List/ OmniJoin IM and from the OmniJoin global directory. Other users will NOT be able to use it and join it. To remove a group from your own Live Contact List/ OmniJoin IM, [click here]. |
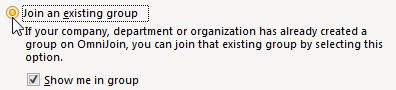
You may get asked to join a group on OmniJoin. This could be a group of your company office or site, a group of customers or simply just a group of friends.
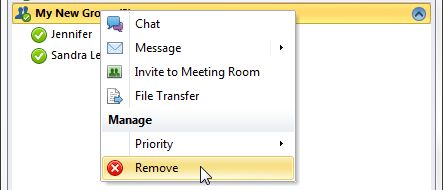
If at any stage you want to remove a group from your Live Contact List/ OmniJoin IM, you can do so by right-clicking on the group header.
NOTE: You can only remove groups that you do not own. If you are the owner of a group, you can choose to [delete it permanently]. |
NOTE: Removing a group will not permanently delete it!The group will be removed from your own Live Contact List/ OmniJoin IM but will remain listed on the OmniJoin global directory. Other users will still be able to use it and join it.To permanently delete a group from OmniJoin, [click here]. |
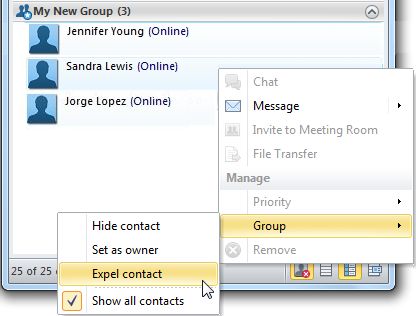
If the need arises to expel a contact from a group, the group owner can do so.
NOTE: You can only expel a contact from a group that you own. |
(1)Ownership of a group is denoted by a "star" icon...
OmniJoin allows you to create and manage as many meetings as you wish. You can also create templates for specific meetings.
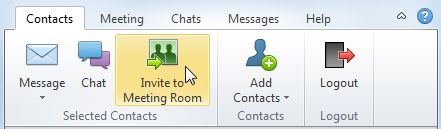
You can easily invite an OmniJoin contact into your web meeting in just a couple of clicks.
The following contents will guide you through how to create meetings, templates and manage them.
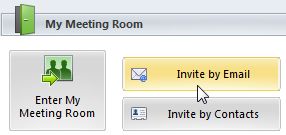
For simplicity, OmniJoin will set you up with your own personal meeting room. This room is used whenever you invite contacts or groups into a web meeting. However, you can change this to another room if required.
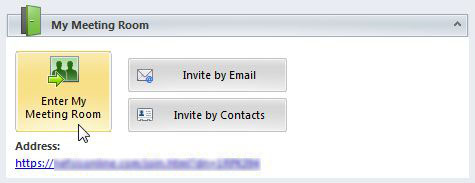
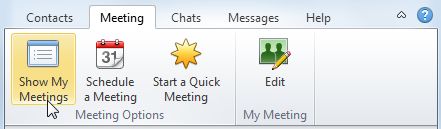
To enter your own personal meeting room, just visit the Meeting tab.
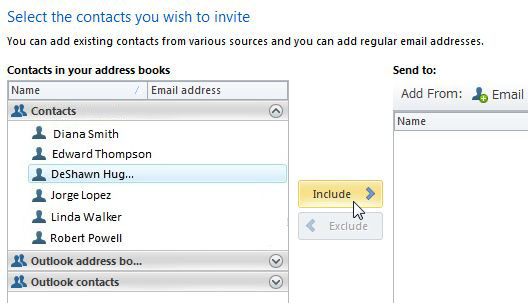
Inviting a contact to join you in your personal meeting room is easy! Just follow these steps below...
Did you know? You can send invitations to anyone who isn't an Outlook® or OmniJoin contact by clicking on the "Email" button. |
Did you know? You can edit the invitation email that will be sent, by clicking "Edit and Send" instead. |
Alternatively... You can also invite other people by right-clicking on a contact then select Invite to Meeting Room. |
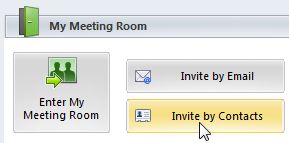
Should you wish to invite someone who isn't on your Live Contact List/ OmniJoin IM, you can invite them via email.
Your personal meeting room is automatically created when you login for the first-time. However, if you've created additional meeting rooms, you can change your personal meeting room to a different one.
(1)My Meeting Room
Your personal meeting room will be displayed in bold text and cannot be deleted.
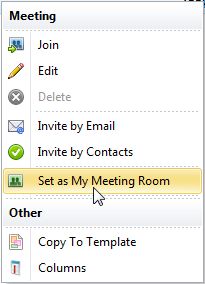
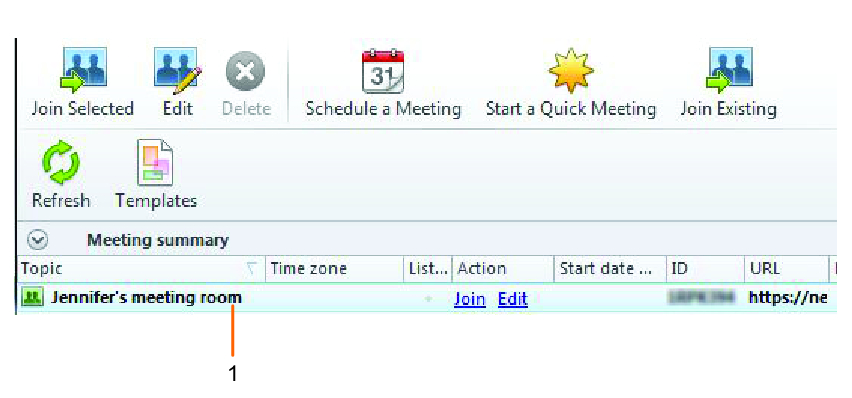
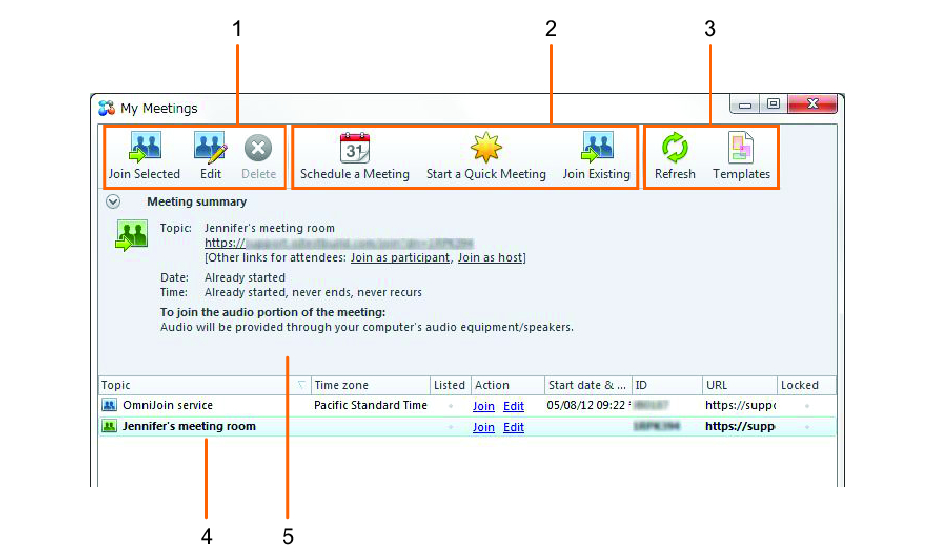
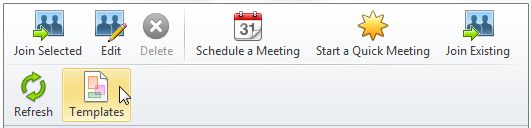
OmniJoin allows you to create and manage as many meetings as you wish. You can view, create, edit or delete any meetings you own by following the steps below.
(1)Selected Meeting Options
These options apply to the meeting that is selected in the list below.
(2)General Options
Create a new scheduled or quick meeting or join an existing one by using these options.
(3)Refresh & Templates
Refresh will update the meeting list below. Selecting Templates will open up the meeting template window.
(4)My Meeting List
Any meetings started or created by you will be displayed in this list. The bold meeting is your default "My Meeting Room".
(5)Meeting Summary
Clicking on the meeting will display a summary of its details, such as topic, start date, time and various links you can copy and send out to your attendees.
Generally most users will find one meeting room enough for day-to-day activities. However in some cases, you may want to schedule a meeting so that it starts at a specific time and date.
Have contacts in address books? You can click Edit Contacts to quickly add people from your local address book or Microsoft® Exchange (if available). |
Alternatively... You can leave the Invites section blank and invite people once in the meeting itself by using the "[Start page]". |
Once created, you as the owner can access the meeting room at any time, but importantly the meeting will remain locked for your attendees. This can be useful if you want to access the meeting in advance to prepare your PowerPoint® files or documents.
Did you know? If you want the meeting to start earlier, join the meeting and [unlock the meeting] in the Meeting tab. |
Generally most users will find their default 'my meeting room' enough for day-to-day activities, and Scheduled Meetings best for important online meetings and web events, where multiple hosts, sharing features and audio/visual properties need to be strictly controlled.
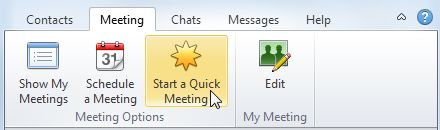
Use Quick Meeting when you want an impromptu online meeting, but still need specific meeting room controls not available in your default 'my meeting room.'
NOTE: A quick meeting expires 15 minutes after the last attendee leaves. To learn about how to disable the automatic deletion of a meeting room, [click here]. |
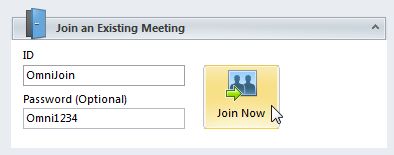
With OmniJoin, you can join a video meeting in a number of ways. Normally, you would just click a web link sent by the meeting host (by email or OmniJoin message). In addition, as an OmniJoin account holder, you can also join the online meeting by any of the methods below.
This will take you straight into a meeting.
Alternatively you can enter a meeting ID by the following steps:
Even after a meeting has been created, you can change the meeting settings and meeting room properties.
Quick meetings will expire 15 minutes after the last person leaves. Scheduled meetings will expire 1 hour after the last person leaves. You can, however delete meetings whenever required.
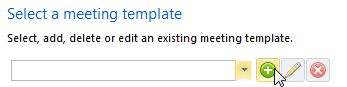
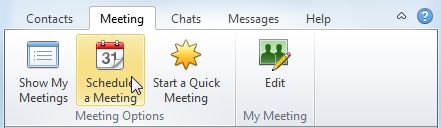
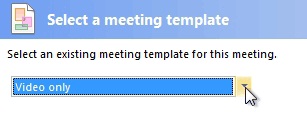
If you prefer to customize your meetings with specific settings on a regular basis, you can create and save these settings to a meeting template. This template can then easily be applied to any future meetings you may create.
NOTE: Even though you select Locked or Unlocked in the Schedule section of the template edit screen, the setting would not be applied for the Quick Meeting. |
Did you know? You may also tick “Default meeting template" to use the template as the default for all new meetings that you create. |
Once you have created a meeting template, you can apply the settings to any future meetings or recurring online meetings you may create.
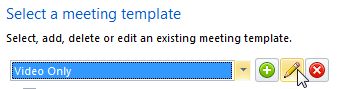
Should you ever need to make adjustments to a meeting template, you can edit the template.
Should you ever need to remove or delete a meeting template, you can do so by following the steps below.
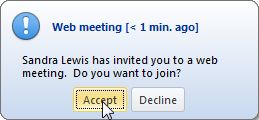
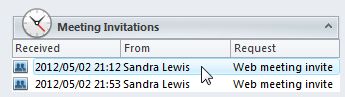
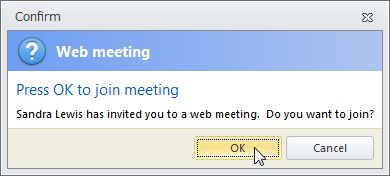
Should you ever miss or decline a meeting invitation sent to you, you can always retrieve any invitations using the following steps...
NOTE: After you exit OmniJoin or turn off your computer, any old requests or invites for that session will be erased from the Meeting tab. |
For those of you who wish to customize your meeting rooms, OmniJoin can provide you with a series of advanced options. These options are especially useful for managing multiple web and video meeting events, or creating and managing multiple meeting rooms with specific online meeting controls
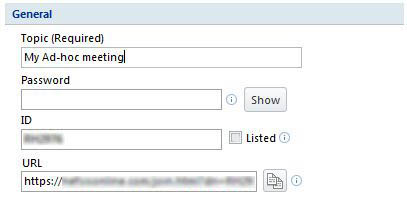
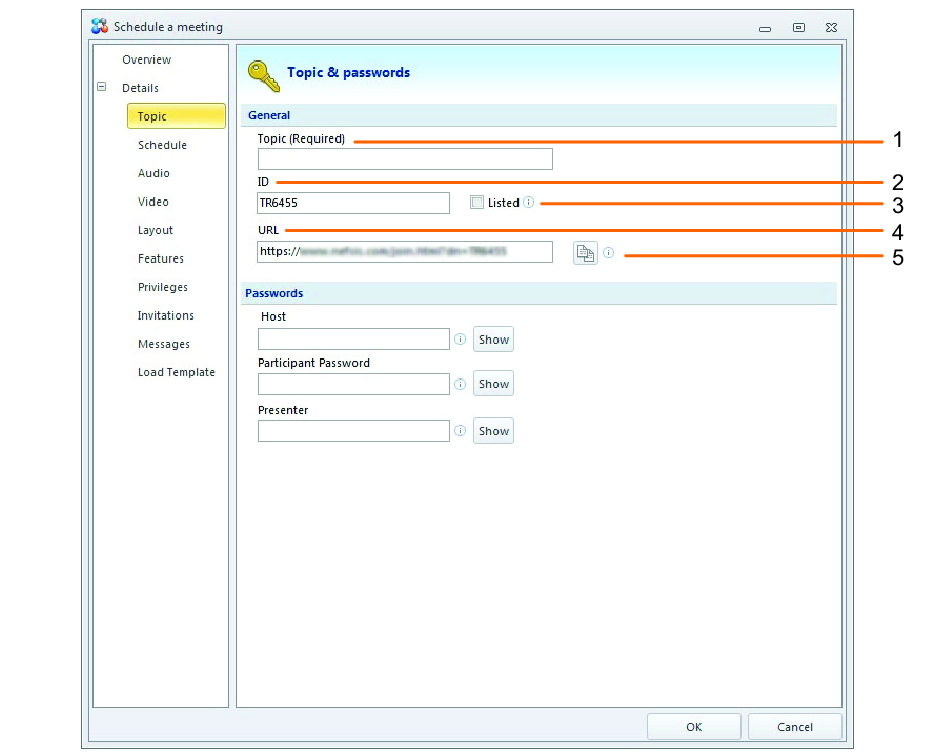
You must enter a meeting topic, and can specify passwords if necessary. Passwords can give your meeting additional security, as attendees will be prompted for it before joining a meeting.
You can also set different passwords for different types of attendee (Host, Presenter, Participant). This can be useful when you want people to join your meeting with certain rights or privileges (such as being able to share documents, applications), without having to manually promote them.
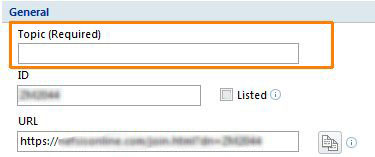
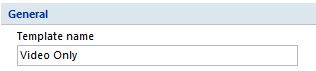
Customizing the meeting Topic, ID, security and other aspects can be done via the Topic section when creating or editing a meeting.
(1)Topic
Required. Useful for providing a description of the meeting, such as "Service Review" or "Design Meeting".
(2)ID
The unique name of the meeting. You can customize this to something that is easier to remember.
(3)Listed
When ticked, listed meetings appear on your personal web page on OmniJoin.
(4)URL
This is the unique web address for the meeting.
(5)Copy
Clicking the button will copy the URL for the meeting, allowing you to paste it into an email or meeting request to send out to colleagues.
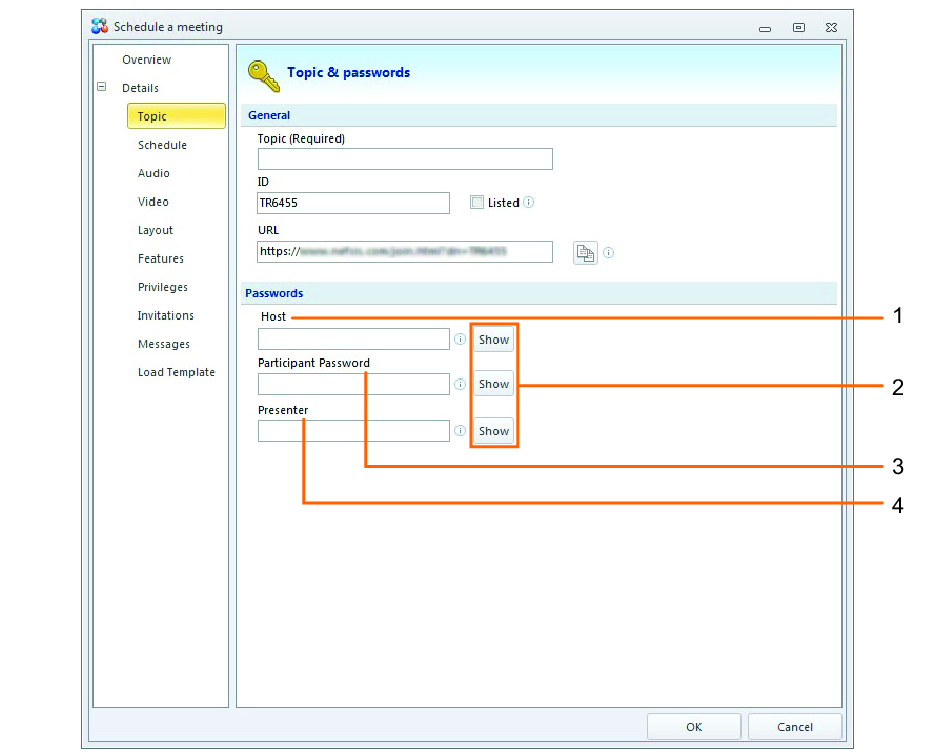
Passwords can be useful to help secure your meeting. There are 3 types of password.
(1)Host
Required, generated automatically (or manually set yourself), the host password can be used to automatically elevate a participant to a host if used while joining.
(2)Show / Hide
Toggles the visibility of a password. Useful, if you ever forget any meeting passwords.
(3)Participant Password
Optional, the participant password will prevent people from joining your meeting unless they know the
participant password.
(4)Presenter
Optional, the presenter password can be used in the same way as the Host password and can be used to automatically elevate a participant to a presenter if used while joining.
Did you know? You can also use any password as part of the meeting URL or you can use it to take host using the "Take host or presenter" feature inside of the meeting. |
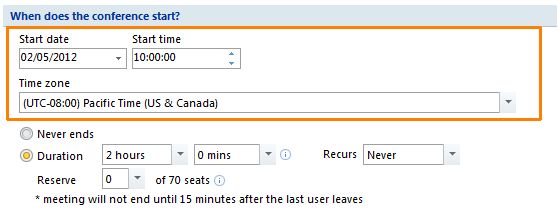
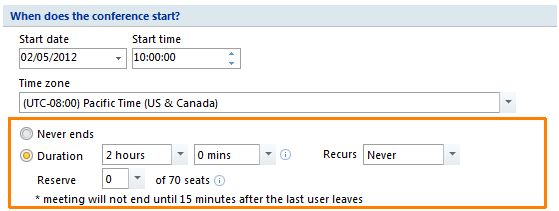
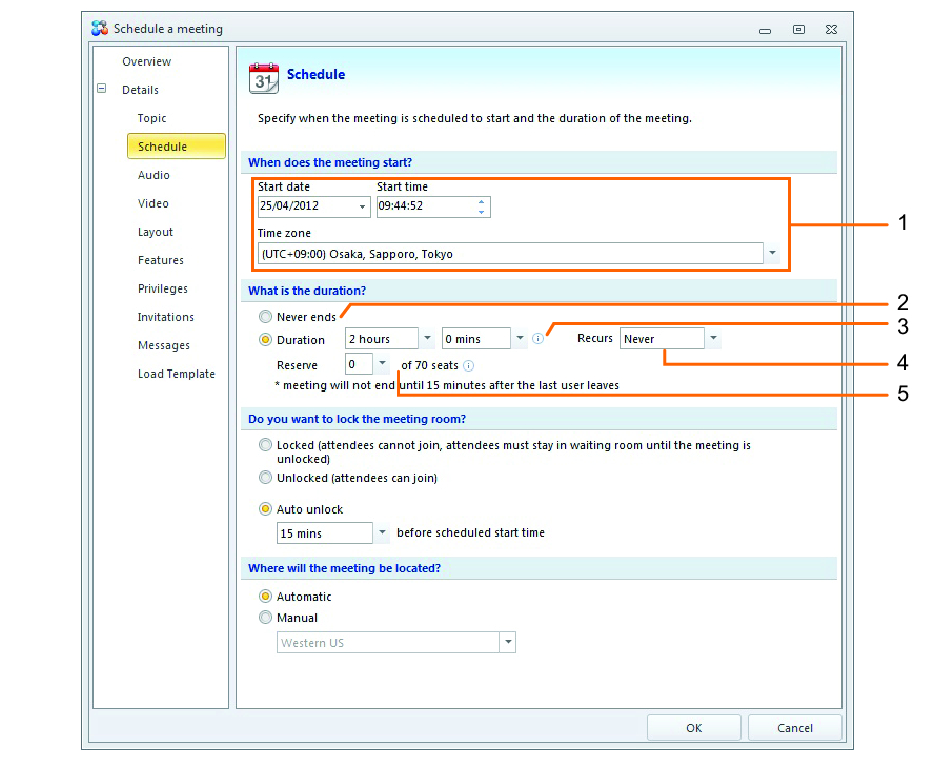
Specify when the meeting is scheduled to start and the duration of the meeting.
Under this section, you can specify the date and time of when the meeting should start. You can also make
the meeting permanent (never ending) or to expire after a certain time-frame.
NOTE: The options below do not appear if you're creating or editing an existing [quick meeting]! |
(1)Date, Time, Zone
lf scheduled, choose a date, time and time zone for the meeting.
(2)Never ends
Select if you want the meeting to permanently remain available for use.
(3)Duration
Instead of a permanent (never ending) meeting, you can schedule the meeting for a specified duration, such as 2 hours. After which, it will be automatically deleted.
(4)Recurs
Select whether the meeting is a "one off", or if you want it to recur daily, weekly or monthly.
(5)Reserve seats
Used for informational purposes, you can indicate how many attendees may attend. This is displayed in a shared calendar, to help avoid scheduling conflicts.
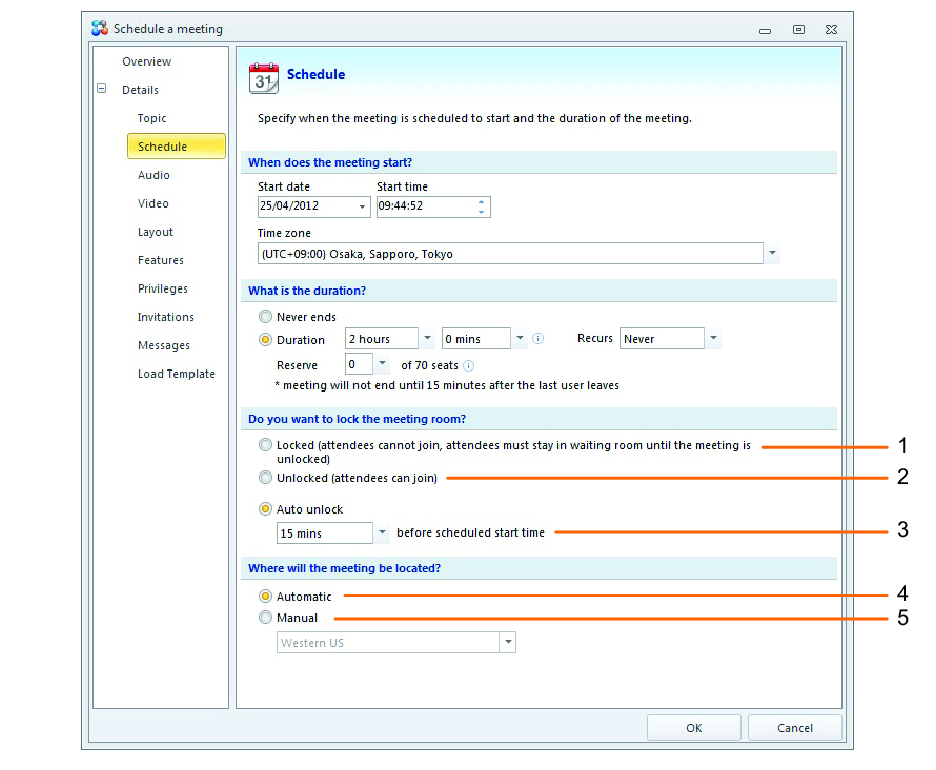
The meeting (by default) is unlocked 15 minutes before the scheduled start time and is assigned to a geographical location automatically. However, by using the options below you can manually specify how the meeting behaves prior to it starting.
(1)Locked
This will lock the meeting and will stop participants being able to join. You (the Host) will be able to join and unlock it when you choose to.
(2)Unlocked
This will open the meeting, so participants can join whenever they like - before the scheduled start date or time.
(3)Auto unlock
This will open the meeting a specific duration before the scheduled start time.
(4)Automatic
OmniJoin will automatically assign a location nearest you (the owner of the meeting) for best performance.
(5)Manual
Manually assign a particular OmniJoin location. Useful when meeting with people from disparate locations and assigning the meeting to a location in between for equal benefit.
NOTE: Participants will not be able to join until it is unlocked. You (the Host) can unlock it at any time by using the "[unlock meeting]" feature or by waiting for the scheduled start time. |
NOTE: By default, all meetings are assigned to a region automatically, for best general performance. |
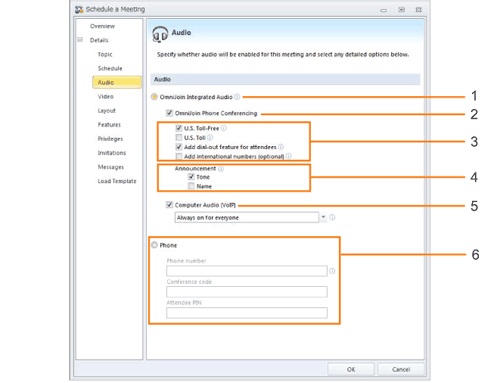
Specify whether audio will be enabled for this meeting. Audio can be either OmniJoin Phone Conferencing call, integrated VoIP or use a separate phone number.
(1)OmniJoin Integrated Audio
This menu appears only for the uses who have an optional license of OmniJoin Integrated Audio.
Select the available audio mode in a meeting. You can select both computer audio and OmniJoin Phone Conferencing.
(2)OmniJoin Phone Conferencing
Use this option to allow the attendees to join a meeting using OmniJoin Phone Conferencing.
(3)Call number (Fee type options)
Choose the call types and international call options you want for your meeting.
(4)Optional function
Your entry in the meeting room is announced by Tone or Name. If you select Name, all attendees will receive an audio prompt to say their name when they enter the meeting room.
(5)Computer Audio (VoIP)
Use this option to allow the attendees to join a meeting using the computer's audio system (VoIP).
(6)Use My Own Phone Provider
Use this option if you prefer to use your own meeting call facility. If you are using your own meeting calling facility, enter the relevant number and PIN codes here. OmniJoin will display these details to all attendees as they join the meeting.
OmniJoin Integrated Audio explained...
Hosts who have an OmniJoin Integrated Audio license can set up meetings that integrate OmniJoin Phone Conferencing and the computer's audio system (VoIP).
NOTE: You cannot use OmniJoin Integrated Audio on the Quick Meeting. All Quick Meetings use computer's audio system (VoIP) automatically. |
Did you know? The person with granted permission privilege can set up/edit a meeting also on My Account. |
OmniJoin Phone Conferencing
Call number (Fee type options):
■ Toll-Free (free dial): (If your dialing plan includes it.)
No fees are charged to the attendees and only the host (the person with the license contract) has to pay the OmniJoin Phone Conferencing usage fees.
■ Toll (normal telephone charges):
Each attendee is charged for normal telephone charges. The host (the person with the license contract) has to pay the OmniJoin Phone Conferencing usage fees (at a reduce rate than for Toll-Free calls).
■ Add dial-out feature for attendees: (If your dialing plan includes it.)
Dial-out feature allows meeting attendees to be directly dialed when they first join the meeting. This feature is charged the same as toll-free at a flat rate in the contiguous U.S.
NOTE: To use the Invite by Call function for an OmniJoin Integrated Audio meeting, the Dial-Out function must be selected. |
NOTE: When using the Invite by Phone function for an OmniJoin Integrated Audio meeting, the Dial-Out function must be enabled. |
■ Add international numbers:
You can add international numbers to your meeting if necessary. This option is not available for some regional numbers. Attendees are also responsible for any fees for toll calls charged by their service provider.
■ Tone:
When you select this option and join the meeting, the other attendees will hear a tone indicating that you have joined.
■ Name:
When you select this option and join the meeting, the other attendees will hear a spoken announcement saying that you have joined. (You will be asked to provide your name just before joining the meeting).
Computer Audio (VoIP) options explained...
■ Host controlled
Host controlled allows the host to turn on audio at their discretion.
■ Always on for hosts and presenters
Always on for hosts and presenters activates audio automatically for everyone who is not a regular participant.
■ Always on for everyone
Always on for everyone who activates audio for all attendees as soon as they enter the meeting.
Phone number, Conference code, Attendee PIN
If you want to use your own meeting call or telephone conference provider, you can enter it in the boxes provided.
This number (and any access or PIN codes) will then be displayed as they join the OmniJoin meeting.
Related Meeting Articles...
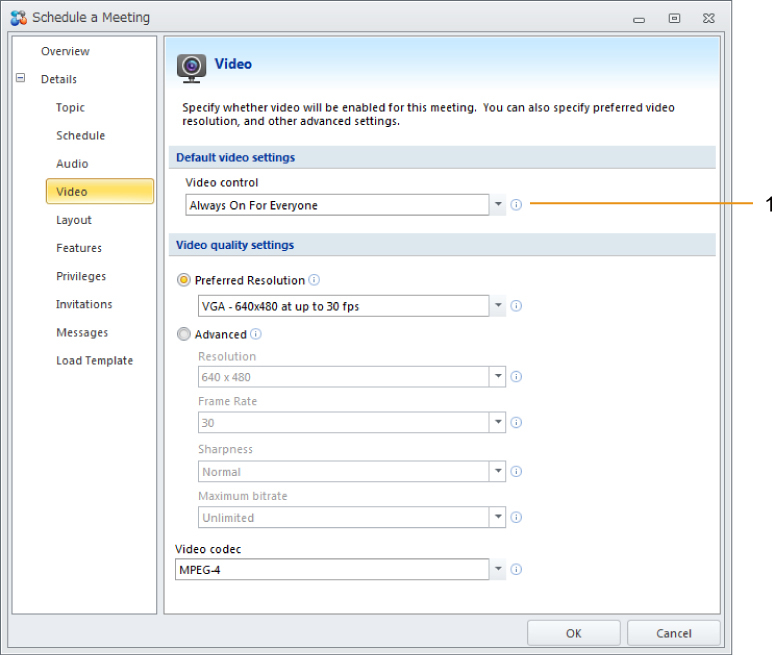
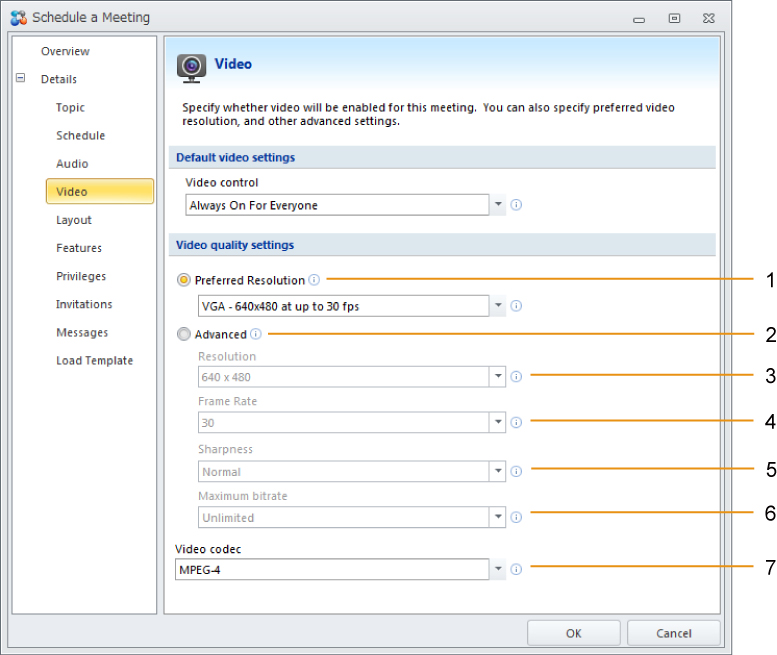
Specify whether video will be enabled for this meeting. You can also select default video resolutions, frames per second (refresh rate) and limits.
Under this section, you can choose how the video behaves for everyone as they join the meeting.
(1)Video control
Choose how you want to control the video.
Host controlled
Host controlled allows the host to turn on video at their discretion.
Always on for hosts and presenters
Always on for hosts and presenters activates video automatically for everyone who is not a regular participant.
Always on for everyone
Always on for everyone activates video for all attendees as soon as they enter the meeting.
If you want to change the maximum limits for videos in the meeting, you can use the options provided to adjust the maximum allowed video resolution, frames per second and set the video compression.
Settings in this section are the maximum value. Depending on the situation of the network, the actual performances are less than the value of these. |
(1)Preferred Resolution
Select the preferred video resolution from the drop-down list.
(2)Advanced
Select if you want to manually set the maximum video resolution, frame rate, sharpness, and bitrate.
(3)Resolution
Select the maximum video resolution for each meeting participant.
(4)Frame Rate
Select the maximum video frames per second for each meeting participant.
(5)Sharpness
Select the video sharpness for each meeting participant. Crisp provides a much sharper image than Normal (but requires more bandwidth).
(6)Maximum bitrate
Select the maximum bitrate for each meeting participants video. The quality of their video will be limited by the bitrate automatically.
(7)Video codec
Choose the type of compression used for everyone's video. MPEG4 is the default.
■ MPEG4
This is the default codec and will generally suit most people's needs. It offers a good balance of performance and compression without overtaxing the CPU.
■ H.264
Although the compression rate is higher and less bandwidth is used compared to MPEG4, it requires more CPU power.
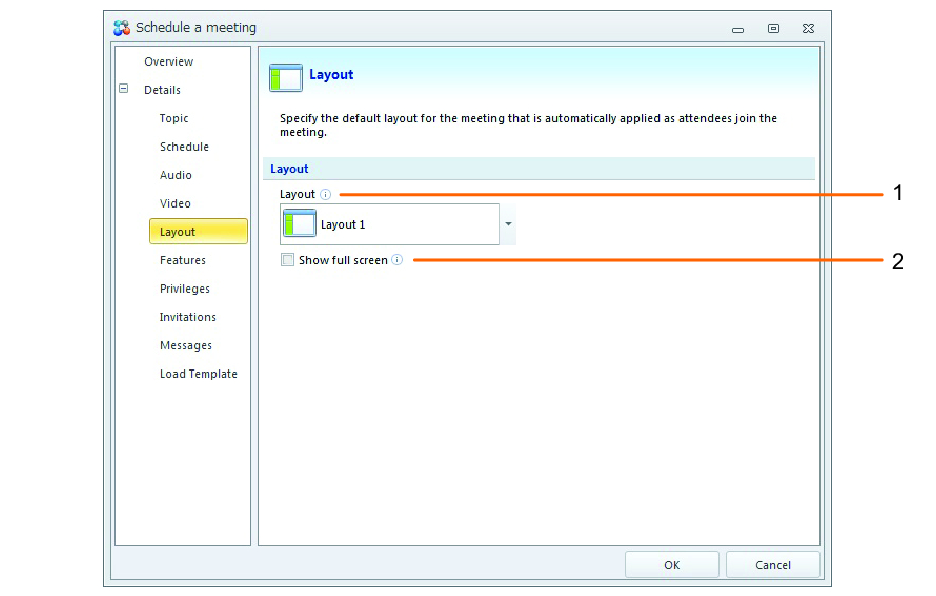
Specify the default layout for the meeting that is automatically applied as attendees join the meeting.
(1)Layout
This feature sets the default layout for all meeting attendees.
(2)Show full screen
Ticking this box will have the meeting open full-screen on each attendee's computer as they join.
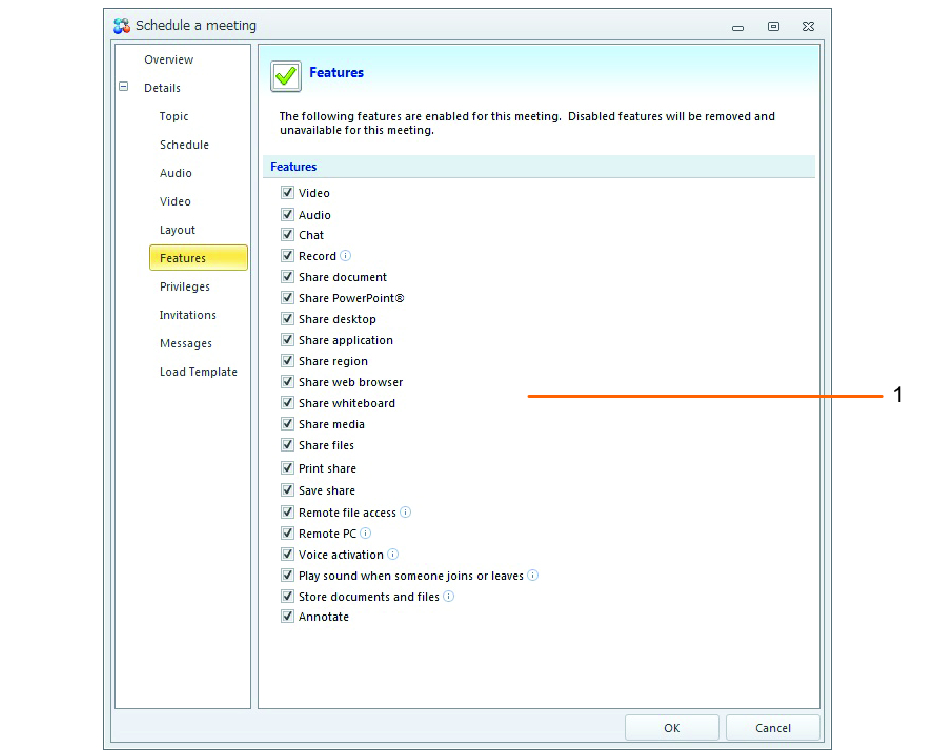
The features listed below are enabled by default. However, if you want to disable certain features for a web meeting or online video meeting, simply un-check the feature under the Details tab.
(1)Features
Untick specific features to remove them from the meeting.
NOTE: For OmniJoin Private Cloud Users: Administrators can enable or disable changes to settings by users. Setting changes made by users will not take effect if user changes have not been enabled for those settings. Only settings made by administrators will take effect. |
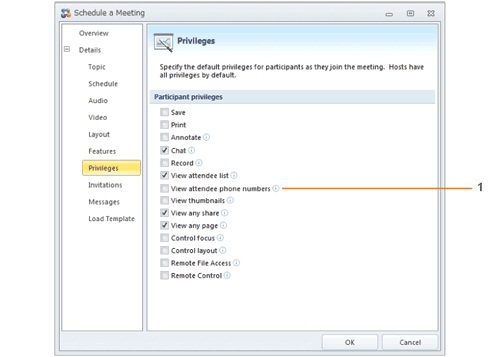
Specify the default privileges for participants as they join the meeting. Hosts have all privileges by default.
(1)Participant privileges
Untick specific features or privileges to disable or hide them from regular participants.
NOTE: For OmniJoin Private Cloud Users: Administrators can enable or disable changes to settings by users. Setting changes made by users will not take effect if user changes have not been enabled for those settings. Only settings made by administrators will take effect. |
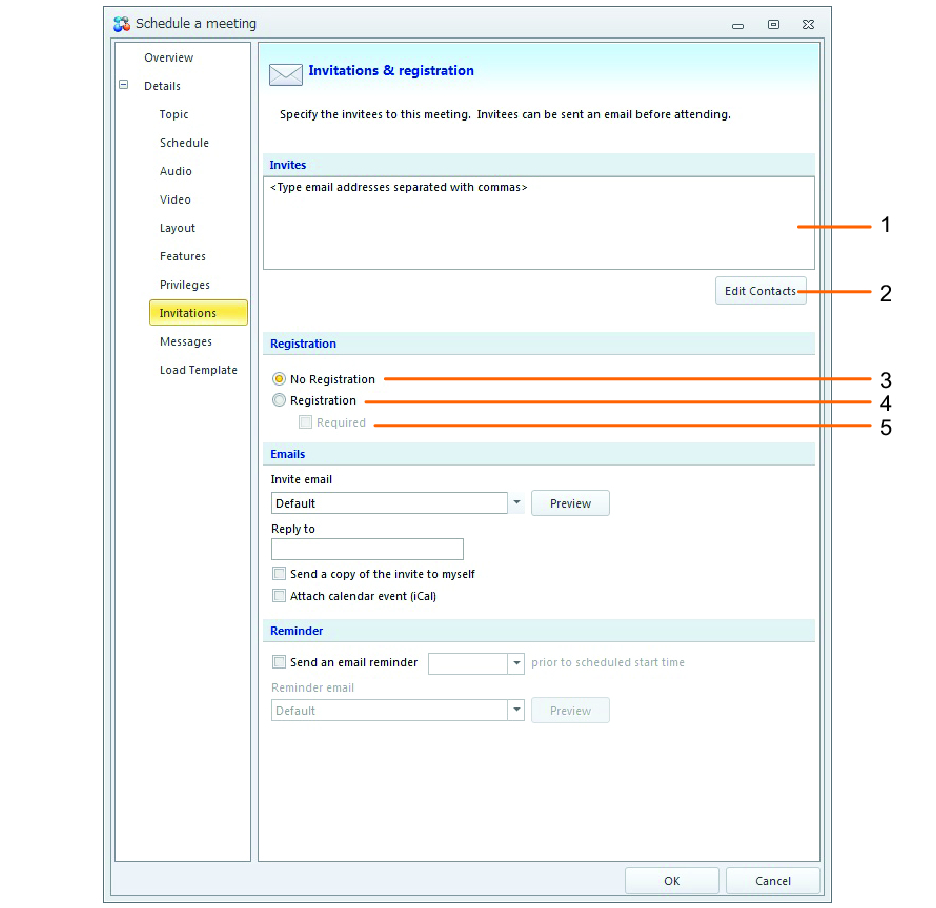
Specify the invitees to this meeting. Invitees can either be sent an email or be required to register before attending.
Did You Know? You can customize and create your own invitations via the OmniJoin My Account - instead of using the standard "Meeting invitation" email template. (Depending on the type of the license used, you may not be able to customize Meeting invitation.) |
When scheduling an advanced meeting, not only can you select who to invite but also choose whether people have to register first. (Depending on the type of the license used, you may not be able to use Registration.)
(1)Invitation List
Enter the email addresses of the people you would like to attend.
(2)Edit Contacts
lf you have contacts in an address book (such as Microsoft® Outlook® or Microsoft® Exchange), click Edit Contacts to add them to the invite list.
(3)No Registration
This is used by default and allows invitation recipients to send the meeting link onto anyone else. In other words, access to the meeting is open to anyone who has the link to the meeting.
(4)Registration 1
This option is useful if you want to know who is able to attend the meeting. Selecting this option will send an RSVP email to your invitees and will ask them to confirm their attendance.
Did you know?The registration status of the attendees can be checked in the meeting list in My Account. |
5.Registration (Required) 1
Ticking this will require each invitation recipient to confirm their attendance via an RSVP email that is sent when you finish creating the meeting. Only people who register their attendance are able to join.
1 Depending on the type of the license used, you may not be able to use Registration.
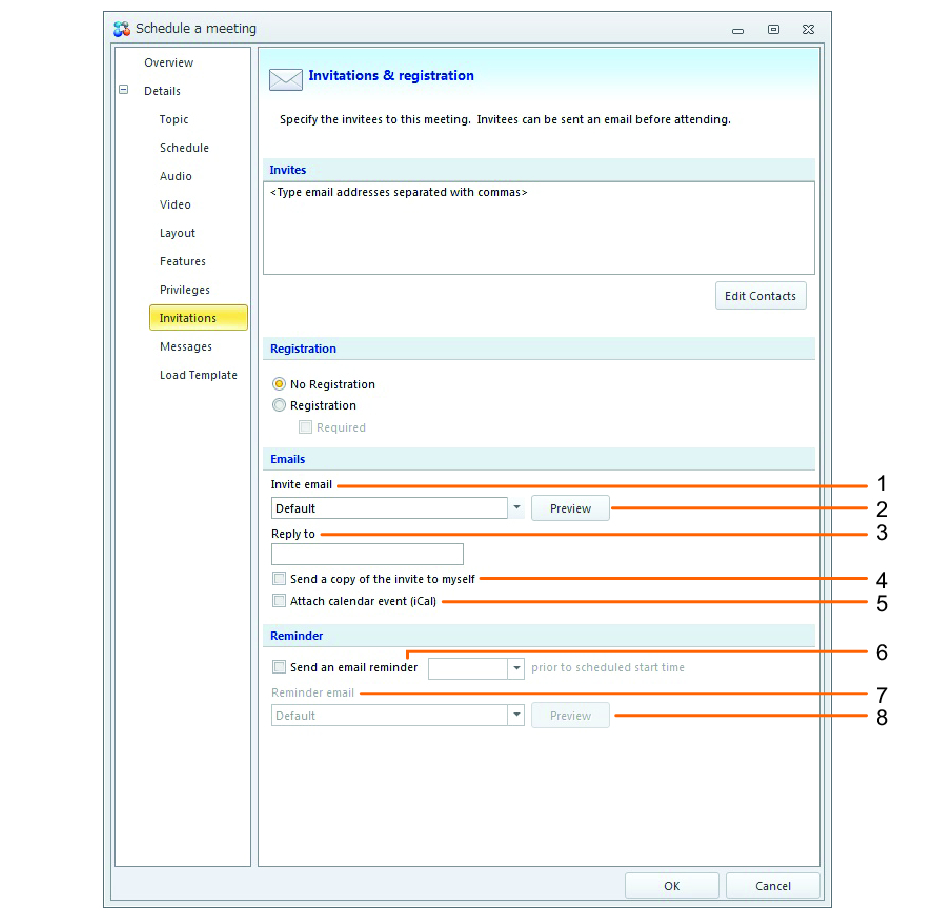
After specifying who to invite, you have the ability to select an invitation email and have OmniJoin send an automated reminder (if necessary). Customized emails can be created via My Account. (Depending on the type of the license used, you may not be able to customize emails.)
(1)Invite email
Select the email invitation that will be sent to attendees.
(2)Preview (Emails)
Click Preview to preview what the actual message will look like.
(3)Reply to
Enter a email address so that attendees can reply to your email, and specify a subject.
(4)Send a copy of the invite to myself
Sends a copy of the invite mail to your registered address.
(5)Attach calender event (iCal)
Sends a calender event (iCal) at the same time as the invite mail.
(6)Send an email reminder
Sends a reminder before the meeting starts to the invite mail recipient.
(7)Reminder email
Select the reminder mail's contents.
(8)Preview (Reminder)
Click Preview to preview the reminder mail's contents.
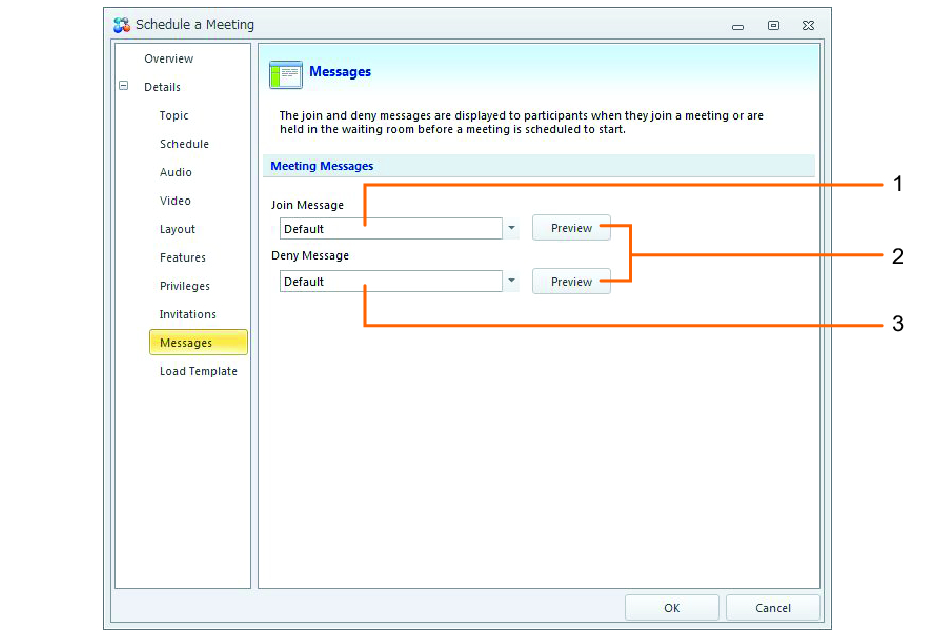
The join and deny messages are displayed to attendees when they join a meeting or are held in the waiting room before a meeting is scheduled to start.
Did You Know? You can customize and create your own messages via the OmniJoin My Account - instead of using the standard "Join Message" and "Deny Message" templates. (Depending on the type of the license used, you may not be able to customize messages.) |
(1)Join Message
Select a join message from the list. This will be displayed to attendees as they join the meeting.
(2)Preview
Click Preview to view the selected message template.
(3)Deny Message
Select a deny message from the list. This will be displayed to attendees if the meeting they join is locked.
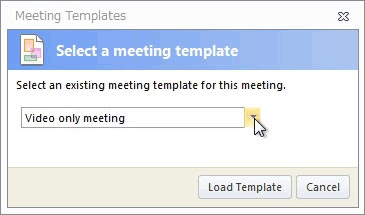
To save time, you can load an existing template to quickly create a meeting with predefined options. Load template allows you to enter the template manager and choose an existing template to import, or alternatively create or edit a new one.
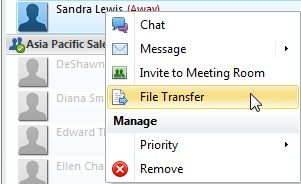
File Transfer allows you to transfer a file to your OmniJoin contacts, even during an online meeting, web, or video meeting.
Also, you can retrieve any files that have been sent during the meeting.
Not only can you send messages, or initiate chats but you can also initiate a file transfer to your OmniJoin contacts, even during an online meeting, web, or video meeting. Files of up to 5 MB can be transferred.
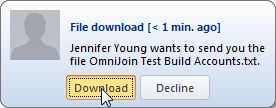
Should you ever miss or decline a file sent to you, you can always retrieve any files using the following steps...
NOTE: After you exit OmniJoin or turn off your computer, any file transfer history for that session will be erased from the Meeting tab. |
While messages are useful for brief or intermittent notices, chats can be used for when you are in need of a more substantial conversation online.
The following articles will guide you through how to start and manage chats.
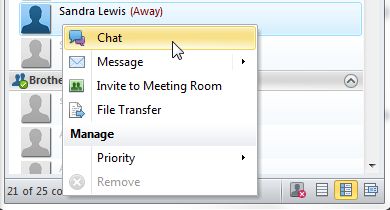
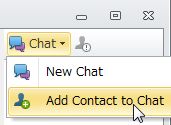
You can start a chat by right-clicking on the contact or group you wish to chat with and then selecting Chat.
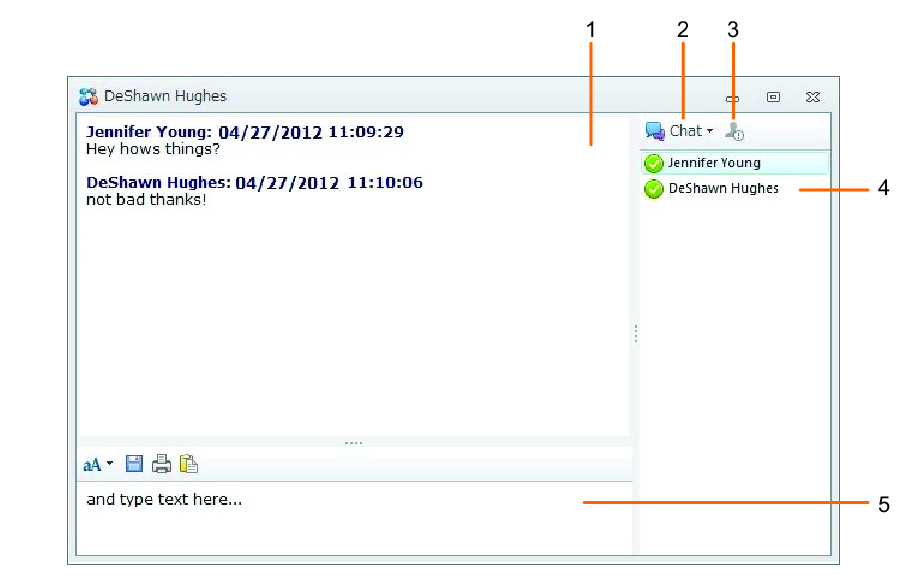
(1)Text conversation
The text conversation between you and other contacts will appear here.
(2)Chat
You can start a new chat or add more contacts to the conversation by clicking "Chat".
(3)Nudge!
Not sure if your colleague is paying attention to your chat? Select the contact and click the "Nudge" icon to send them another message and literally "shake" their chat window!
(4)Contacts
Contacts currently in the text conversation will be listed here.
(5)Type text here...
Use this section of the chat window to type your message. You can also change the font, color, save the conversation and even use emoticons!
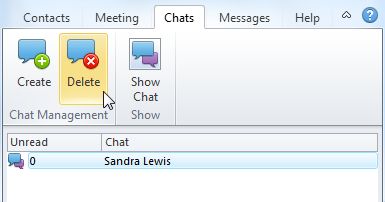
Any chats on Live Contact List/ OmniJoin IM will remain on your computer so that you can refer back to them. If however, you wish to remove old chats, you can do so by following the steps below.
NOTE: Chat history is deleted when you logout. |
OmniJoin keeps an archive of old chats that you've participated in, just in case you need to refer to the conversations later on.
NOTE: Chat history is deleted when you logout. |
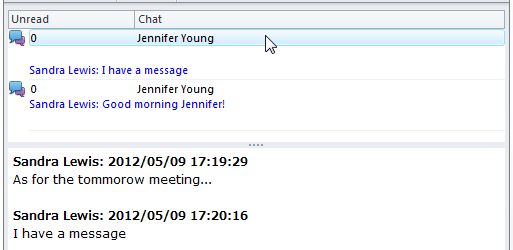
On occasions you may get sent messages while you're away from your computer or you might not see if you're too busy. OmniJoin will alert you to any unread messages.
By using the chat preview option, you can quickly view the most recent entry in each chat you've been involved in...
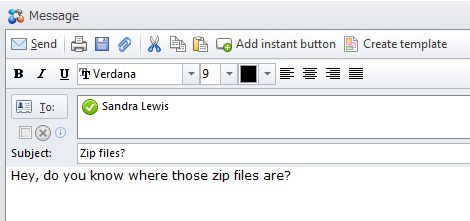
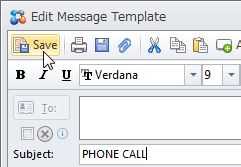
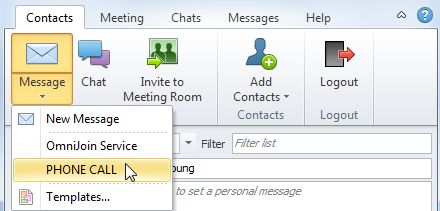
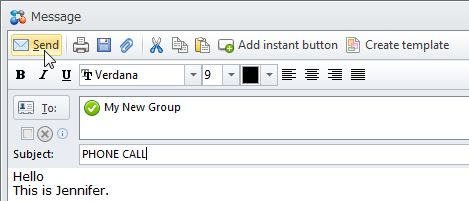
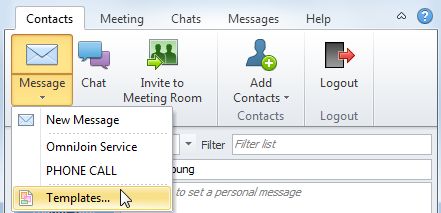
A message allows you to quickly send a message to anyone in your Live Contact List/ OmniJoin IM. You can make repetitive messages into a template so things like a 'phone call' can be a one-click action.
The following contents will guide you through how to use messages.
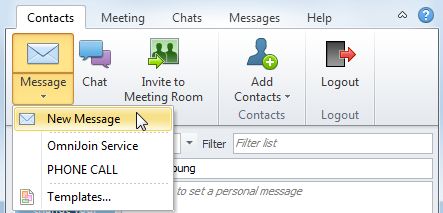
A message allows you to quickly send a message to anyone in your Live Contact List/ OmniJoin IM. Sending a message can be achieved by first selecting a contact or group and then clicking the "Send Message" icon.
Alternatively: Use the Messages tab... |
When you send a message, you can add instant buttons to the message body. The instant button enables the recipient to easily reply to the message, or to access to the specific web site.
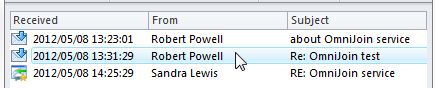
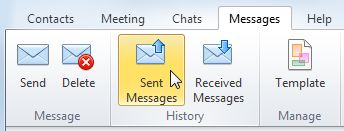
OmniJoin keeps an archive and history of old messages that have been sent and received, just in case you need them later on.
On occasions you may get sent messages while you're away from your computer or you might not see if you're too busy. OmniJoin will alert you to any unread messages.
On occasions you may get sent messages while you're away from your computer or you might not see if you're too busy. OmniJoin will alert you to any unread messages.
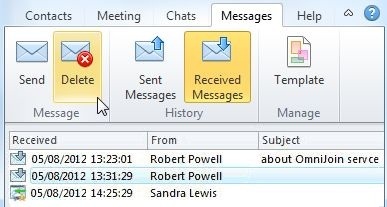
OmniJoin will automatically retain 100 messages in your history by default. However, if you want to delete a specific message, simply follow the steps below.
Alternatively... You can delete a message by right-clicking on the message then select Delete. |
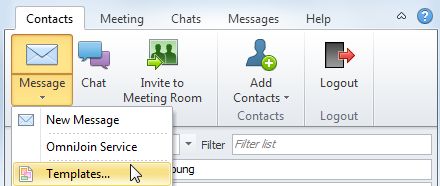
Using the Live Contact List/ OmniJoin IM, you can create a 'template' which can help improve the efficiency of repeatedly sending out similar messages.
Alternatively: Use the Messages tab... |
After
[creating a message template], you can use it to send frequently similar messages quickly and efficiently with just a few clicks.
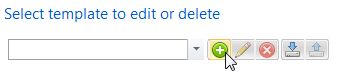
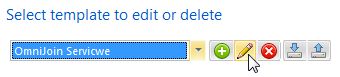
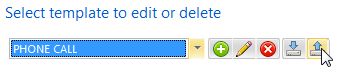
You can edit previously created templates by selecting the template and clicking the edit icon.
Alternatively: Use the Messages tab... |
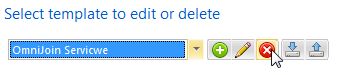
Should you no longer wish to keep a message template, you can delete it by selecting the template and clicking the delete icon.
Alternatively: Use the Messages tab... |
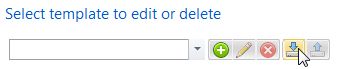
You can import previously saved message templates using the OmniJoin Import template feature.
Alternatively: Use the Messages tab... |
Any created message templates can be exported as a file, should you wish to keep them in a safe place or to send to other OmniJoin contacts.
NOTE: Don't forget where you save it! |
Alternatively: Use the Messages tab... |