Search

Home > Troubleshooting > If You Are Having Difficulty with Your Label Maker

If You Are Having Difficulty with Your Label Maker

This chapter explains how to resolve typical problems you may encounter when using the Label Maker.

If you still have problems, see Related Information. If after reading the topics you are unable to resolve the problem, visit the Brother support website at support.brother.com/faqs.

Problem Solution

The Label Maker does not print.

  • Check that the Tape Cassette is inserted correctly.
  • (For USA) If the Tape Cassette is empty, replace it. To order supplies and accessories, visit www.brother-usa.com.

    (For Canada) If the Tape Cassette is empty, replace it. To order supplies and accessories, visit www.brother.ca.

  • Check that the Tape Cassette Compartment Cover is securely closed.
  • Check that the Label Maker is on.
  • If the Print Head is dirty, clean it with a cotton swab.
  • PT-N25BT: Confirm the following:
    • Your mobile device’s Bluetooth setting is on.
    • The Label Maker is connected to your mobile device via Bluetooth.
    • The Label Maker is selected in the Brother P-touch Design&Print 2 app.
    • The Label Maker is not paired with another device.
    • The Label Maker and your mobile device are within range to communicate.
    • No devices that emit radio waves (for example, a microwave oven) are located nearby.
  • The tape does not feed correctly.
  • The tape gets stuck inside the Label Maker.
  • If the tape is bent, cut off the bent section.
  • If the tape is jammed, remove the Tape Cassette, remove the jammed tape, and then cut off any damaged tape. To avoid tape jams, clean the Tape Cutter and Tape Exit Slot. See Related Topics.
  • Check that the end of the tape exits through the Tape Guide.
  • Confirm that the tape is pointed at the Tape Exit Slot.
  • Remove the Tape Cassette and reinstall it.
  • Make sure that the Tape Cassette fits securely between the clips when it snaps into place.

An error occurred when using a mobile app.

Go to your mobile application’s settings menu and select Support > FAQs & Troubleshooting.

The LCD is not responding.

  • PT-N10: Remove the batteries, press and hold image for a few seconds, and then wait for at least 10 minutes.
  • PT-N20/PT-N25BT: Disconnect the AC Adapter, remove the batteries, press and hold image for a few seconds, and then wait for at least 10 minutes.
  • Reset the internal memory to the factory settings.

    For more information, see Related Topics: Reset the Label Maker.

The LCD remains blank after turning the power on.

  • PT-N10: Check that the batteries are correctly installed.
  • PT-N20/PT-N25BT: Check that the batteries are correctly installed and that the AC Adapter is correctly connected.

The LCD messages are displayed in a foreign language.

Set the LCD language you want.

For more information, see Related Topics: Set Language.

The Label Maker stops while printing a label.

  • If striped tape is visible, this indicates that you have reached the end of the tape. Replace the Tape Cassette.
  • PT-N10: Replace all batteries.
  • PT-N20/PT-N25BT: Replace all batteries or connect the AC Adapter directly to the Label Maker.

Previously saved label files are not available.

  • PT-N10: All files saved in the internal memory will be deleted when the batteries are low or are depleted.
  • PT-N20/PT-N25BT: All files saved in the internal memory will be deleted when the batteries are low, depleted, or the AC Adapter is disconnected.

The ink ribbon is separated from the ink roller.

If the ink ribbon is damaged, replace the Tape Cassette. If it is not damaged, leave the tape uncut and carefully remove the Tape Cassette, and then wind the loose ink ribbon back onto the spool.

For more information, see Related Topics: Insert Tape Cassette.

image

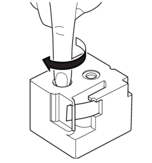
I do not know the version number of the firmware for the Label Maker.

(PT-N25BT)

You can confirm the firmware version number and other information on the LCD.

For more information, see Related Topics: Check the Version Information.

When the label is printed, there is too much space (wide margin) on both sides of the text.

Due to its design, the Label Maker feeds some margin each time it prints a new label. The margin length depends on "Margin Options" setting. Select the Small or Chain Print option for smaller margins.

For more information, see Related Topics: Margin Options.

The font size cannot be increased.

The font is already the maximum size for the width of the label, or the label length has been set, so there is a limit on the font size to prevent exceeding the set length.

When multiple labels are printed, the last label is cut incorrectly.

When Chain Print is enabled, feed the tape to eject the last printed label, and then press the Tape Cutter Lever to cut the label manually.

The Label Maker does not operate normally.

  • PT-N10: Remove the batteries, press and hold image for a few seconds, and then wait for at least 10 minutes before powering back ON.
  • PT-N20/PT-N25BT: Disconnect the AC Adapter, remove the batteries, press and hold image for a few seconds, and then wait for at least 10 minutes before powering back ON.
  • Reset the internal memory to the factory settings.

    For more information, see Related Topics: Reset the Label Maker.

The printer and mobile device cannot connect via Bluetooth.

(PT-N25BT)

  • Turn the printer off, and then on again.
  • If the communication error is not cleared, check your mobile device's Bluetooth screen. If the printer's name (PT-N25BT) is listed on the screen, cancel the registration by tapping the information button or setting button displayed next to the printer's name.
  • Try to connect the printer again in the Brother P-touch Design&Print 2 app.

For more information, see Related Topics.

When the green sticker holding the tape in place was peeled off, the protective film came off with it.

Carefully reattach the protective film to the tape, as shown.
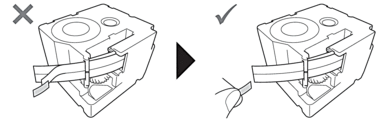
image
Did you find the information you needed?