Home > Set Up Your Label Printer > Keyboard Overview


Keyboard Overview
PT-E310BT
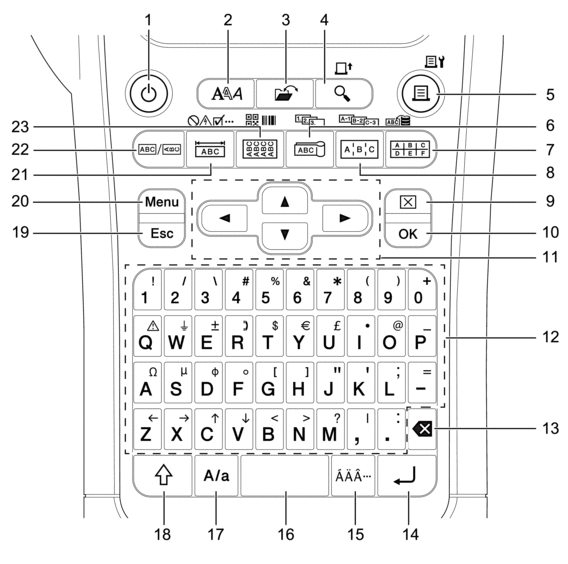
- Power
- Press to turn the Label Printer on or off.
- Style
- Press to set character and label attributes.
- File
- Press to retrieve data saved in the printer's memory.
- Preview/Feed
- Press to view an image of the label before printing.
- To feed the tape, press the Shift key once, and then press the Preview/Feed key.
- Print/Print Options
- Press to print.
- To set Print Options, press the Shift key once, and then press the Print/Print Options key.
- Cable Flag/Serialise
- Press to create cable flag labels.
- To create serialised labels, press the Shift key once, and then press the Cable Flag/Serialise key.
- Punch Block/Database
- Press to create labels for punch-down blocks with up to two lines drawn.
- To create labels using the selected range of records in the downloaded database, press the Shift key once, and then press the Punch Block/Database key.
- Patch Panel/Adv.Serialise
- Press to create single or multiple line labels for a group of ports on a patch panel.
- To create advanced serialised labels, press the Shift key once, and then press the Patch Panel/Adv.Serialise key.
- Clear
- Press to clear all text and format settings.
- OK
- Press to select the displayed option.
- Cursor
- Press to move the cursor in the direction of the arrow.
- Letter
- Press to enter letters or numbers.
- You can enter upper-case letters and symbols using these keys in combination with the Caps key.
- Backspace
- Press to delete any character to the left of the cursor.
- Enter
- Press to enter a new line when entering text.
- If you select the General mode for label application type and want to enter a new block of text, press the Shift key, and then press the Enter key.
- Accent
- Press to select an accented character.
- Space
- Press to insert a blank space.
- Press to return to the default value.
- Caps
- Press to turn Caps mode on and off.
- Shift
- Press to enter the symbol marked on the key.
- Escape
- Press to cancel the current operation.
- Menu
- Press to select a function menu.
- Faceplate/Symbol
- Press to create labels for faceplates, nameplates, and single port applications.
- To select a symbol from the symbols menus, press the Shift key once, and then press the Faceplate/Symbol key.
- General
- Press to create general purpose labels.
- Cable Wrap/Barcode
- Press to create labels that wrap around a cable or wire.
- To open the Barcode Setup screen, press the Shift key once, and then press the Cable Wrap/Barcode key.
PT-E510/PT-E560BT
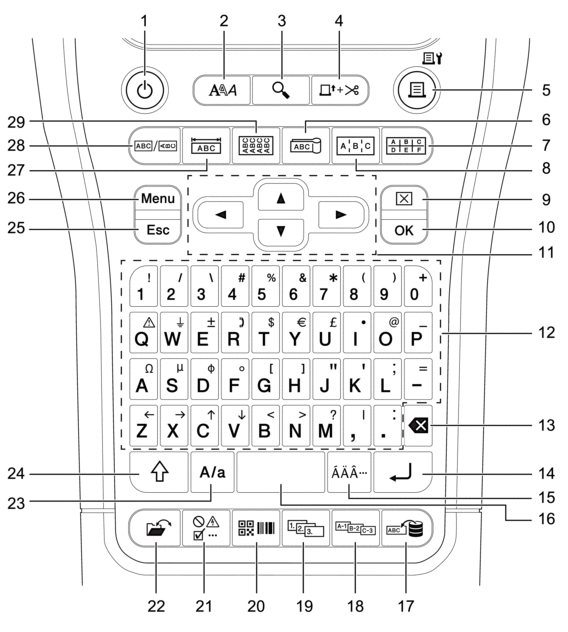
- Power
- Press to turn the Label Printer on or off.
- Style
- Press to set character and label attributes.
- Preview
- Press to view an image of the label before printing.
- Feed&Cut
- Press to feed 22.7 mm of blank tape then cut the tape.
- Print/Print Options
- Press to print.
- To set Print Options, press the Shift key once, and then press the Print/Print Options key.
- Cable Flag
- Press to create cable flag labels.
- Punch Block
- Press to create labels for punch-down blocks with up to three lines drawn.
- Patch Panel
- Press to create single or multiple line labels for a group of ports on a patch panel.
- Clear
- Press to clear all text and format settings.
- OK
- Press to select the displayed option.
- Cursor
- Press to move the cursor in the direction of the arrow.
- Letter
- Press to enter letters or numbers.
- You can enter upper-case letters and symbols using these keys in combination with the Caps key.
- Backspace
- Press to delete any character to the left of the cursor.
- Enter
- Press to enter a new line when entering text.
- If you select the General mode for label application type and want to enter a new block of text, press the Shift key, and then press the Enter key.
- Accent
- Press to select an accented character.
- Space
- Press to insert a blank space.
- Press to return to the default value.
- Database
- Press to create labels using the selected range of records in the downloaded database.
- Adv.Serialise
- Press to create advanced serialised labels.
- Serialise
- Press to create serialised labels.
- Barcode
- Press to open the Barcode Setup screen.
- Symbol
- Press to select and insert a symbol from the symbols menus.
- File
- Press to retrieve data saved in the printer's memory.
- Caps
- Press to turn Caps mode on and off.
- Shift
- Press to enter the symbol marked on the key.
- Escape
- Press to cancel the current operation.
- Menu
- Press to select a function menu.
- Faceplate
- Press to create labels for faceplates, nameplates, and single port applications.
- General
- Press to create general purpose labels.
- Cable Wrap
- Press to create labels that wrap around a cable or wire.
Did you find the information you needed?