Search

Home > Troubleshooting > Printing Problems

Printing Problems

Printing Problems

Problem Solution

The LED or the LCD is not lit. (TD-2350D/TD-2350DF/TD-2320DSA/TD-2350DSA)

The LED is not lit. (TD-2310D/TD-2320D/TD-2320DF)

  • Is the AC adapter cord connected correctly?

    Check the cord is connected correctly.

  • TD-2350D/TD-2350DF/TD-2320DSA/TD-2350DSA: If the LED or the LCD still does not light up, contact Brother customer service.
  • TD-2310D/TD-2320D/TD-2320DF: If the LED still does not light up, contact Brother customer service.
The printer does not print, or a printing error is received.
  • Is the cable loose?

    Make sure the cable is connected securely.

  • Is the media roll installed correctly?

    If not, remove the media roll and reinstall it.

  • Has the media roll run out?

    Install a new media roll.

  • Is the Roll Compartment Cover open?

    Make sure the Roll Compartment Cover is closed.

  • Has a print error or transmission error occurred?

    Turn the printer off, and then turn it on again. If there is still a problem, contact Brother customer service.

  • If the printer is connected via a USB hub, try connecting it directly to the computer. If not, try connecting it to another USB port.
A data transmission error appears on the computer.
  • Is the correct port selected?

    Make sure the correct port is selected.

  • Is the printer in cooling mode?

    If the Power LED lights in green and the Status LED is flashing in orange, wait until the Status LED stops flashing, and then try printing again.

  • Are there any unfinished print jobs?

    If you try to print while other users are printing large amounts of data, the printer is unable to accept your print job until the current print jobs are completed. If this occurs, send the print job again after the other jobs are completed.

I want to cancel the current printing job. Press image while printing is paused.
The print quality is poor.

Is there dust or dirt on the printer parts preventing it from their proper work?

Clean around the Roller, Print Head, the side of Roll Guide, and Label Support. For more information, see Related Information.

Adjust the Energy Rank from the Paper Size Setup tool or adjust the Print Speed from the Device Settings tool.

For more information, see Related Information.

I want to increase the print density.

From the Paper Size Setup tool, go to the New and Advanced Printing Adjustments, and then increase the Energy Rank.

For more information, see Related Information.

The printer does not feed paper.
  • Is there dirt or lint on the roller preventing it from rotating freely?

    Clean the roller. For more information, see Related Information.

  • Make sure the ejection path of the paper is not blocked.
  • Remove the media roll and install it again. For more information, see Related Information.
  • Make sure the Roll Compartment Cover is closed completely.
The printer feeds paper continuously.
  • Open the Roll Compartment Cover.
  • Press any button to stop feeding.

    Press image while printing is paused to cancel the print job.

    TD-2350D/TD-2350DF/TD-2320DSA/TD-2350DSA: Press any button except for image, image, or image while printing is paused to resume printing.

    TD-2310D/TD-2320D/TD-2320DF: Press any button except for image while printing is paused to resume printing.

The printer does not pause between labels.
  • Make sure you entered the media information correctly. You can set the media information using Paper Size Setup in the Printer Setting Tool.
  • If the sensor is dirty, wipe it with a dry cotton swab.
  • Make sure there are no items blocking the sensor.
An error occurs when the roll cannot be fed to the beginning of the printing.

If a feed error occurs, use the Paper Size Setup of the Printer Setting Tool to assign the correct paper settings to the printer.

TD-2350D/TD-2350DF/TD-2320DSA/TD-2350DSA: Press Menu, and then press Media > Selection to check whether the correct media is set in the printer when a Media roll is used.

Head, motor, or Rechargeable Li-ion Battery is cooling down.

The thermal head, motor, or Rechargeable Li-ion Battery is too hot.

Head:

The printer stops and resumes printing only after the thermal head has cooled down. The head may become too hot if you are printing a large number of documents with high text content. If the thermal head becomes too hot, it may produce imaging on the paper in areas not intended to be printed. To avoid or delay this condition, print using a lighter density setting, reduce the amount of black space being printed (for example, remove background shading and colors in graphs and presentation documents), and make sure that the printer has adequate ventilation and is not located in an enclosed space.

Motor or Rechargeable Li-ion Battery:

Do not use the printer continuously. If the printer is used continuously, the motor or Rechargeable Li-ion Battery will become too hot. In this case, the printer will stop and resume printing after the motor or Rechargeable Li-ion Battery has cooled down.

NOTE
This condition may occur more often when the printer is used at high altitude (more than 3,048 m) due to a lower air density available to cool the printer.
I want to reset the printer/delete the data transferred from the computer. See Related Information.
Print Head cannot be attached. The Print Head cannot be attached if the Print Head spring is sticking out. Place the Print Head spring correctly and try again.
The media is not ejected correctly when using the optional label peeler. Has the sensor of the label peeler been exposed to direct sunlight?

If the sensor of the label peeler has been exposed to direct sunlight, loaded media may not be detected correctly. Use the printer in a location not exposed to direct sunlight.

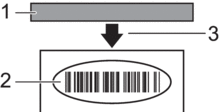
Barcodes printed using applications other than P-touch Editor cannot be read.

If the barcode data was created using a landscape orientation, change the Orientation setting in the Basic tab of the printer driver to Landscape and try again.
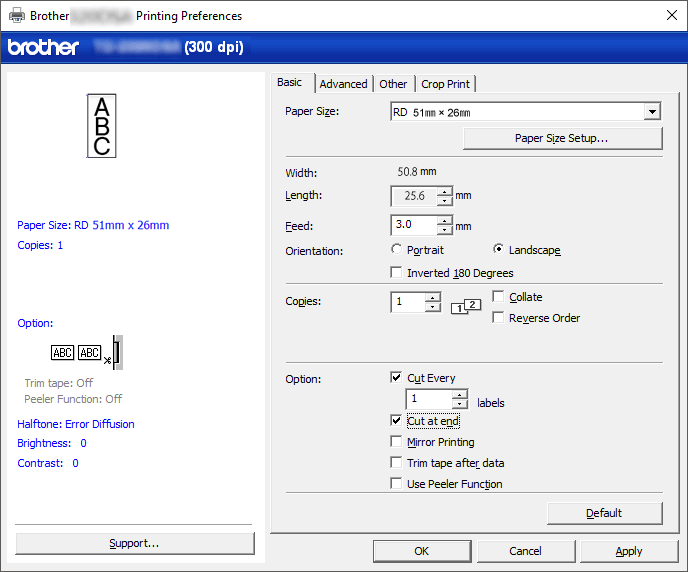
image

Wrinkles appear on the printed label. (Linerless models)

Is media roll adhesive adhered to the Roll Guide?

Readjust the position of the Roll Guide using the adjuster dial, following the Load Media Roll instruction. For more information, see Related Information.

Printed labels are getting jammed. (Linerless models)

  • Is there dirt, lint, or roll adhesive stuck to the printer parts, preventing free roll feeding?

    Clean around the Roller, Print Head, and the side of Roll Guides. For more information, see Related Information.

  • Is the media roll correctly wound?

    Remove the media roll and replace it with a new one. If the labels continuously become stuck or jammed in the printer, the Platen Roller may be worn and needs to be replaced. For more information, see Related Information.

The media is entangled around the Platen Roller.

Remove the media from the Platen Roller.

  1. Open the Roll Compartment Cover and unlock the lever of both sides of the Platen Roller and lift it up.
    image
    1. Platen Roller
  2. Remove the entangled media from the Platen Roller.
  3. Put the Platen Roller back and pull down the levers and close the Roll Compartment Cover.
    image

When printing is executed while using the USB power delivery function, the printer enters the cooling mode and cannot start printing.

  • Make sure that the main unit and the device are connected with a USB-C to USB-C cable.
  • The printer is hot and cooling down. Printing will restart once it cools down.

Printed Image Problems

Problem Solution
Printed paper contains streaks or poor quality characters, or paper is not fed correctly. Is the Print Head or Roller dirty?

Although the Print Head generally remains clean under normal use, lint or dirt from the roller may become stuck on the printer head. If this occurs, clean the roller. For more information, see Related Information.

Printed barcodes cannot be read.
  • Print labels so that barcodes are aligned with the Print Head as shown below:

    image
    1. Print Head
    2. Barcodes
    3. Printing orientation
  • Barcodes may not be read if they are reduced or enlarged.
  • TD-2320D/TD-2350D/TD-2320DF/TD-2350DF/TD-2320DSA/TD-2350DSA: Try using another scanner.

Network Problems (TD-2320D/TD-2350D/TD-2320DF/TD-2350DF/TD-2320DSA/TD-2350DSA)

Problem Solution
You are using security software.
  • Confirm your settings in the installation dialog box.
  • Allow access when the security software alert message appears during the printer installation.
Your security settings (SSID/Network Key) are incorrect. (TD-2350D/TD-2350DF/TD-2350DSA)

Recheck and select the correct security settings.

  • The manufacturer's name or model number of the wireless access point/router may be used as the default security settings.
  • See the instructions supplied with your wireless access point/router for information on how to find the security settings.
  • Contact the wireless access point/router manufacturer, Internet provider, or network administrator.

Your printer cannot connect to the host device using Wi-Fi or Bluetooth. (TD-2350D/TD-2350DF/TD-2350DSA)
  • Move your printer within about one metre of the mobile device when you configure the Wi-Fi network settings.
  • Move your printer to an obstruction-free area.
  • If a wireless computer, Bluetooth-equipped device, microwave oven, digital cordless phone, or other device is near your printer or the wireless access point/router, move the device away from your printer or wireless access point/router.
Your printer cannot print using Wi-Fi or Bluetooth. (TD-2350D/TD-2350DF/TD-2350DSA)
There are obstructions (walls or furniture, for example) between your printer and the mobile device. (TD-2350D/TD-2350DF/TD-2350DSA)

Move your printer to an obstruction-free area.

You are using MAC Address filtering.

You can confirm the MAC address by printing the Printer Settings Report. For more information, see Related Information.

Your printer is not connected correctly to the network.
  • Make sure the printer is in the mode you want to connect to.
  • If the printer is still not connected, do the following:
    • For Wi-Fi connection (TD-2350D/TD-2350DF/TD-2350DSA)

      image
      : Your printer is searching for a wireless network. Wait until the search is complete.

    • For Wireless Direct (TD-2350D/TD-2350DF/TD-2350DSA)

      If the Wireless Direct icon is displayed on the LCD, search for the printer from the device you want to connect.

    • For Wired LAN

      Make sure the LAN cable is connected correctly.

    • For Bluetooth (TD-2350D/TD-2350DF/TD-2350DSA)

      If the Bluetooth icon is displayed on the LCD, search for the printer from the device you want to connect.

I have checked and tried all of the above, but still cannot set the Wi-Fi/Bluetooth function. (TD-2350D/TD-2350DF/TD-2350DSA)

Turn the printer off, and then turn it on again. Then, configure the Wi-Fi and Bluetooth settings again.

Your printer is not connected if the Bluetooth connection with an Apple device (iPad, iPhone, or iPod touch) is lost. (TD-2350D/TD-2350DF/TD-2350DSA)

Turn the Auto Reconnect function on. You can set it from the Printer Setting Tool. For more information, see Related Information.

TD-2350D/TD-2350DF/TD-2320DSA/TD-2350DSA: You can also set it using the Bluetooth menu on the printer's LCD.

Your printer is not assigned with an available IP address.
  • Confirm the IP address and the Subnet Mask. Verify both the IP addresses and Subnet Masks of your computer and your printer are correct and located on the same network.

    For more information on how to verify the IP address and the Subnet Mask, contact your network administrator.

  • Confirm your IP address, Subnet Mask and other network settings using the Printer Setting Tool. For more information, see Related Information.

    TD-2350D/TD-2350DF/TD-2320DSA/TD-2350DSA: You can also confirm network settings on the printer's LCD.

Your previous printing job was unsuccessful.
  • If an unfinished print job is still in your computer's print queue, delete it.

    For example, when using Windows 10:

    Click Start > Settings > Devices > Printers & scanners. Click the printer you want to set up, and then click Open queue. Click Printer > Cancel All Documents.

I have checked and tried all of the above, but my printer does not print.

Uninstall the printer driver and the software, and then reinstall them.

You did not select to allow access when the security alert dialog box appeared during the standard installation, or when printing.

If you did not select to allow access when the security alert dialog box appeared, the firewall function of your security software may be blocking access. Some security software may block access without displaying a security alert dialog box. To allow access, see your security software instructions or contact the manufacturer.

Other Problems

Problem Solution

I want to prevent dates and times from being modified.

Set a passcode for the Administration menu to ensure security.

For more information, see Related Information.

Unable to transfer template to printer.

The printer driver may not be correctly installed. Re-install the printer driver, and then try transferring again.

The printer has 8 MB or 32MB of built-in memory available, allowing a maximum of 255 templates to be saved. When there is no more of the built-in memory available or when 255 templates have been registered, templates can no longer be transferred to (be registered with) the printer. Delete unnecessary templates from the printer.

  • Make sure printer's LCD displays the Home screen (either the Template List Screen or the Template Touch Screen).
  • If the Transfer button does not appear in P-touch Transfer Manager, check the connection between your computer and printer.

    Alternatively, save the LBX file you want to transfer, open P-touch Editor, and then select File > Transfer.

The template has been transferred, but the date is not updated automatically.

If the date was not updated, make sure the At Printing check box is selected in the Date and Time Properties dialog box for the template.

When transferring the template to the printer, the file size changed.

Since the format of a template file added to P-touch Transfer Manager is different from the format of a file after it has been transferred to the printer, the file size changes. This size change is not a problem.

Unable to check the number of registered templates to the printer and the related key number.

  1. Connect the printer to the computer with a USB cable, and then turn the printer on.
  2. Start P-touch Transfer Manager

  3. Click the model name of your printer in the pane on the left side to display the templates registered with the printer in the pane on the right side. The number of templates and the key numbers that are being used can be checked.

For more information, see Related Information.

  • Make sure printer's LCD displays the Home screen (either the Template List Screen or the Template Touch Screen).
  • If the Transfer button does not appear in P-touch Transfer Manager, check the connection between your computer and printer.

    Alternatively, save the LBX file you want to transfer, open P-touch Editor, and then select File > Transfer.

Did you find the information you needed?