
- Brother support website
- Brother Support for IT Administrators
- I want to have the same printer driver settings on all Windows computers connected to my printer fleet.
I want to have the same printer driver settings on all Windows computers connected to my printer fleet.
You can change the printer driver settings of Windows PCs across your entire printer fleet by distributing a batch file. Using this process, your colleagues with Windows PCs do not need to reinstall the printer driver on their computers.
Before you begin, make sure the target printer's printer driver is installed on your computer. If the printer driver is already installed, go to Step 3.
Only locally connected printers can be used, this method will not work with a shared printer.
-
To download the printer driver, go to the Brother support website, click Downloads, search for your target printer, and download its printer driver.
-
Double-click the EXE file and follow the on-screen instructions to install the printer driver on your computer.
-
Open Notepad and type or copy the command from the example shown below, and then save the file with the extension ".bat" to create the "export.bat" file.
Example:@echo off
set PRINTER_NAME="Brother HL-L6400DW series"
rundll32 printui.dll,PrintUIEntry /e /n %PRINTER_NAME%
rundll32 printui.dll,PrintUIEntry /Ss /n %PRINTER_NAME% /a "export.dat" u g dIn the "PRINTER_NAME" string, change the printer's name to the name of the target printer that contains the printer driver you want to distribute to all users.
NOTE:
To confirm the printer's name, open the Control Panel on the user's computer.
Click View devices and printers, and then copy the printer's exact name for the "PRINTER_NAME" string.
In this example, the printer's name is "Floor_2_pod". Be sure to type the name exactly as shown.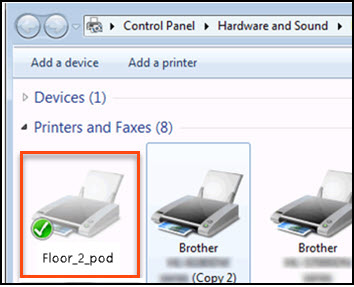
Save the export.bat file containing the target printer's name, then navigate to that file and double-click to launch it. NOTE:
Make sure that both the "export.dat" file and the "export.bat" file have the same parent folder.
Distribute the "export.dat" file to Windows PCs connected to target printers.
Create and run the set.bat file
Open Notepad and type the command, then save the file with the extension ".bat" to create the set.bat file.In the "PRINTER_NAME" string, change the printer's name to the target printer's name.
Example:@echo off
set PRINTER_NAME="Brother HL-L6400DW series"
rundll32 printui.dll,PrintUIEntry /Sr /n %PRINTER_NAME% /a "export.dat" f u g Save the "set.bat" file containing the target printer's name and distribute the "set.bat" file to Windows PCs connected to target printers.
On each Windows computer, double-click and run the "set.bat" file to change the printer driver settings.
NOTE:
Run the "set.bat" file in the same parent folder as the "export.dat" file if you used the same commands as shown in the example.
HINT:
For more information, go to the Microsoft website.