- Brother support website
- Brother Support for IT Administrators
- I want to install a custom printer driver on all Windows computers connected to my printer fleet.
I want to install a custom printer driver on all Windows computers connected to my printer fleet.
- The Export Driver Settings feature allows you to export customized driver settings and reuse the exported settings when installing the printer driver on multiple computers across your organization.
- Install the printer driver in one of two ways:
- Use the Windows Control Panel
- Use the Command Prompt
NOTE:
To create a customized printer driver initialization file, first install the device's printer driver onto your administrator computer.
Customize the printer driver settings and export them as a custom initialization file
-
Go to your product's Downloads page on the Brother support website and download the device's Printer Driver.
-
Double-click on the EXE file and follow the on-screen instructions to install the printer driver.
-
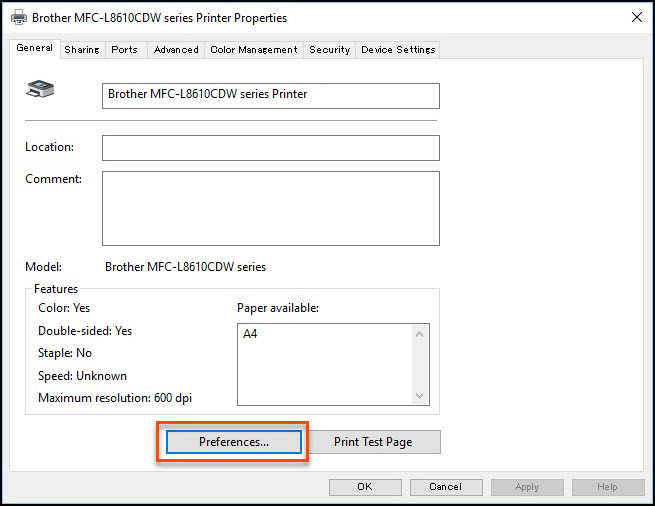
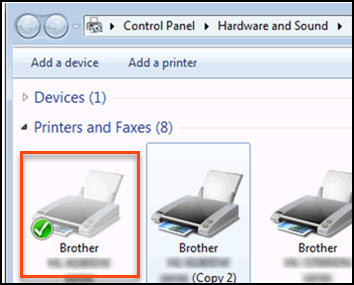
Open the Control Panel, click View devices and printers, right-click the icon of the device whose driver you just installed, and then click Printer Properties.
-
Click Preferences...
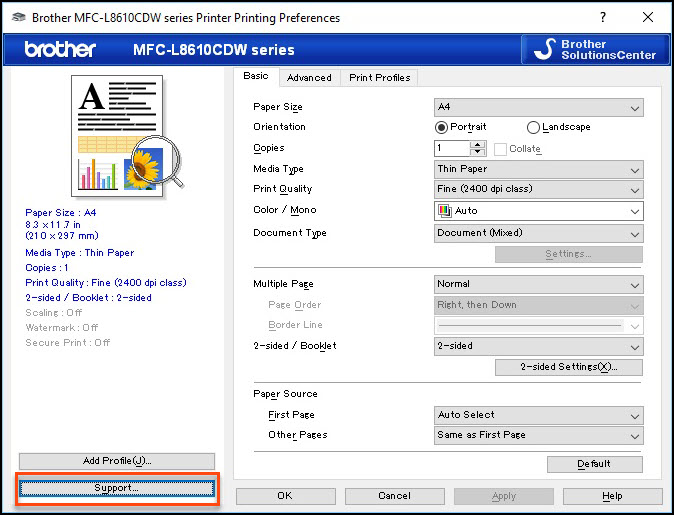
Customize the settings that you want to apply to all computers that will use this device.
Click Support...
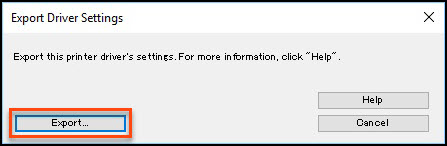
Click Export Driver Settings...
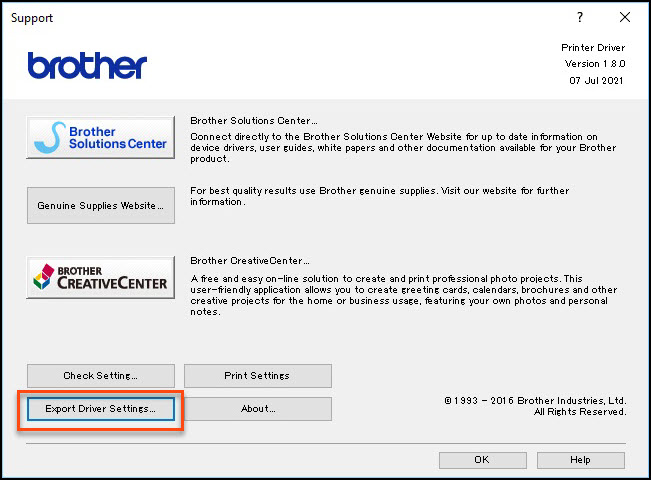
The Export Driver Settings dialog box appears. Click Export...
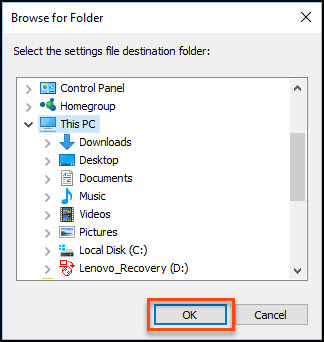
Browse to the folder where you want to save the custom initialization file, and then click OK.
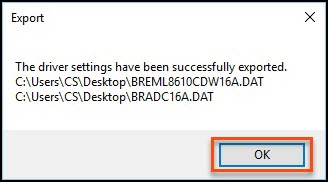
Click OK.
Install the printer driver
Install the custom printer driver in one of the following ways:
Install the printer driver using the Windows Control Panel
Install the printer driver using the Command Prompt
Install the printer driver using the Windows Control Panel
NOTE:
Make sure you remove the device's standard printer driver before you install the custom printer driver.
-
Copy the custom initialization file to the following folder on each user's computer (if the folder does not exist, create it):
...\ProgramData\Brother\PrtDrv\DefaultSettings
On the user's computer, open the Control Panel.
Click View devices and printers.
Click Add a printer.

Follow the on-screen instructions to complete the installation. The values in the custom initialization file saved in Step 11 will be applied and the printer driver will be added.
When the device appears in the Devices and Printers window, click Finish.
Install the printer driver using the Command Prompt
-
Go to the Brother support website, select your region/country, and then go to the product page for the device whose printer driver you want to install. Go to the Downloads section to download the Full Driver & Software Package and follow the on-screen prompts.
-
Extract the downloaded Full Driver & Software Package.
-
Double-click the Install/MSI folder.
-
Right-click the correct MSI file for your device, and then click Properties according to following table:
For Color Laser Devices MSI file name start with "brprc" or "broch".
Example:
brprc16a.msi/ broch16a.msiFor Monochrome Laser Devices MSI file name start with "brprm" or "brohl".
Example:
brprm16a.msi/ brohl16a.msiFor Inkjet Devices MSI file name start with "brpri" or "broih".
Example:
brpri16a.msi/ broih16a.msi -
In the Properties window, click the Details tab. Confirm that the "Brother Printer Driver" appears in the Description section. If it does not, download the correct driver, and try again.
-
Save the MSI file to a local folder on the user's computer.
-
Open the Install/Model folder.
-
Open each DAT file in a text editor and confirm that the "ModelName" and "PrinterDriverName" lines contain the model number of the device that you want to install.
-
Save the custom initialization file exported in Step 9 to a local folder on the user's computer. Make sure you specify the same folder for each user computer for the location of the DAT file.
Do not save the exported file to a network folder, otherwise the printer driver installation will be unsuccessful. -
Click Start > (All apps) > Windows System > Command Prompt.
-
Run the msiexec command as follows:
msiexec /i [printer driver's filename].msi parameter parameter parameter
where the printer driver's filename is followed by one or more of the parameters listed below:
Examples:
- If storing the printer driver without installing the device:msiexec /i broch16a.msi DEFAULTSETTING="C:\temp\BREHL9310CDW16A.DAT“ ADMINSETTING="C:\temp\BRADC16A.DAT“
- If storing the printer driver and installing the device by specifying the port:
msiexec /i broch16a.msi DRIVERNAME="Brother HL-L9310CDW series" PRINTERNAME="BrotherPrinter_HL-L9310CDW" IPADDRESS=1.1.1.1 DEFAULTSETTING="C:\temp\BREHL9310CDW16A.DAT“ ADMINSETTING="C:\temp\BRADC16A.DAT“ DISABLESETTINGEXPORT=1 ISDEFAULTPRINTER=1
Parameter Description Default Value1Example DRIVERNAME Specify the printer driver you want to install. To find a driver name, see the [PrinterDriverName] line in the DAT file of the Full Software & Driver Package.
When creating a print queue, you must specify the DRIVERNAME parameter.- DRIVERNAME="Brother HL-L9310CDW series" PRINTERNAME Specify the device name. If not specified, the value of DRIVERNAME is set as the device name. - PRINTERNAME="Brother Printer HL-L9310CDW" IPADDRESS Specify the TCP/IP port name of the device you want to install using its IP address.
When creating a print queue, you must specify one of the following: IPADDRESS, PORTNAME, or USBPORT.- IPADDRESS=1.1.1.1 PORTNAME Specify the TCP/IP port name of the device you want to install using its node name.
When creating a print queue, you must specify one of the following: IPADDRESS, PORTNAME, or USBPORT.- PORTNAME=BR1234567890123 USBPORT Specify the device's local port name.
When creating a print queue, you must specify one of the following parameters: IPADDRESS, PORTNAME, or USBPORT.- USBPORT=LPT1 ISDEFAULTPRINTER Specify if you want to set this device as the default printer.
1: Install the driver and make this device the default printer.
0: Install the driver and do not make this device the default printer.1 ISDEFAULTPRINTER=1 DEFAULTSETTING Specify the custom initialization file (DAT file starting with "BRE") exported by Export Driver Settings. - DEFAULTSETTING="C:\temp\BREHL9310CDW16A.DAT“ ADMINSETTING Specify the functional restriction file (DAT file starting with "BRAD") exported by Export Driver Settings. - ADMINSETTING="C:\temp\BRADC16A.DAT“ DISABLESETTINGEXPORT Hides or displays the Export Driver Settings button in the Support dialog box.
1: Hide the Export Driver Settings button.
0: Display the Export Driver Settings button.1 DISABLESETTINGEXPORT=1 1 When no parameter is specified.
-
Press the Enter key on your computer's keyboard.
-
When the device appears in the Devices and Printers window, click Finish.