(For more information, see the Help text in the printer driver.)

Note
| • | To use the BR-Script3 printer driver you must install the driver using the Custom Install from the CD-ROM. |
| • | The screens in this section are based on HL-5380DN with Windows® XP. |
| • | The screens on your computer may vary depending on your operating system. |
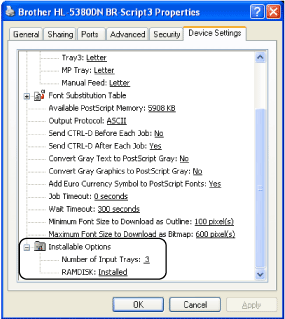
Device Settings tab
Note
From the
Start menu, select
Control Panel and then
Printers and Faxes1. Right-click the
Brother HL-5380DN BR-Script3 icon and select
Properties to access the
Device Settings tab.
Choose the options you have installed.
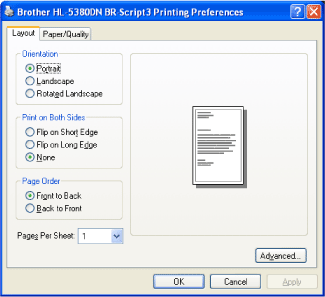
Printing Preferences
Note
You can access the Printing Preferences dialog box by clicking Printing Preferences... in the General tab of the Brother HL-5380DN BR-Script3 Properties dialog box.
| • | Layout tab You can change the layout setting by choosing the settings for Orientation, Print on Both Sides (Duplex), Page Order and Page Per Sheet. | • | Orientation Orientation selects the position of how your document will be printed. (Portrait, Landscape or Rotated Landscape) | | • | Print on Both Sides If you want to do duplex printing, choose Flip on short Edge or Flip on Long Edge. | | • | Page Order Specifies the order in which the pages of your document will be printed. Front to Back prints the document so that page 1 is on top of the stack. Back to Front prints the document so that page 1 is on the bottom of the stack. | | • | Pages Per Sheet Choose how many pages will appear on each side of the paper, or Booklet. |
|
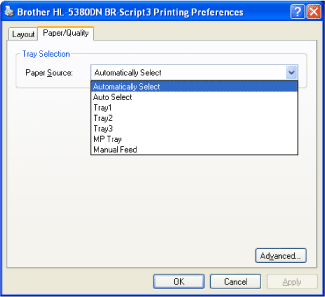
| • | Paper/Quality tab Choose the Paper Source. | • | Paper Source You can choose Automatically Select, Auto Select, Tray1, Tray21, Tray31, MP Tray or Manual Feed. |
|
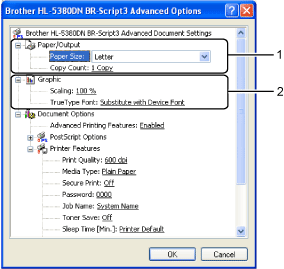
Advanced options
| 1 | Choose the Paper Size and Copy Count(1). | • | Paper Size | | From the drop-down box choose the Paper Size you are using. |
| • | Copy Count | | The copy selection sets the number of copies that will be printed. |
|
| 2 | Set the Scaling and True Type Font settings (2). | • | Scaling | | Specifies whether to reduce or enlarge documents, and by what percentage. |
| • | True Type Font | | Specifies the TrueType font options. Click Substitute with Device Font (the default) to use equivalent printer fonts for printing documents that contain TrueType fonts. This will permit faster printing; however, you might lose special characters not supported by the printer font. Click Download as Softfont to download TrueType fonts for printing instead of using printer fonts. |
|
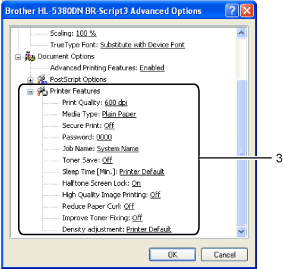
| 3 | You can change settings by choosing a setting in the Printer Features list (3): | • | Print Quality | | You can choose the following print quality settings. | • | 1200 dpi | | • | HQ 1200 | | • | 600 dpi | | • | 300 dpi |
|
| • | Media Type | | You can use the following types of media in your printer. For the best print quality, select the type of media that you wish to use. Plain Paper | Thin Paper | Thick Paper | Thicker Paper | Bond Paper | Env. Thick | Env. Thin | Recycled Paper | Envelopes | Transparencies |
|
| • | Secure Print | | Secure Print allows you to secure documents that are password protected when they are sent to the printer. Only the people who know the password will be able to print them. Since the documents are secured at the printer, you must enter the password using the control panel of the printer. The secured document must have a Password and Job Name. (For more information about the Secure Print function, See Printing Secure data.) |
| • | Password | | Choose the password for your secured document that you send to the machine from the drop-down box. |
| • | Job Name | | Choose the Job name from the drop-down list for your secured document. |
| • | Toner Save | | You can conserve toner use with this feature. When you set Toner Save mode to On, print appears lighter. The default setting is Off. Note | • | We do not recommend Toner Save for printing Photo or Greyscale images. | | • | Toner Save mode is not available for 1200 dpi or HQ 1200 resolution. |
|
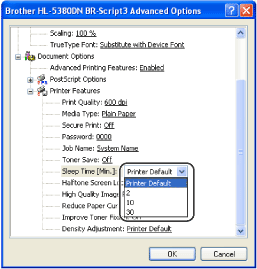
| • | | | When the printer does not receive data for a certain period of time, it enters sleep mode. In sleep mode, the printer acts as though it were turned off. When you choose Printer Default the timeout setting will be 1 minute. While the printer is in sleep mode, Back light is off, the LCD shows SLEEP, but the printer can still receive data. Receiving a print file or document or pressing Go will automatically wake up the printer to start printing. |
| • | Halftone Screen Lock | | Stops other applications from modifying the Halftone settings. The default setting is On. |
| • | High Quality Image Printing | | You can get high quality image printing. If you set High Quality Image Printing to On, the printing speed will be slower. |
| • | Reduce Paper Curl | | If you choose this setting, the paper curl may be reduced. If you are printing only a few pages, you do not need to choose this setting. We recommend that you change the printer driver setting in Media Type to a thin setting. |
| • | Improve Toner Fixing | | If you choose this setting, the toner fixing on paper may be improved. If this selection does not provide enough improvement, select Thicker Paper in Media Type settings. |
| • | Density Adjustment | | Increase or decrease the print density. |
|