Home > Network > Additional Methods of Configuring Your Brother Machine for a Wireless Network > Configure Your Machine for a Wireless Network Using the PIN Method of Wi-Fi Protected Setup™ (WPS)


Configure Your Machine for a Wireless Network Using the PIN Method of Wi-Fi Protected Setup™ (WPS)
If your wireless LAN access point/router supports WPS, you can use the Personal Identification Number (PIN) Method to configure your wireless network settings.
The PIN Method is one of the connection methods developed by the Wi-Fi Alliance®. By submitting a PIN created by an Enrollee (your machine) to the Registrar (a device that manages the wireless LAN), you can set up the wireless network and security settings. For more information on how to access WPS mode, see the instructions provided with your wireless access point/router.
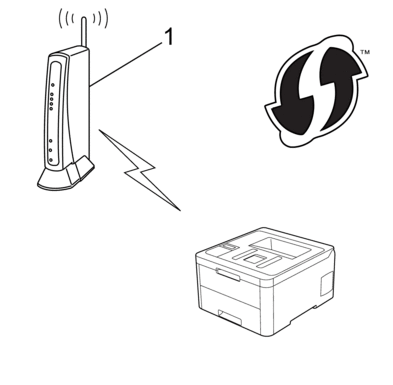
- Type A
- Connection when the wireless LAN access point/router (1) doubles as the Registrar:
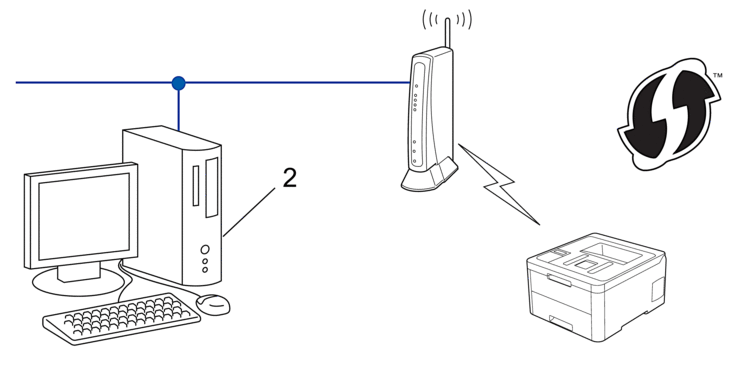
- Type B
- Connection when another device (2), such as a computer, is used as the Registrar:


HL-L3210CW/HL-L3230CDW
- Press
 or
or  to select the [Network] option, and then press OK.
 - Press or to select the [WLAN] option, and then press OK.
- Press or to select the [WPS w/PIN Code] option, and then press OK.
- When [WLAN Enable?] appears, select On.This will start the wireless setup wizard.
- The LCD displays an eight-digit PIN and the machine starts searching for a wireless LAN access point/router.
- Using a computer connected to the network, in your browser's address bar, type the IP address of the device you are using as the Registrar. (For example: http://192.168.1.2)
- Go to the WPS settings page and type the PIN, and then follow the on-screen instructions.
- The Registrar is usually the wireless LAN access point/router.
- The settings page will differ depending on the brand of wireless LAN access point/router. For more information, see the instructions supplied with your wireless LAN access point/router.
- Do one of the following:
- Windows 7
Click
 .
. - Windows 8
Move your mouse to the lower right corner of your desktop. When the menu bar appears, click .
- Windows 10
Click
 Windows SystemControl Panel. In the Hardware and Sound group, click Add a device.
- To use a Windows 7, Windows 8, or Windows 10 computer as a Registrar, you must register it to your network in advance. For more information, see the instructions supplied with your wireless LAN access point/router.
- If you use Windows 7, Windows 8, or Windows 10 as a Registrar, you can install the printer driver after the wireless configuration by following the on-screen instructions. To install the Full Driver & Software Package necessary for operating your machine, insert the Brother installation disc into your computer or go to your model's Downloads page on the Brother Solutions Center at support.brother.com.
- Select your machine and click Next.
- Type the PIN displayed on the machine's LCD, and then click Next.
- (Windows 7) Select your network, and then click Next.
- Click Close.
You have completed the wireless network setup. To install the Full Driver & Software Package necessary for operating your machine, insert the Brother installation disc into your computer, or go to your model's Downloads page on the Brother Solutions Center at support.brother.com.
HL-L3270CDW
- Press
 .
. - When [Enable WLAN?] appears, press [Yes].This will start the wireless setup wizard. To cancel, press [No].
- The LCD displays an eight-digit PIN and the machine starts searching for a wireless LAN access point/router.
- Using a computer connected to the network, in your browser's address bar, type the IP address of the device you are using as the Registrar. (For example: http://192.168.1.2)
- Go to the WPS settings page and type the PIN, and then follow the on-screen instructions.
- The Registrar is usually the wireless LAN access point/router.
- The settings page will differ depending on the brand of wireless LAN access point/router. For more information, see the instructions supplied with your wireless LAN access point/router.
- Do one of the following:
- Windows 7
Click
. - Windows 8
Move your mouse to the lower right corner of your desktop. When the menu bar appears, click .
- Windows 10
Click
Windows SystemControl Panel. In the Hardware and Sound group, click Add a device.
- To use a Windows 7, Windows 8, or Windows 10 computer as a Registrar, you must register it to your network in advance. For more information, see the instructions supplied with your wireless LAN access point/router.
- If you use Windows 7, Windows 8, or Windows 10 as a Registrar, you can install the printer driver after the wireless configuration by following the on-screen instructions. To install the Full Driver & Software Package necessary for operating your machine, insert the Brother installation disc into your computer or go to your model's Downloads page on the Brother Solutions Center at support.brother.com.
- Select your machine and click Next.
- Type the PIN displayed on the machine's LCD, and then click Next.
- (Windows 7) Select your network, and then click Next.
- Click Close.
You have completed the wireless network setup. To install Full Driver & Software Package necessary for operating your device, insert the Brother installation disc into your computer or go to your model's Downloads page on the Brother Solutions Center at support.brother.com.