Home > Introduction to Your Machine > Control Panel Overview
Control Panel Overview
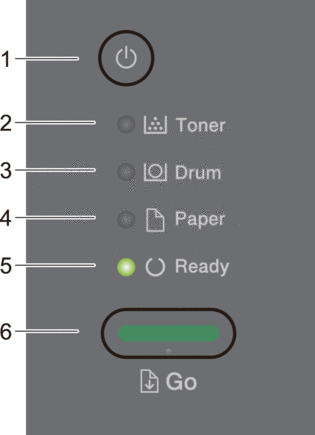
HL-L2400D

 Power On/Off
 -
Turn on the machine by pressing
 .
. Turn off the machine by pressing and holding
 .
.
- Toner LED
- The Toner LED indicates that the Toner is low.
- Drum LED
- The Drum LED indicates that the Drum Unit must be replaced soon.
- Paper LED
- The Paper LED indicates that there is an error relating to paper feeding.
- Ready LED
- The Ready LED blinks to indicate the machine's status.
- Go Button
-
- Press Go to clear certain errors.
- Press Go to print any data remaining in the machine's memory.
- Press and hold Go for about two seconds to cancel a print job.
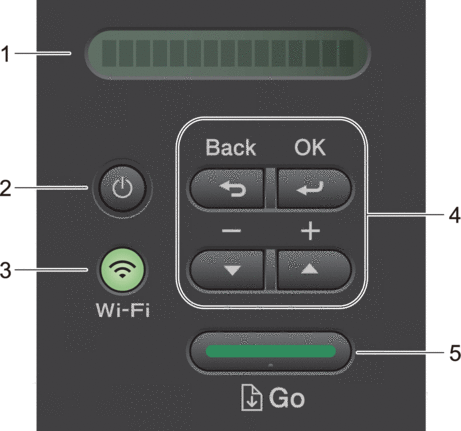
HL-L2405W/HL-L2420DW/HL-L2460DW/HL-L2460DWXL/HL-L2865DW
The control panel will vary depending on your model.

- Liquid Crystal Display (LCD)
- Displays messages to help you set up and use your machine.
-
Wireless Models:
A four-level indicator shows the wireless signal strength if you are using a wireless connection.

 Power On/Off
 -
Turn on the machine by pressing
 .
. Turn off the machine by pressing and holding
 . The LCD displays [Shutting Down] for a few seconds before turning off.
- Network Buttons
-
Models with Wireless Network:
Wi-Fi
Press and hold the Wi-Fi button and launch the wireless installer on your computer. Follow the on-screen instructions to set up a wireless connection between your machine and your network.
When the Wi-Fi light is on, your Brother machine is connected to a wireless access point. When the Wi-Fi light blinks, the wireless connection is down, or your machine is in the process of connecting to a wireless access point.
Model with Wired Network only:
Network
Press Network to set up wired network settings.
Models without Network Function:
Report
Press Report to print the Printer Settings.
- Menu Buttons
-
- OK
-
Press to store your machine settings. After you change a setting, the machine returns to the previous menu level.
- Back
-
- Press to go back one level in the menu.
- Press to select the previous digit when entering numbers.
 or
or  ( + or -)
 -
- Press to scroll through menus and options.
- Press to enter a number or to increase or decrease the number. Press and hold down
 or
or  to scroll faster. When you see the number you want, press OK.
- Go Button
-
- Press to clear certain error messages. To clear all other errors, follow the control panel instructions.
- Press to print any data remaining in the machine's memory.
- Press to select the displayed option. After you change a setting, the machine returns to Ready mode.
- Press and hold Go for about two seconds to cancel a print job.


