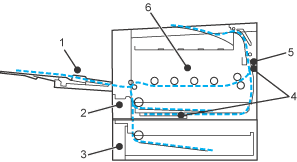
Paper jams and how to clear them

If paper jams inside the printer, the printer will stop. One of the following LCD messages will appear to tell you where to find the jammed paper.
Graphic
• 
Jam MP Tray (1)
Paper jam in the MP tray. (See Jam MP Tray (paper jam in the MP tray).)
• 
Jam Tray 1 (2)
Paper jam in the standard paper tray (Tray 1). (See Jam Tray 1 / Tray 2 (paper jam inside the paper tray).)
• 
Jam Tray 2 (3)
Paper jam in the lower tray (Tray 2). (See Jam Tray 1 / Tray 2 (paper jam inside the paper tray).)
• 
Jam Duplex (4)
Paper jam underneath the standard paper tray (Tray 1) or in the fuser unit. (See Jam Duplex (paper jam underneath the standard paper tray (tray 1) or in the fuser unit) (HL-4050CDN / HL-4070CDW only).)
• 
Jam Rear (5)
Paper jam where the paper comes out of the printer. (See Jam Rear (paper jam behind the back cover).)
• 
Jam Inside (6)
Paper jam inside the printer. (See Jam Inside (paper jam inside the printer).)
If the error message still appears on the LCD after you remove the jammed paper, there may be more paper jammed somewhere else. Check the printer thoroughly.
After you have removed all the jammed paper, open the front cover and then close it again to start printing.
Note Note
 
Always remove all paper from the paper tray and straighten the stack when you add new paper. This helps prevent multiple sheets of paper from feeding through the printer at one time and prevents paper jams.

Jam MP Tray (paper jam in the MP tray)

Jam MP Tray
 
If a paper jam occurs inside the MP tray, follow these steps:
1
Remove the paper from the MP tray.
2
Remove any jammed paper from in and around the MP Tray.
3
Fan the paper stack, and then put it back in the MP tray.
Graphic
4
When loading paper in the MP tray, make sure that the paper stays under the maximum paper height guides on both sides of the tray.
5
If the printer does not automatically start printing, press Go.