Control panel button (Go button)
The control panel button has the following functions:
If the printer is in Sleep mode, press the
Go button to wake the printer up and go to the Ready state.
If there is an error, the printer will recover automatically from some errors. If an error is not automatically cleared, press the
Go button to clear the error, and then continue to use the printer.
If the green
Ready LED blinks for a long time, press the
Go button. The printer will print any data that is left in the printer memory.
While printing press the
Go button for about 4 seconds until all the LEDs light up. The
Ready and
Paper LEDs will flash as the job is being cancelled.
To reprint the last document, press the
Go button for about 4 seconds until all the LEDs light up.
Print a test page
You can use the
Go button or the printer driver to print a test page.
Using control panel button
- Turn off the printer.
- Make sure that the front cover is closed and the power cord is plugged in.
- Hold down the Go button as you turn on the power switch. Keep the Go button pressed down until the Toner, Drum and Paper LEDs light up. Release the Go button. Make sure that the Toner, Drum and Paper LEDs are off.
- Press the Go button again. The printer will print a test page.
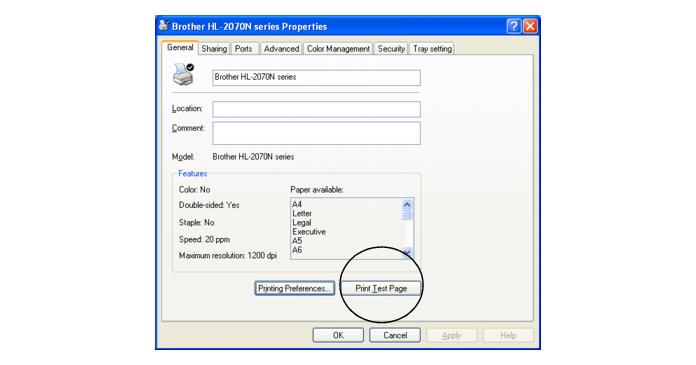
Using the printer driver
If you are using Brother’s Windows
® printer driver, click the
Print Test Page button. It is in the
General tab of the Windows
® printer driver.
Print a Printer Settings page
You can print the current settings using the control panel button or printer driver.
Using the control panel button
- Make sure that the front cover is closed and the power cord is plugged in.
- Turn on the printer and wait until the printer is in the Ready state.
- Press the Go button three times within 2 seconds. The printer will print the current printer settings page.
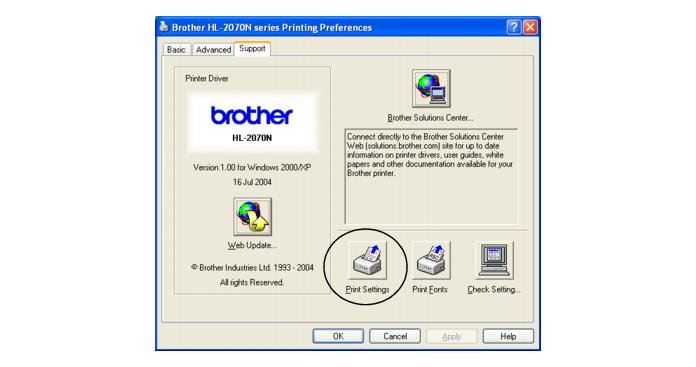
Using the printer driver
If you are using Brother’s Windows
® printer driver, you can print the current printer settings page by clicking the
Print Settings button in the
Support tab.
Print Fonts (For HL-2070N)
You can print a list of the internal fonts using the control panel button or printer driver.
Using the control panel button
- Turn off the printer.
- Make sure that the front cover is closed and the power cord is plugged in.
- Hold down the Go button as you turn on the power switch. Keep the Go button pressed down until the Toner, Drum and Paper LEDs light up. Release the Go button. Make sure that the Toner, Drum and Paper LEDs are off.
- Press the Go button twice. The printer will print a list of the internal fonts.
Using the printer driver
If you are using Brother’s Windows
® printer driver, you can print a list of the internal fonts by clicking the
Print Fonts button in the
Support tab.
Network factory default setting (For HL-2070N)
If you wish to reset the print server back to its default factory settings (resetting all information such as the password and IP address information), please follow these steps:
- Turn off the printer.
- Make sure that the front cover is closed and the power cord is plugged in.
- Hold down the Go button as you turn on the power switch. Keep the Go button pressed down until the Toner, Drum and Paper LEDs light up. Release the Go button. Make sure that the Toner, Drum and Paper LEDs are off.
- Press the Go button six times. Make sure that all the LEDs light up to indicate the print server has been reset to its default factory settings.
Network factory default setting with APIPA protocol disabled (For HL-2070N)
If you wish to reset the print server back to its factory default settings with APIPA protocol disabled, please follow these steps:
- Turn off the printer.
- Make sure that the front cover is closed and the power cord is plugged in.
- Hold down the Go button as you turn on the power switch. Keep the Go button pressed down until the Toner, Drum and Paper LEDs light up. Release the Go button. Make sure that the Toner, Drum and Paper LEDs are off.
- Press the Go button seven times. Make sure that all the LEDs light up to indicate the print server has been reset to its default factory settings.
 Note Note |
|
• You can also disable the APIPA protocol using Web browser, BRAdmin Professional or Web BRAdmin.