Printer driver
A printer driver is software that translates data from the format used by a computer to the format that a particular printer needs. Typically, this format is a printer command language or page description language.
The printer drivers for the following version of Windows
® and Macintosh
® are on the CD-ROM that we have supplied. You can also download the latest printer driver for all of the following operating systems from the Brother Solutions Center at
http://solutions.brother.com
The installation instructions for installing the printer driver for Windows
® and Macintosh
® are in the Quick Setup Guide.
For Windows® 95/98/Me, Windows NT® 4.0 and Windows® 2000/XP
- Windows printer driver (Hewlett-Packard LaserJet laser printer compatible driver) (For HL-2070N)
- Brother GDI printer driver for Windows® (For HL-2030 and HL-2040)
- Generic PCL Driver (For users of Citrix® MetaFrame®, Windows® Terminal Server environments and other Windows NT 4.0® and Windows® 2000/XP network shared environments, we recommend the use of our Generic PCL Driver. This driver only supports basic printing functions.) (For HL-2070N: For Windows NT®4.0 and Windows® 2000/XP.)
For Macintosh®
- Brother Laser driver for Macintosh®
For Linux
 Note Note |
|
|
|
|
|
|
|
|
|
|
|
|
|
|
|
|
|
|
|
(For HL-2030 and HL-2040)
|
|
|
|
|
|
|
Mac OS® X 10.2.4 or greater
|
|
|
|
|
Linux (Mandrake 9.1, Red Hat 9.0, SuSE Linux 8.2, Debian 3.0r1)
|
|
|
|
|
You can change the following printer settings when you print from your computer.
- Insert Command/File*1*2*3
*1 These settings are not available with Brother Laser driver for Macintosh
®.
*2 These settings are not available with Windows NT
® 4.0 and Windows
® 2000/XP.
*3 These settings are not available for HL-2030 and HL-2040.
For Windows®
Features in the printer driver
You can download the latest printer driver or get other information by accessing the Brother Solutions Center at
http://solutions.brother.com
You can also change settings by clicking the illustration on the left side of the
Basic tab in the
Properties dialog box.
For more information, please see the
Help text in the printer driver.
| Note |
|
The screens in this section are from Windows
® XP. The screens on your PC will vary depending on your Operating System.
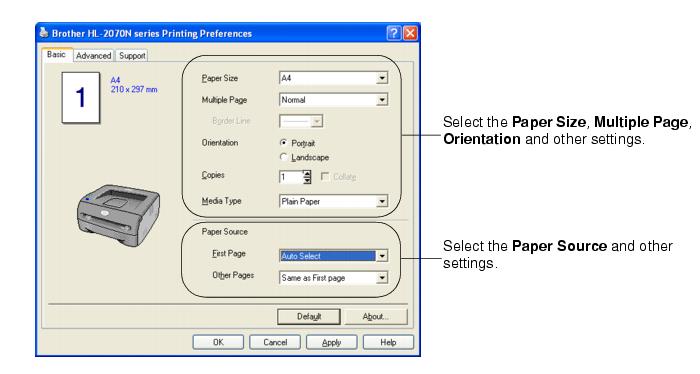
Basic tab
| Note |
|
If you are using Windows
® 2000 or XP, you can access the
Basic tab by clicking
Printing Preferences... in the
General tab of the
Printer Properties screen.
If you are using Windows NT
® 4.0, you can access the
Basic tab by clicking
Document Defaults... in the
file menu of the
Printers folder.
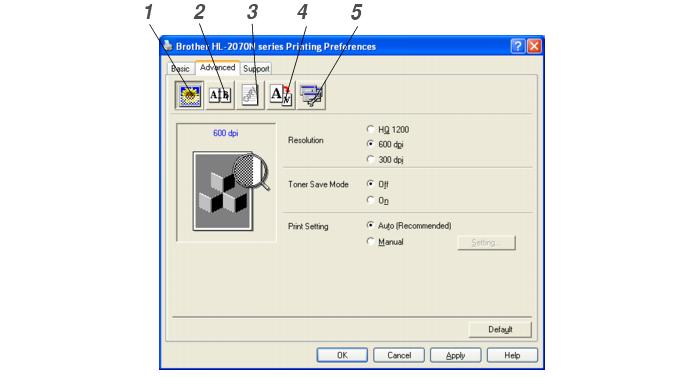
Advanced tab
| Note |
|
If you are using Windows
® 2000 or XP, you can access the
Advanced tab by clicking
Printing Preferences... in the
General tab of the
Printer Properties screen.
If you are using Windows NT
® 4.0, you can access the
Advanced tab by clicking
Document Defaults in the
file menu of the
Printers and Faxes folder.
Change the tab settings by clicking the following icons:
- Print Quality
- Duplex Printing
- Watermark
- Page Setting
- Device Options
Select the resolution, toner save mode and print settings or gray printing setting.
You can change the resolution as follows:
You can save running costs by turning on the toner save mode, which reduces the print density.
You can manually change the Print setting.
Selecting the
Auto button will allow automatic printing with the most suitable print settings for your print job.
You can change the settings manually by selecting the
Manual button and clicking the
Setting... button.
For
Windows® 95/98/Me users: brightness, contrast and other settings
.
For Windows NT® 4.0, Windows® 2000/XP users: Printer Halftone, System Halftone, Improve gray printing.
If you select
Manual Duplex, the dialog box for the manual duplex settings will appear. There are six types of manual duplex binding directions available for each orientation.
If you check the Binding Offset option, you can also specify the offset for binding in inches or millimeters.
You can put a watermarked logo or text into your documents.
When you use a bitmap file as a watermark, you can change the size of the watermark and put it anywhere you like on the page.
When you use text as a watermark, you can change the font, darkness and angle settings.
You can change the print image scaling and select
Mirror / Reverse print options.
You can set the following
Printer Function modes in this tab:
(You can jump to the page for each
Printer Function by clicking the function name in the list below.)
| Note |
|
The
Printer Function list may differ depending on the model.
The printer saves data that you want to reprint.
You can reprint a document without sending the data again from your PC. To reprint press and hold down the
Go button for about 4 seconds until all the LEDs light up in order (
Toner,
Drum,
Paper,
Ready).
| Note |
|
•
Reprint function is not available for multiple copies.
• If you want to prevent other people from printing your data using the Reprint function, clear the
Use Reprint check box in the job spooling settings.
You can turn the Quick Print Setup function ON or OFF. A small selection window appears on your computer. This will then let you make changes to the settings of the following functions:
When the printer does not receive data for a certain period of time (timeout), it enters sleep mode. Sleep mode acts as though the printer was turned off. The default time-out is 5 minutes. When
Intelligent Sleep Mode is selected, it is automatically adjusted to the most suitable time-out setting depending on how often you use your printer. While the printer is in sleep mode, all the LEDs are off, but the printer can still receive data from the computer. Receiving a print file or document automatically wakes up the printer to start printing. Pressing the
Go button will also wake up the printer.
Sleep mode can be turned off. To turn sleep mode off, go to the
Advanced tab, select
Device Options and then select
Sleep Time. Double click the word
Sleep Time in the
Sleep Time screen, this will allow the
Sleep Time Off function to appear, click
Sleep Time Off to stop the printer from going into sleep mode. The
Sleep Time Off function can be hidden by double clicking the word
Sleep Time in the
Sleep Time screen again. We recommend that you keep Sleep mode on for power saving.
This reports the printer status (any errors that may happen with the printer) when printing. The default setting for the Status Monitor is off. If you would like to turn the status monitor on, go to the
Advanced tab, select
Device options and then select
Status monitor.
You can save a page of a document as a macro to the printer memory. Moreover, you can execute the saved macro - in other words, you can use the saved macro as an overlay on any document. This will save time and increase printing speed for often used information such as forms, company logos, letterhead formats or invoices.
Administrator (For Windows® 95/98/Me users only)
Administrators have the authority to limit the Number of copies, Scaling setting and Watermark setting functions.
Enter the password into this box.
Click here to change the password.
Lock the copy pages selection to prevent multiple copy printing.
Lock the current settings of the Watermark option to prevent changes being made.
Lock the scaling setting as shown below.
Insert Command/File (For HL-2070N: For Windows® 95/98/Me users only)
This option allows data to be inserted into a print job.
Using this function allows you to do the following.
• Insert a print file or tiff format file into a print job.
• Insert a text string into a print job.
• Insert a macro, which is saved in printer memory, into a print job.
Page Protection refers to a setting that reserves additional memory for the creation of full page images.
Selections are AUTO, OFF and Printer Default.
The page protection feature allows the printer to create the full page image to be printed in memory before physically moving the paper through the printer. When the image is very complicated and the printer has to wait to process the image before printing, use this function.
Date: Specifies the format of the date.
Time: Specifies the format of the time.
Increase or decrease the print density.
You can choose whether the printer reports problem by printing error page or not. About the errors,
Error message printout.
Selections are Printer Default (ON), ON and OFF.
Tray Settings tab
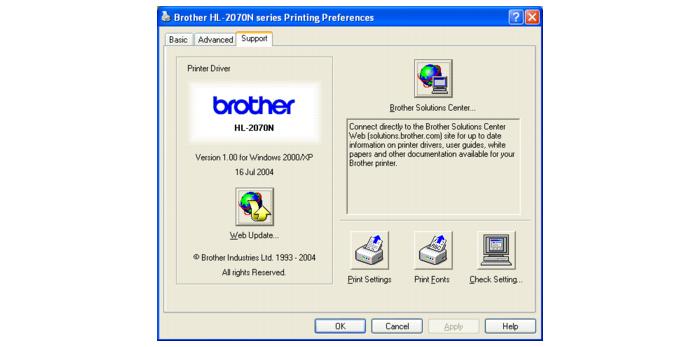
Support tab
| Note |
|
If you are using Windows
® 2000 or XP, you can access the
Support tab by clicking
Printing Preferences... in the
General tab of the
Printer Properties screen.
If you are using Windows NT
® 4.0, you can access the
Support tab by clicking
Document Defaults... in the
file menu of the
Printers folder.
- You can download the latest driver or get other product information by accessing the Brother Solutions Center at http://solutions.brother.com
- You can see the printer driver version.
- You can check the current driver settings.
- You can print the printer settings page and the internal fonts list. (The internal fonts list is available for HL-2070N only.)
For Macintosh®
This printer supports Mac OS
® 9.1 to 9.2 and Mac OS
® X 10.2.4 or greater.
| Note |
|
The screens in this section are from Mac OS
® X 10.3.
The screens on your Macintosh
® will vary depending on your Operating System.
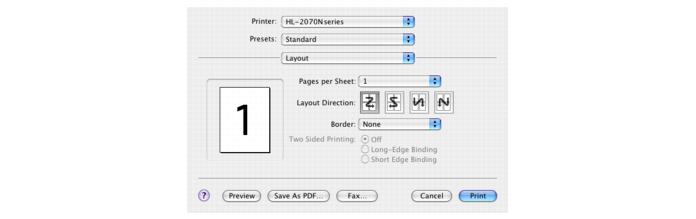
Page setup
You can set the
Paper size,
Orientation and
Scale.
Print
Set the
Pages per Sheet, Layout direction and
Border.
Pages per sheet: Select how many pages will appear on each side of the paper.
Layout direction: When you specify the Pages per sheet, you can also specify the direction of the layout.
Border: If you want to add a border, use this function.
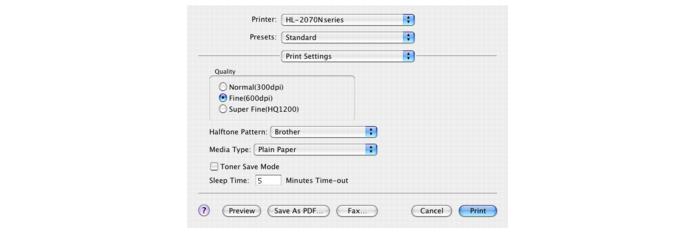
Set the
Resolution,
Media Type,
Toner Save and other settings.
You can change settings by selecting the setting in the
Printer Settings list:
You can change the resolution as follows:
You can change the media type as follows:
You can save running costs by turning on the
Toner Save setting, which reduces the print density.
Uninstalling the printer driver
You can uninstall the printer driver that you installed with the following steps.
| Note |
|
• This instruction is not available if you installed the printer driver from Windows Add Printer function.
• After uninstalling, we recommend that you restart your PC to remove files that were in use during uninstall.
Printer driver for Windows®
For Windows® 95/98/Me, Windows NT® 4.0 and Windows® 2000
- Click Start and select your appropriate printer from Programs.
- Select UnInstall.
- Follow the instructions on the screen.
For Windows® XP
- Click Start and select your appropriate printer from ALL Programs.
- Select UnInstall.
- Follow the instructions on the screen.
Brother Laser driver for Macintosh®
For Mac OS® 9.1 to 9.2
- Open the Extensions folder located in the System Folder on the Macintosh HD.
- Drag all these following files in the Extensions folder to the trash.
| Note |
|
There may be several of the USB Print Driver(BRXXX)* and BR_PrintMonitor(BXX)* extensions with different endings.
*The 'x' refers to the model of your machine.
- Restart the Macintosh®.
- Once the computer has restarted you can then dump the trash.
For Mac OS® X 10.2.4 or greater
- Disconnect the USB cable between the Macintosh and your printer.
- Restart the Mac.
- Log on as an "Administrator".
- Run the Print Center (from the Go menu > Applications > Utilities > Print Center folder), then choose the printer you want to remove and remove it by clicking the Delete button.
- Click on the name of your printer in the printer list. From the Finder menu, delete the Printer.
- Drag the HL-MFLPro folder (from the Mac OS X 10.X > Library > Printers > Brother) into the Trash bin and then empty the trash bin.
- Restart the Macintosh®.


 Selecting the Auto button will allow automatic printing with the most suitable print settings for your print job.
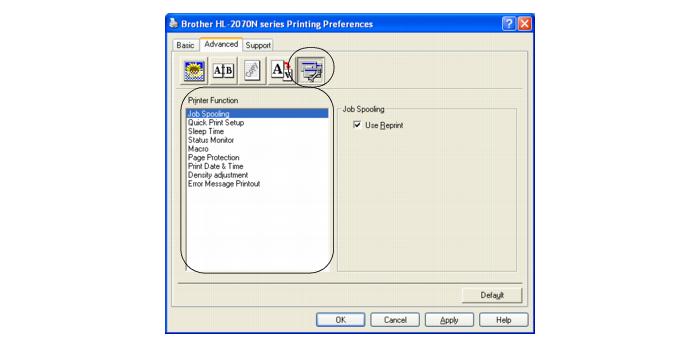 (You can jump to the page for each Printer Function by clicking the function name in the list below.)
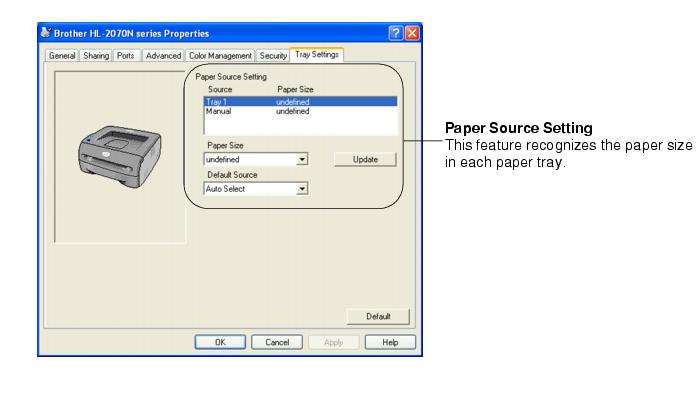

 Layout direction: When you specify the Pages per sheet, you can also specify the direction of the layout.