LCD messages | Consumable item to replace | Approximate life | How to replace | Order No. |
Toner Life End Replace Black(K) Toner Cartridge.1 | Toner cartridges standard | 2,500 pages (Black)2 1,500 pages (Cyan, Magenta, Yellow)2 | TN-110BK TN-110C TN-110M TN-110Y | |
Toner cartridges high yield | 5,000 pages (Black)2 4,000 pages (Cyan, Magenta, Yellow)2 | TN-115BK TN-115C TN-115M TN-115Y | ||
Waste Toner Full | Waste toner box | 20,000 pages3 | WT-100CL |
LCD messages | Consumable item to replace | Approximate life | How to replace | Order No. |
Toner Low Prepare New Black(K) Toner Cartridge.1 | Toner cartridges standard | 2,500 pages (Black)2 1,500 pages (Cyan, Magenta, Yellow)2 | TN-110BK TN-110C TN-110M TN-110Y | |
Toner cartridges high yield | 5,000 pages (Black)2 4,000 pages (Cyan, Magenta, Yellow)2 | TN-115BK TN-115C TN-115M TN-115Y | ||
Change Parts Waste Toner Box | Waste toner box | 20,000 pages3 | WT-100CL |
LCD messages | Consumable item to replace | Approximate life | How to replace | Order No. |
Change Parts Drum | Drum unit | 17,000 pages1 | DR-110CL | |
Change Parts Belt Unit | Belt unit | 50,000 pages2 | BU-100CL | |
Change Parts Fuser Unit | Fuser unit | 80,000 pages3 | Call Brother Customer Service to replace the fuser unit. | — |
Change Parts Laser Unit | Laser unit | 100,000 pages3 | Call Brother Customer Service to replace the laser unit. | — |
Change Parts PF Kit 1 | Paper feeding kit 1 (Paper pick-up roller and Separator pad for Tray 1) | 100,000 pages3 | Call Brother Customer Service to replace the paper feeding kit 1. | — |
Change Parts PF Kit 2 (when the optional lower tray is installed) | Paper feeding kit 2 (Paper pick-up roller and Separator pad for Tray 2) | 100,000 pages3 | Call Brother Customer Service to replace the paper feeding kit 2. | — |
Change Parts PF Kit MP | Paper feeding kit MP (Paper pick-up roller and Separator pad for MP tray) | 50,000 pages3 | Call your Brother dealer or Brother Customer Service to replace the paper feeding kit MP. | — |
Toner Low Prepare New
|
Toner Life End Replace Black(K) |
We recommend that you clean the machine and corona wires of the drum unit when you replace a toner cartridge. (See Cleaning the laser scanner windows and Cleaning the corona wires.) |
| 1 | Press the front cover release button and then open the front cover.  | ||
| 2 | Hold the green handle of the drum unit. Lift the drum unit up and then pull it out until it stops. 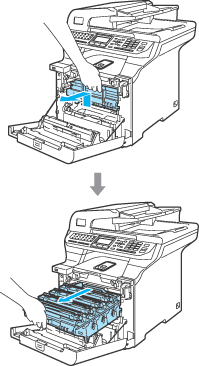 | ||
| 3 | Hold the handle of the toner cartridge and pull it out of the drum unit. Repeat this for all the toner cartridges. 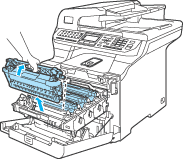
| ||
| 4 | Clean the corona wires as follows. | ||
| 5 | Unpack the new toner cartridge. Hold the cartridge level with both hands and gently rock it from side to side five or six times to spread the toner evenly inside the cartridge. 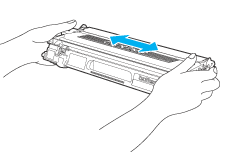 | ||
| 6 | Remove the orange protective cover.  | ||
| 7 | Hold the handle of the toner cartridge and slide the toner cartridge into the drum unit. Make sure that you match the toner cartridge color to the same color label on the drum unit, and make sure that you fold down the toner cartridge handle (A) once the toner cartridge is in place. Repeat this for all the toner cartridges. 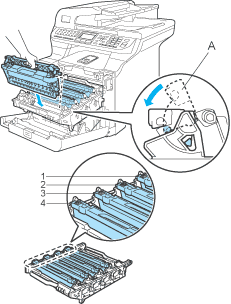 | ||
| 8 | Push the drum unit in until it stops. 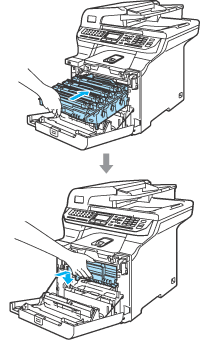 | ||
| 9 | Close the front cover of the machine.  |