Scanning a document into the PC

There are two ways in which you can scan a whole page. You can either use the ADF (automatic document feeder) or the scanner glass.
If you want to scan and then crop a portion of a page after pre-scanning the document, you need to use the scanner glass. (See Pre-Scanning to crop a portion you want to scan using the scanner glass.)

Scanning a document using the ADF

1
Put the document face up in the ADF.
2
Choose Feeder (Scan one side) in the Source drop-down list (2).
3
Adjust the following settings, if needed, in the Scanner dialog box.
Screen
1.
Profile
2.
Source
3.
Paper size
4.
Color format
5.
File type
6.
Resolution
7.
Brightness
8.
Contrast
Note Note
 
The scanner resolution can be set as high as 1200 dpi.
For resolutions greater than 1200 dpi, use the Brother Scanner Utility.
4
Click the Scan button in the Scan dialog box.
The machine starts scanning the document.

Pre-Scanning to crop a portion you want to scan using the scanner glass

The Preview button is used to preview an image for cropping any unwanted portions from the image. When you are satisfied with the preview, click the Scan button in the Scan dialog box to scan the image.
1
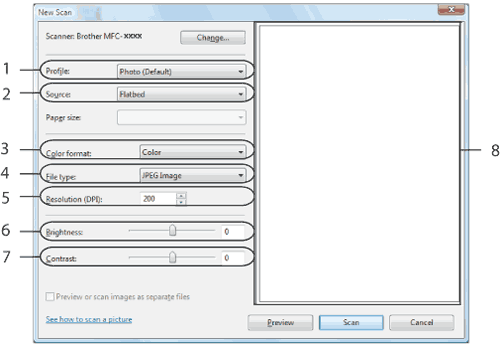
Put the document face down on the scanner glass.
2
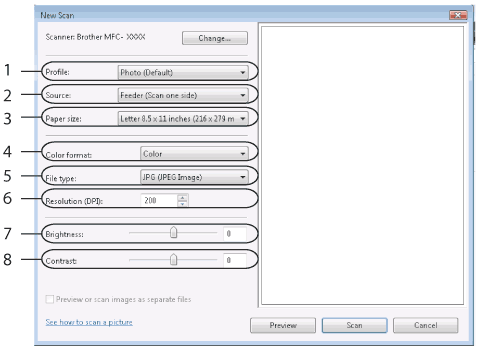
Choose Flatbed in the Source drop-down list. Adjust the following settings, if needed, in the Scanner dialog box.
Screen
1.
Profile
2.
Source
3.
Color format
4.
File type
5.
Resolution
6.
Brightness
7.
Contrast
8.
Scanning area
3
Click Preview.
The whole image is scanned into the PC and appears in the scanning area (8).
4
Press and hold down the left mouse button and drag it over the portion you want to scan.
Screen
5
Click the Scan button in the Scan dialog box.
The machine starts scanning the document.
This time only the chosen area of the document appears in your application window.