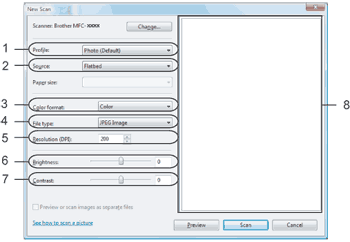
Pre-Scanning and cropping a portion using the scanner glass

The Preview button is used to preview an image for cropping any unwanted portions from the image. When you are satisfied with the preview, click the Scan button in the Scan dialog box to scan the image.
1
Follow the step from 1 to 5 of Scanning a document into the PC.
2
Put the document face down on the scanner glass.
3
Choose Flatbed in the Source drop-down list. Adjust the following settings, if needed, in the Scanner dialog box.
Screen
1.
Profile
2.
Source
3.
Color format
4.
File type
5.
Resolution
6.
Brightness
7.
Contrast
8.
Scanning area
Note Note
If your machine has no Auto Document Feeder (ADF), you do not need to specify the Source.
4
Click Preview.
The whole image is scanned into the PC and appears in the scanning area (8).
5
Press and hold down the left mouse button and drag it over the portion you want to scan.
Screen
6
Click the Scan button in the Scan dialog box.
The machine starts scanning the document.
This time only the chosen area of the document appears in your application window.