Scanning a document using the WIA driver
(Windows Photo Gallery and Windows Fax and Scan users)

Scanning a document into the PC

There are two ways to scan a whole page. You can either use the ADF (automatic document feeder) or the scanner glass.
If you want to scan and then crop a portion of a page after pre-scanning the document, you must scan using the scanner glass. (See Pre-Scanning and cropping a portion using the scanner glass.)
1
Load your document.
2
Open your software application to scan the document.
3
Do one of the following:
(Windows Photo Gallery)
Click File, then Import from Camera or Scanner.
(Windows Fax and Scan)
Click File, New, then Scan.
4
Choose the scanner you want to use.
5
Click Import.
The Scan dialog box appears.
6
Adjust the following settings, if needed, in the Scanner dialog box:
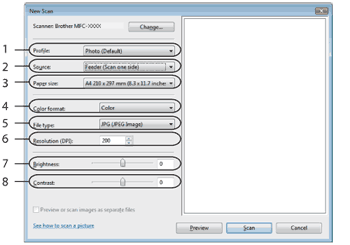
Screen
1.
Profile
2.
Source
3.
Paper size
4.
Color format
5.
File type
6.
Resolution
7.
Brightness
8.
Contrast
Note Note
By default, the scanner resolution can be set to a maximum of 1200 dpi.
If you want to scan at higher resolutions, use the Scanner Utility. (See Scanner Utility.)
7
Click the Scan button in the Scan dialog box.
The machine starts scanning the document.