Home > Troubleshooting > If You Are Having Difficulty with Your Machine > Paper Handling and Printing Problems


Paper Handling and Printing Problems
If, after reading this table, you still need help, see the latest FAQs & Troubleshooting tips at support.brother.com.
Printing Difficulties
| Difficulties | Suggestions |
|---|
| No printout | (Windows) Check that the correct printer driver has been installed and selected. |
| Check to see if the machine's display is showing an error message. See Related Information: Error and Maintenance Messages. |
| Check that the machine is online:
|
| One or more ink cartridges have reached the end of their life. See Related Information: Replace the Ink Cartridges. |
| If old, unprinted data remains in the printer driver spooler, it will prevent new print jobs from printing. Open the printer icon and delete all data as follows:
|
| The headers or footers appear when the document is displayed on the screen but do not appear when the document is printed. | There is an unprintable area on the top and bottom of the page. Adjust the top and bottom margins in your document to allow for this. See Related Information: Unprintable Area. |
| Cannot perform ‘Page Layout’ printing. | (Windows ) Check that the paper size setting in the application and in the printer driver are the same. |
| Print speed is too slow. | (Windows) Try changing the printer driver setting. The highest resolution needs longer data processing, sending, and printing time. Try the other quality settings in the printer driver as follows: In the printer driver, clear the Color Enhancement (True2Life) checkbox on the Advanced tab. |
| Turn the Borderless feature off. Borderless printing is slower than normal printing. See Related Information: Print Settings (Windows). |
| Turn off the Quiet Mode setting. Print speed is slower in Quiet Mode. See Related Information: Reduce Printing Noise. |
| Make sure the Media Type setting in the printer drivers, your application, or the Paper Type setting on the machine matches the type of paper you are using. See Related Information: Change the Paper Size and Paper Type. See Related Information: Print Settings (Windows). |


Print Quality Difficulties
| Difficulties | Suggestions |
|---|
| Poor print quality | Check the print quality. See Related Information: Check the Print Quality. |
| Make sure the Media Type setting in the printer drivers, your application, or the Paper Type setting on the machine matches the type of paper you are using. See Related Information: Change the Paper Size and Paper Type. See Related Information: Print Settings (Windows). |
| Make sure your ink cartridges are fresh. The following may cause ink to clog:
|
| Make sure you are using one of the recommended types of paper. See Related Information: Acceptable Print Media. |
| The recommended environment for your machine is between 68 °F to 91 °F (20°C to 33°C). |
| White lines appear in text or graphics. 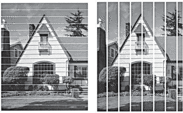 | Clean the print head. See Related Information: Clean the Print Head from Your Brother Machine. See Related Information: Clean the Print Head Using Web Based Management. See Related Information: Clean the Print Head from Your Computer (Windows). |
| Check and adjust the paper feed. See Related Information: Correct the Paper Feed to Clear Vertical Lines. |
| Try using the recommended types of paper. See Related Information: Acceptable Print Media. |
| To prolong print head life, provide the best ink cartridge economy and maintain print quality, we do not recommend frequently unplugging the machine and/or leaving the machine unplugged for extended periods of time. We recommend using |
| Dark lines appear at regular intervals. 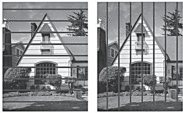 | Check and adjust the paper feed. See Related Information: Correct the Paper Feed to Clear Vertical Lines. |
| The machine prints blank pages. | Check the print quality. See Related Information: Check the Print Quality. |
| To prolong print head life, provide the best ink cartridge economy and maintain print quality, we do not recommend frequently unplugging the machine and/or leaving the machine unplugged for extended periods of time. We recommend using |
| Characters and lines are blurred.  | Check the printing alignment. See Related Information: Check the Print Alignment from Your Brother Machine. |
| Change the print options. See Related Information: Change the Print Options to Improve Your Print Results. |
| Printed text or images are skewed. | Make sure the paper is loaded correctly in the paper tray and the paper guides are adjusted correctly. See Related Information: Load Paper. |
| Make sure the Jam Clear Cover is closed correctly. |
| There are smudges or stains at the top center of the printed page. | Make sure the paper is not too thick or curled. See Related Information: Acceptable Print Media. |
| Printing appears dirty or ink seems to run. | Make sure you are using the recommended types of paper. Do not handle the paper until the ink is dry. See Related Information: Acceptable Print Media. |
| Make sure the printing surface is face down in the paper tray. |
| If you are using photo paper, make sure the glossy side of the photo paper is face down in the tray and you have set the correct paper type. If you are printing a photo from your computer, set the Media Type in the printer driver or in the application you use to print. |
| Ink is smudged or wet when using glossy photo paper. | Be sure to check the front and back of the paper. Place the glossy surface (printing surface) face down. See Related Information: Change the Paper Size and Paper Type. |
| If you use glossy photo paper, make sure the paper type setting is correct. |
| Stains appear on the reverse side or at the bottom of the page. | Make sure the printer platen is not dirty with ink. See Related Information: Clean the Machine's Printer Platen. |
| Make sure you are using the paper support flap. See Related Information: Load Paper. |
| Make sure the paper feed rollers are not dirty with ink. See Related Information: Clean the Paper Feed Rollers. |
| The printouts are wrinkled. | (Windows) In the printer driver, select the Advanced tab, click Other Print Options, and then click Advanced Color Settings. Clear the Bi-Directional Printing checkbox. |
| Smudge or stain on the reverse side of the page when using the automatic 2-sided printing feature. | (Windows) Change the Reduce Smudge option in your printer driver properties or preferences. See Related Information: Prevent Smudged Printouts and Paper Jams (Windows). |

Paper Handling Difficulties
| Difficulties | Suggestions |
|---|
| The machine does not feed paper. | Make sure the paper tray is pushed in all the way until it locks into place. |
| Make sure the Jam Clear Cover at the back of the machine is closed. |
| If the machine's LCD displays a Paper Jam message and you still have a problem, see Related Information: Error and Maintenance Messages. |
| If the paper tray is empty, load a new stack of paper into the paper tray. |
| If there is paper in the paper tray, make sure it is straight. If the paper is curled, straighten it. Sometimes it is helpful to remove the paper, turn the stack over and put it back in the paper tray. |
| Reduce the amount of paper in the paper tray, and then try again. |
| Clean the paper pick-up rollers. See Related Information: Clean the Paper Pick-up Rollers for Paper Tray #1 or Clean the Paper Pick-up Rollers for Paper Tray #2. |
| Make sure that the paper is within specifications for the machine. See Related Information: Paper Orientation and Capacity of the Paper Trays. |
| Photo paper does not feed correctly. | When you print on photo paper, load one extra sheet of the same photo paper in the paper tray. |
| Machine feeds multiple pages. |
See Related Information: Load Paper. |
| Make sure the Jam Clear Cover is closed correctly. See Related Information: Printer Jam or Paper Jam. |
| Make sure the Base Pad in the paper tray is not dirty. See Related Information: Clean the Base Pad. |
| There is a paper jam. | See Related Information: Printer Jam or Paper Jam. Make sure the paper guides are set to the correct paper size. |
| Use the jam prevention settings. For copying: See Related Information: Change the Print Options to Improve Your Print Results. For printing: See Related Information: Prevent Smudged Printouts and Paper Jams (Windows). |
| Paper jam reoccurs. | If there is a repeat paper jam, a small piece of paper may be stuck in the machine. Make sure paper is not still jammed in the machine. See Related Information: Remove Paper Scraps. |
| The paper jams when you use 2-sided print. | If paper jams occur frequently during 2-sided printing, the paper feed rollers may be stained with ink. Clean the paper feed rollers. See Related Information: Clean the Paper Feed Rollers. |
Printing Received Faxes
| Difficulties | Suggestions |
|---|
| This is usually caused by a poor telephone connection. Make a copy; if your copy looks good, you probably had a bad connection, with static or interference on the telephone line. Ask the other party to send the fax again. |
| Black lines when receiving. | The sender’s scanner may be dirty. Ask the sender to make a copy to see if the problem is with the sending machine. Try receiving from another fax machine. |
| Left and right margins are cut off or a single page is printed on two pages. | If the received faxes are divided and printed on two pages or if you get an extra blank page, your paper size setting may not be correct for the paper you are using. See Related Information: Change the Paper Size and Paper Type. |
| Turn on Auto Reduction. See Related Information: Shrink Page Size of an Oversized Incoming Fax. |
| Received color fax prints only in black and white. | Replace the color ink cartridges that have reached the end of their life, and then ask the other person to send the color fax again. See Related Information: Replace the Ink Cartridges. |