Advanced tab

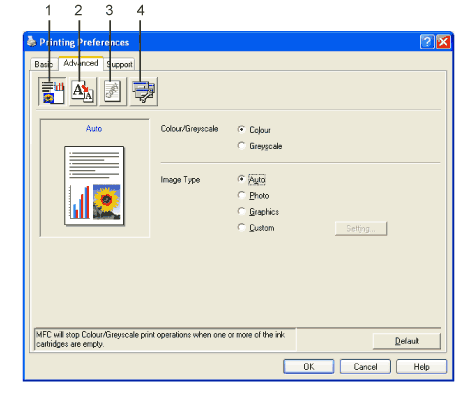
Change the tab settings by clicking one of the following icons:
Screen
• 
Colour (1)
• 
Scaling (2)
• 
Watermark (3)
• 
Device Options (4)
Note Note
 
To return to the default settings, click Default.

Colour

Colour/Greyscale

This selection allows a colour document to be printed in black and white using greyscale.
Screen

Image Type

The printer driver will choose the most suitable colour matching and half tone method, depending on your image type. Generally, text and business graphics are printed vividly and photographic images are printed softly.
• 
Auto
The printer driver automatically chooses the image type.
• 
Photo
Use for photographic images.
• 
Graphics
Use for documents that contain text or business graphics (charts or clip art).
• 
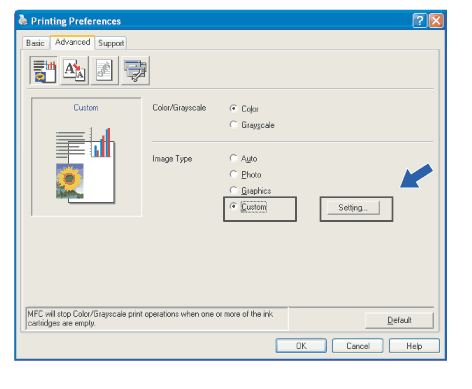
Custom
If you want to choose the colour matching and halftone method, choose this mode.
Screen

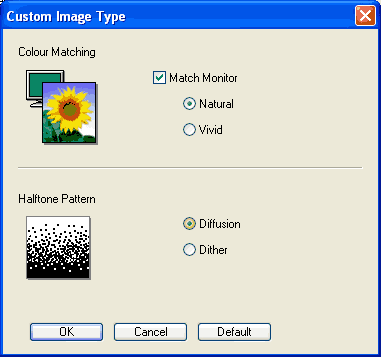
Custom Image Type

You can choose the colour matching method manually. Choose the best one for your document.
Screen
Screen
• 
Match Monitor
Colour is adjusted to get the closest colour match with the PC monitor.
• 
Natural: Use for photographic images. The colour is adjusted to print more natural colours.
• 
Vivid: Use for business graphics such as charts, graphics and text. The colour is adjusted to print more vivid colours.
• 
Halftone Pattern
The machine can use two methods (Diffusion or Dither) to arrange dots to express halftones. There are some predefined patterns and you can choose which one to use for your document.
• 
Diffusion: Dots are put at random to create the halftones. Use for printing photographs that have delicate shades and graphics.
• 
Dither: Dots are arranged in a pre-defined pattern to make halftones. Use for printing graphics that have definite colour boundaries or for printing charts such as business charts.
Note Note
 
Some halftone settings cannot be chosen with certain combinations of Media Type and Quality settings.