主頁 > 安全性 > 使用 SSL/TLS > 使用 SSL/TLS 安全地管理網路機器 > 安裝自我簽署憑證 (具有管理員權限的 Windows 使用者)
安裝自我簽署憑證 (具有管理員權限的 Windows 使用者)
以下步驟適用於 Microsoft Internet Explorer。如果使用其他網頁瀏覽器,查看網頁瀏覽器的說明書獲取安裝憑證的協助。
- 執行下列其中一項操作:
- Windows 10、Windows Server 2016 和 Windows Server 2019
按一下。
- Windows 8.1
在工作列上的
 (Internet Explorer) 圖示上按一下滑鼠右鍵。
 - Windows Server 2012 和 Windows Server 2012 R2
按一下
 (Internet Explorer),然後在工作列上出現的
  (Internet Explorer) 圖示上按一下滑鼠右鍵。
 - Windows 7 和 Windows Server 2008
按一下
 。
。
- 在 Internet Explorer上按一下滑鼠右鍵,再按一下以系統管理員身分執行。
 如果出現更多選項,按一下更多。如果出現使用者帳戶控制螢幕,按一下是。
 - 在瀏覽器的位址列中輸入「https://machine's IP address」(「machine's IP address」為指定給憑證的機器 IP 位址或節點名稱) 以存取機器。
- 按一下 其他資訊。
- 按一下 转到此网页(不推荐)。
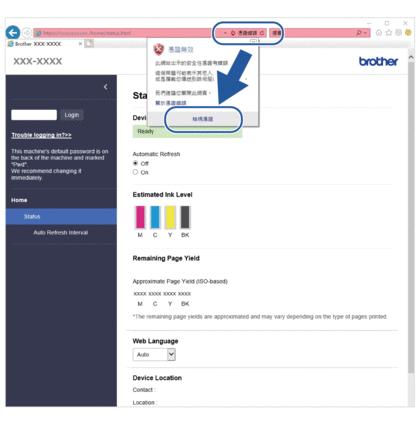
- 按一下憑證錯誤,再按一下檢視憑證。

- 按一下 安裝憑證...。
- 顯示憑證匯入精靈時,按一下下一步。
- 選擇將所有憑證放入以下的存放區,然後按一下瀏覽...。
- 選擇受信任的根憑證授權單位,然後按一下確定。
- 按一下 下一步。
- 按一下 完成。
- 如果憑證指紋碼正確,按一下是。
- 按一下 確定。
此頁對您有幫助嗎?


