Home > Routine Maintenance > Replace Supplies > Replace the Drum Unit


Replace the Drum Unit
Before starting the replacement procedure, see Related Information: Replace Supplies.
Replace the Drum Unit
- Make sure the machine is turned on.
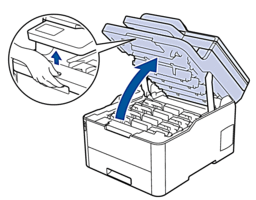
- Open the top cover until it locks in the open position.
- WARNING
- HOT SURFACE
The machine's internal parts will be extremely hot. Wait for the machine to cool down before touching them.

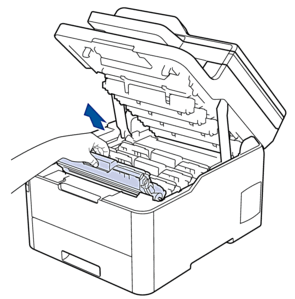
- Remove the toner cartridge and drum unit assembly for the color shown on the LCD.
- CAUTION
-
We recommend placing the toner cartridge and drum unit assemblies on a clean, flat surface with disposable paper underneath it in case you accidentally spill or scatter toner.
- IMPORTANT
-
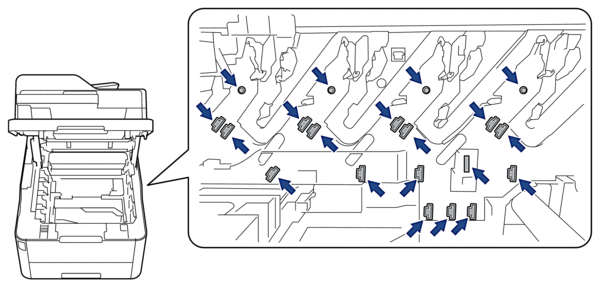
To prevent damage to the machine from static electricity, DO NOT touch the electrodes shown in the illustration.
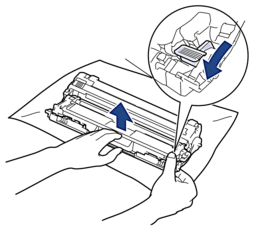
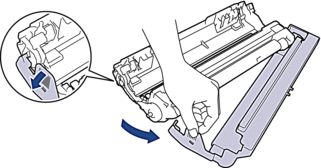
- Push down the green lock lever and remove the toner cartridge from the drum unit.
- Unpack the new drum unit.
- Remove the protective cover.
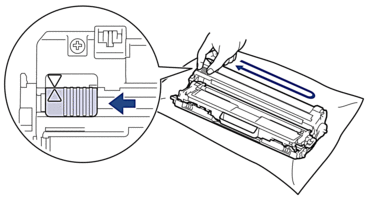
- Reinsert the toner cartridge firmly into the new drum unit until you hear it lock into place.

 Make sure you put the toner cartridge in correctly or it may separate from the drum unit.
 - Clean the corona wire inside the drum unit by gently sliding the green tab from left to right and right to left several times. Repeat this for all the corona wires.
 Be sure to return the green tab to the Home position (
 ). The arrow on the tab must be aligned with the arrow on the drum unit. If it is not, printed pages may have a vertical stripe.
 - Slide the toner cartridge and drum unit assemblies into the machine. Make sure that you match the toner cartridge color to the same color label on the machine.
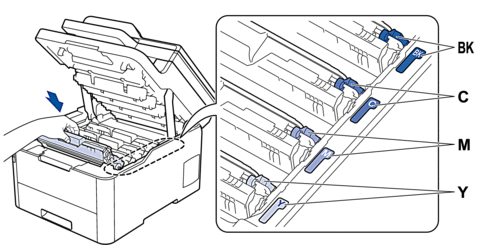
- Close the machine's top cover.
- Reset the drum counter by following the next section.
- NOTE
-
- Drum wear and tear occurs due to use and rotation of the drum and interaction with paper, toner and other materials in the paper path. In designing this product, Brother decided to use the number of rotations of the drum as a reasonable determinant of the drum life. When a drum reaches the factory-established rotation limit corresponding to the rated page yield, the product’s LCD will advise you to replace the drum. The product will continue to function; however, print quality may not be optimal.
- If an unpacked drum unit is placed in direct sunlight (or artificial light for long periods of time), the unit may be damaged.
There are many factors that determine the actual drum life, such as the temperature, humidity, type of paper, type of toner used and so on. Under ideal conditions, the average drum life is estimated at approximately 18,000 pages based on one page per job [A4/letter simplex pages]. The number of pages may be affected due to a variety of factors including but not limited to media type and media size.
Because we have no control over the many factors that determine the actual drum life, we cannot guarantee a minimum number of pages that will be printed by your drum.
For best performance, use only genuine Brother toner.
The machine should be used only in a clean, dust-free environment with adequate ventilation.
Printing with a non-Brother drum unit may reduce not only the print quality but also the quality and life of the machine itself. Warranty coverage does not apply to problems caused by the use of a non-Brother drum unit.
- IMPORTANT
-
- To avoid print quality issues or damage to the machine, DO NOT reset the drum counter unless you are replacing the drum unit.
- If you reset the drum counter without replacing the drum unit, the machine will not be able to correctly calculate the remaining drum life.
- Using non-genuine Brother supplies may affect the print quality, hardware performance, and machine reliability.
Reset the Drum Counter (HL-L3290CDW/DCP-L3551CDW)
- Make sure the machine is turned on.
- Make sure the machine's cover is closed.
- Hold down OK as you press.
- Press OK to select [Drum].
- Press or
 to display the toner color for the drum unit you just replaced, and then press OK.
 - Press to reset the drum counter.
Reset the Drum Counter (MFC-L3710CW/MFC-L3750CDW/MFC-L3770CDW)
- Make sure the machine is turned on.
- Press and hold
 for about five seconds.
 - Press [Drum].
- Select the toner color for the drum unit you just replaced.
- Press [Yes].