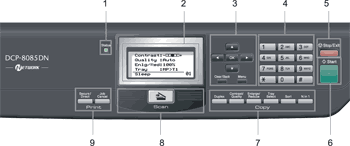
Control panel overview

Graphic
1.
Status LED
The LED will flash and change colour depending on the machine status.
2.
LCD
Displays messages to help you set up and use your machine.
3.
Menu keys:
Menu
Lets you access the Menu to program your settings in this machine.
Clear/Back
Deletes entered data or lets you cancel the current setting.
OK
Lets you store your settings in the machine.
Bsymbol.ltri or Bsymbol.rtri
Press to scroll backwards or forwards through menu selections.
Bsymbol.utri or Bsymbol.dtri
Press to scroll through the menus and options.
4.
Numeric keys
Use these keys to enter text.
5.
Stop/Exit
Stops an operation or exits from a menu.
6.
Start
Lets you start making copies or scanning.
7.
Copy keys:
Duplex
You can choose Duplex to copy on both sides of the paper.
Contrast/Quality
Lets you change the quality or contrast for the next copy.
Enlarge/Reduce
Reduces or enlarges copies.
Tray Select
Lets you change which tray will be used for the next copy.
Sort
Sorts multiple copies using the ADF.
N in 1
You can choose N in 1 to copy 2 or 4 pages onto one page.
8.
Graphic Scan
Puts the machine in Scan mode.
(For details about scanning, see the Software User’s Guide on the CD-ROM.)
9.
Print keys:
Secure/Direct
This key has two functions.
Secure
You can print data saved in memory when you enter your four-digit password. (For details about using the Secure key, see the Software User’s Guide on the CD-ROM.)
When using Secure Function Lock, you can switch restricted users by holding down Bsymbol.ltri as you press Secure/Direct. (See Secure Function Lock 2.0.)
Direct
Lets you print data from a USB Flash memory drive. The Direct key will be active when a USB Flash memory drive is connected to the machine’s USB direct interface. (See Printing data directly from the USB Flash memory drive or a digital camera supporting mass storage.)
Job Cancel
Cancels a programmed print job and clears it from the machine’s memory.
To cancel multiple print jobs, hold down this key until the LCD shows Job Cancel (All).

Status LED indications

The Status LED (light emitting diode) will flash and change colour depending on the machine’s status.
Graphic
LED
Machine Status
Description
Graphic
Sleep Mode
The power switch is off or the machine is in Sleep mode.
Graphic
Green
(blinking)
Warming Up
The machine is warming up for printing.
Graphic
Green
Ready
The machine is ready to print.
Graphic
Yellow
(blinking)
Receiving Data
The machine is either receiving data from the computer, processing data in memory, or printing data.
Graphic
Yellow
Data Remaining in Memory
Print data remains in the machine memory.
Graphic
Red
(blinking)
Service error
Follow the steps below.
1. Turn off the power switch.
2. Wait a few seconds, and then turn it back on and try to print again.
If you cannot clear the error and you see the same service call indication after turning the machine back on, please call your Brother dealer for service.
Graphic
Red
Cover open
The front cover or fuser cover is open. Close the cover.
Toner Life End
Replace the toner cartridge with a new one.
Paper error
Put paper in the tray or clear the paper jam. Check the LCD message.
Scan lock
Check that the scanner lock lever is released.
Graphic
Others
Check the LCD message.
Note Note
When the power switch is off or the machine is in Sleep mode, the LED is off.