Home > Edit Labels > Create Serialised Labels > Create Advanced Serialised Labels


Create Advanced Serialised Labels
Create advanced labels with two serialised label ranges by entering the text pattern, as shown.
- Entering Text Pattern: W10-A
- Serialised Range: (1) and (2)
- Printed Label Result:
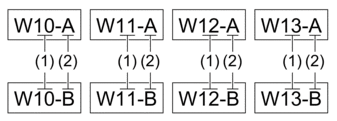
PT-E310BT
- Type "W10-A" using the keyboard.
- Press
 and then press
  .
. - Press
 or
or  to select [Advanced], and then press OK.
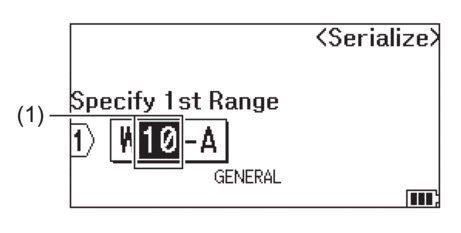
 - Specify the first range (1) you want to serialise, and then select the count and increment for the first range.
- Position the cursor to the left of the first character of the range, and then press OK.
- Press
 or
or  to select the last character of the range, and then press OK.
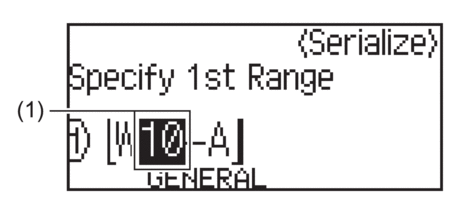
- Press, , , or to set the following parameters (for this example):
- Set "4" in the [Count] menu.
- Set "1" in the [Incremented by] menu.
- Select [Norm] from the [Type] menu.
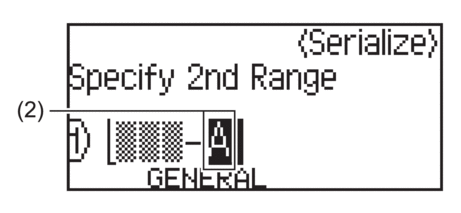
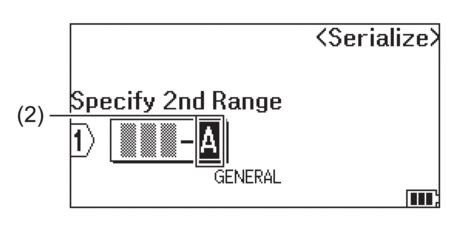
- Specify the second range (2) you want to serialise, and then select the count and increment for the second range.
- Position the cursor to the left of the first character of the range, and then press OK.
- Press or to select the last character of the range, and then press OK. (For (2) in this example, position the cursor to the left of "A" and press OK twice since the first and last characters are the same.)
- Press, , , or to set the following parameters (for this example):
- Set "2" in the [Count] menu.
- Set "1" in the [Incremented by] menu.
- Select [Norm] from the [Type] menu.
- Press
 . You can select [All], [Current], or [Range] for the print option.
PT-E510/PT-E560BT
- Type "W10-A" using the keyboard.
- Press
 .
. - Press or to select [Advanced], and then press OK.
- Specify the first range (1) you want to serialise, and then select the count and increment for the first range.
- Position the cursor to the left of the first character of the range, and then press OK.
- Press or to select the last character of the range, and then press OK.
- Press, , , or to set the following parameters (for this example):
- Set "4" in the [Count] menu.
- Set "1" in the [Incremented by] menu.
- Select [Normal] from the [Type] menu.
- Specify the second range (2) you want to serialise, and then select the count and increment for the second range.
- Position the cursor to the left of the first character of the range, and then press OK.
- Press or to select the last character of the range, and then press OK. (For (2) in this example, position the cursor to the left of "A" and press OK twice since the first and last characters are the same.)
- Press, , , or to set the following parameters (for this example):
- Set "2" in the [Count] menu.
- Set "1" in the [Incremented by] menu.
- Select [Normal] from the [Type] menu.
- Press. You can select [All], [Current], or [Range] for the print option.
Did you find the information you needed?