Home > Set Up Your Printer > Load the Roll
Load the Roll
Load the Roll
- Push the Roll Cover Release Lever to open the Roll Compartment Cover.
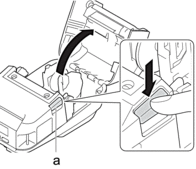
- Roll Cover Release Lever
- Slide both Roll Guides outward.
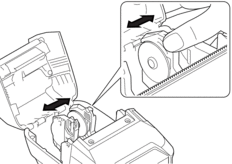
- Make sure that the roll is correctly aligned, and then insert it into the Roll Compartment.
- NOTE
- If the core of the roll is protruding, flatten the edges before setting, as illustrated.
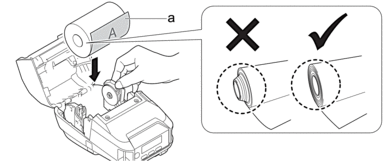
- Print surface (faces outward on the roll)
- Close the Roll Compartment Cover until it locks into place.
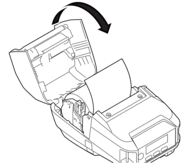
- If the LCD shows [Select Media] or [Auto Detect], select the option you want. To configure these settings later, go to the [Media].
- NOTE
- For best performance, use genuine Brother media.

- When using die-cut labels, set the paper type to Die-cut Label, and press the
 (Feed) / OK button after inserting the roll. The printer will feed the label to the top of form position.
 - To remove the roll, reverse the loading procedure.
- Make sure the inserted roll turns freely between the Roll Guides.
Change the Media Roll Holders to Use Custom-Size Media
To use custom-size media, attach the Media Roll Holders that match your media's core size to the Roll Guides.
- NOTE
-
- Not all types of Media Roll Holders may be supplied with your printer. To purchase additional Media Roll Holders, contact your local Brother dealer.
- To check which media core sizes each Media Roll Holder supports, check the information on the center of the Media Roll Holder.
- If using multi-size Media Roll Holders, make sure the same-size sides face each other when attached to the Roll Guides.
- Push the Roll Cover Release Lever to open the Roll Compartment Cover.
- Hold the left Roll Guide so that it does not rotate, and then remove the currently installed Media Roll Holder using a flathead screwdriver.
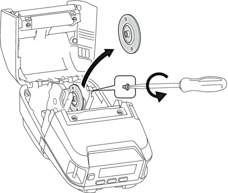
- Hold the right Roll Guide so that it does not rotate, and then remove the currently installed Media Roll Holder using a flathead screwdriver.
- Attach the Media Roll Holders that match your media's core size to the Roll Guides using a flathead screwdriver. Make sure you use the same size Media Roll Holders.
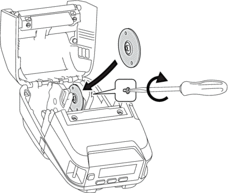
- Insert the roll. For more information, , see Related Topics..
- Close the Roll Compartment Cover and press until it locks into place.
- If the LCD automatically shows [Select Media] or [Auto Detect], select the option you want. To configure these settings later, go to the [Media] menu
Use the Roll Holder Stop
The Roll Holder Stop prevents the Roll Guides from closing. It is ideal to reduce the distance needed to extend the Roll Guides to load the roll.
- Remove the backing paper from the two locations on the Roll Holder Stop, as shown in the illustration.
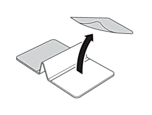
- Extend the Roll Guides outward and attach the Roll Holder Stop to the innermost part of the groove.
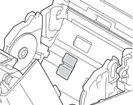

- The Roll Holder Stop is compatible with the 3 inch roll.
- Attach the Roll Holder Stop with the Roll Guides extended outward.
- The Roll Holder Stop can be attached to either side of the groove.
- Attach the Roll Holder Stop to prevent surplus air from accumulating between the adhesive layer and the printer.
- Clean the pasted part of the printer before attaching.
Tear-Off Media
Receipt paper, labels, and tags can be torn off by swiftly pulling up or down on the media according to the set cutting position. Linerless media can only be torn upward. 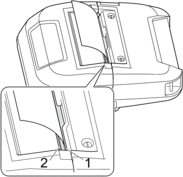


- Upper Tear Bar
- Lower Tear Bar
- CAUTION
- Do not touch the Tear Bar blade.
- The default [Tear Bar] setting is set to [Upward]. (When Linerless is set to On in the Advanced tab of the Printer Setting Tool, the [Tear Bar] setting is not available.)
- To adjust the cutting position, open the Printer Setting Tool, go to Print Position / Sensors in the Device Settings, and then enter the setting you want in the Tear Adjust field. For more information, see Related Topics.
Did you find the information you needed?


