Home > Printer Settings > Change Printer Settings Using the Printer Setting Tool (Windows) > Device Settings of the Printer Setting Tool (Windows)


Device Settings of the Printer Setting Tool (Windows)
- PJ-822/PJ-823:
Use Device Settings in the Printer Setting Tool to specify or change printer settings when connecting the printer and computer with a USB cable.
- PJ-862/PJ-863/PJ-883:
Use Device Settings in the Printer Setting Tool to specify or change printer settings when connecting the printer and computer with a USB cable or via a Bluetooth connection.
Not only can you change the device settings for one printer, but you can also apply the same settings to multiple printers.
When printing from a computer application, various print settings can be specified from the printer driver; however, using the Device Settings tool in the Printer Setting Tool, more advanced settings can be specified. When you open the Device Settings window, the printer's current settings are retrieved and displayed. If the current settings cannot be retrieved, the previous settings are displayed. If the current settings cannot be retrieved and previous settings were not specified, the printer's factory settings appear.
Settings Dialog Box
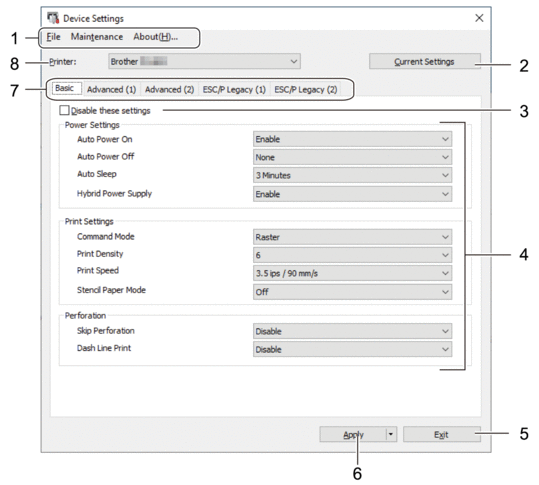
- Menu Bar
- Provides access to various commands grouped under each menu title (the File, Maintenance, and About menus) according to their functions.
- Current Settings
- Retrieves the settings from the currently connected printer and displays them in the dialog box. Settings can also be retrieved for the parameters on tabs with
 .
.
- Disable these settings
- When this checkbox is selected, appears on the tab, and the settings can no longer be specified or changed. Settings in a tab where appears are not applied to the printer even if Apply is clicked. In addition, the settings in the tab are not saved or exported when you use the Save in Command File or Export command.
- Parameters
- Displays the current settings.
- Exit
- Click to exit the Device Settings window and return to the main window of the Printer Setting Tool.
- Apply
- Apply the settings to the printer. To save the specified settings in a command file, select the Save in Command File option from the drop-down list.
The saved command file can be used with the mass storage mode to apply the settings to a printer.
- Settings Tabs
- Contains settings that may be specified or changed.
 If appears in the tab, the settings cannot be changed. In addition, the settings in the tab with the icon are not applied to the printer even if you click Apply. The settings in the tab are not saved when you use the Save in Command File command.
- Printer
- Select the printer you want to configure.
Menu Bar
- File Menu Options
-
- Apply Settings to the Printer
-
Apply the settings to the printer.
- Check Setting
- Displays the current settings.
- Save Settings in Command File
- Saves the specified settings in a command file.
- Import
- Imports an exported file.
- Export
- Saves the current settings in a file.
- Exit
- Click to exit the Device Settings window and return to the main window of the Printer Setting Tool.
- Maintenance Menu Options
- You must have administrator privileges for the computer or the printer to display some items. Check if you have administrator privileges for the printer by clicking the Printer properties menu, and then clicking the Security tab.
- Clean Unit
- Select to clean the platen roller of the printer by feeding the dedicated cleaning sheet.
- Auto Sensor Adjustment
- Adjusts the paper detection sensor automatically.
- Print Unit Settings
- Print a report containing firmware version, paper size, and configuration information.
- Factory Reset
-
(PJ-822/PJ-823) Reset all the settings to the factory settings, including device settings, and transferred data.
(PJ-862/PJ-863/PJ-883) Reset all the settings to the factory settings, including device settings, transferred data, and network settings.
- Reset only Device Settings
- Reset the settings that can be changed in the Device Settings to the factory settings.
- Delete Template
- Delete all the templates stored in the printer.
- Option Settings
- If the Do not display an error message if the current settings cannot be retrieved at startup checkbox is selected, an error message is not displayed next time.
Basic Tab
- Auto Power On
-
Specify how the printer responds when connected to a USB, an AC or DC power socket.
- Auto Power Off
-
Specify the amount of time that passes before the printer turns off automatically.
- Auto Sleep
- Specify the amount of time to pass before the printer automatically goes into sleep mode.
- The printer will automatically enter sleep mode when the specified time elapses under the following conditions:
- The printer does not receive data.
- In idle mode.
- Sleep mode is cancelled when the following operations are performed:
- A printer button is pressed.
- The printer receives data.
- The USB cable is disconnected and then reconnected.
- The AC Adapter is disconnected and then reconnected.
- The Rechargeable Li-ion Battery is removed and then reinserted.
- Hybrid Power Supply
- Use the AC Adapter (PA-AD-600A) along with the Rechargeable Li-ion Battery (PA-BT-002) to increase the printing speed.
- Command Mode
- Specify the printer’s command format.
- Print Density
- Adjusts the printer’s printing density.
- Print Speed
- Select the printer’s printing speed.
-
Option Description 1.1 ips / 27 mm/s Select these options when you want to prioritise image quality. 1.9 ips / 48 mm/s 2.7 ips / 70 mm/s 3.5 ips / 90 mm/s This setting balances speed and image quality. Select this option when printing standard documents. Fast (Draft Quality) Speed priority mode. Select this option when printing documents containing bold text. Fast (Line Conversion) Speed priority mode. Select this option when printing documents with ruled pages or bold text.
- Stencil Paper Mode
- This mode is suitable for printing on stencil paper. Turn this setting on when printing on stencil paper.
- Skip Perforation
- Leaves a 25.4 mm margin at the top and bottom of the paper. Use it when printing on perforated roll paper so that the printer does not print on the perforation.
- Dash Line Print
- Prints dash lines between pages, which is useful when printing on roll paper. Set Form Feed Mode to Fixed Page, and then select Enable. Note that dash lines are printed on the paper; they are not punched into the paper.
Advanced (1) Tab
- Roll/Fanfold Option
- Specify the setting for using the optional roll printer case. Depending on the selected option, you can adjust the feed value or amount of paper retraction for the roll printer case.
-
Option Description Roll Printer Case (With Anti Curl) Select this option when using the anti-curl mechanism while using the roll printer case. Roll Printer Case (Without Anti Curl) Select this option when not using the anti-curl mechanism while using the roll printer case. Roll Printer Case (Short Feed) Using the roll printer case with paper passed through the anti-curl mechanism causes the paper to have pressure marks. Use this option to make sure the pressure marks are not printed. Custom Option When using a case other than the roll printer case, you can customise the feed distance before and after printing starts. No Select this option when not using the roll printer case.
- Tear Distance Adjust
- Adjust the Tear Bar tear-off position for paper media. This setting is available when Roll/Fanfold Option is set to Roll Printer Case (With Anti Curl), Roll Printer Case (Without Anti Curl), or Roll Printer Case (Short Feed).
- Feed Distance Adjust
- Specify the amount of paper fed after printing. This setting is available when Roll/Fanfold Option is set to Custom Option.
- Start Position Adjust
- Specify the adjustment value to align the leading edge of the paper with the appropriate position. This setting is available when Roll/Fanfold Option is set to Custom Option.
- Cut Pause Time
- Specify the waiting time for cutting between pages.
- Print Length Scaling
- Specify the reduction or enlargement ratio for printing.
- Form Feed Mode
- Specify how the printer responds to form feed commands received from any source.
- Paper Grip Time
- Specify the delay before the printer grabs the paper.
- Pre-Feed
- When you select Enable, the printer ejects a short length of paper when the printer turns on. When using perforated roll paper or roll paper that is pre-printed, we recommend setting this parameter to Disable.
- Blackmark Threshold
- Adjusts the threshold value for determining black marks on paper with black marks. If the black marks are too light to recognise the stop position, set a value that is smaller than the current value.
- Page Overrun
- If the print data does not fit on one page and runs onto the second page, select whether to cancel or print the data on the second page.
Advanced (2) Tab
- Print Data after Printing
- Allows to erase print data after it is printed.
- JPEG Printing Setting
- Select the method of image processing when printing JPEG images.
- Simple Binary Threshold
- Specify the simple binary threshold when JPEG Printing Setting is set to Simple Binary.
- Scale JPEG images to fit media
- Allows enlarging or reducing a JPEG image to fit the paper size.
- Airplane Mode
- Allows disabling the Bluetooth or Wi-Fi interfaces. This function is useful when you use the printer in a place where signal transmissions are not allowed.
ESC/P Legacy (1) Tab
- Paper Size
- Select the default paper size. If this parameter is changed in the printer driver’s dialog box, it has priority.
- Form Length
- This parameter can be set only when Paper Size is set to Custom.
Form length is determined by specifying the number of lines per page, or the length in inches of each page. The available settings differ depending on the selected Text Line Spacing settings.
- Bottom Margin
- The setting specified for this parameter takes effect only when Paper Size is set to Custom.
The height of the bottom margin is expressed in lines of text. The available settings differ depending on the selected Text Line Spacing settings.
- Text Line Spacing
- Specify the height of each line of text.
- Left Margin
- Specify the left margin.
- Right Margin
- Specify the right margin.
- Default Pitch
- Specify character width.
- CR-LF Mode
- Specify how the printer responds when LF (line feed) and CR (carriage return) commands (ASCII characters 10 and 13) are received.
ESC/P Legacy (2) Tab
- Extended Characters
- Specify which characters are used when printing ASCII characters 128 to 255.
- Character Set Map
- Specify which character set is used, allowing you to print special characters appropriate for the language selected.
- Default Font
- Specify which built-in font is used.
- Reduce Character Size
- Specify whether text is printed at a reduced size.
- Character Attributes
- Specify the attributes used for printed text.