Home > Set Up Your Printer > Control Panel Overview


Control Panel Overview
PJ-822/PJ-823
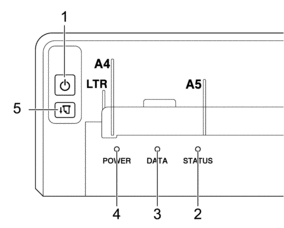
 Power Button
 Function Operation Turn the printer on
Press and hold the Power button
for about one second until the Power LED lights up. Turn the printer off
Press and hold the Power button
for about one second. (If the Auto Power Off feature is enabled in the Printer Setting Tool, the printer will turn off automatically after the selected period of inactivity.) For more information, see Related Topics: Change Printer Settings Using the Printer Setting Tool (Windows).
For more information, see Related Topics: Change Printer Settings Using the Printer Setting Tool (Mac).
Start the printer in Mass Storage Mode
Press and hold the Power button
and press the Feed button  simultaneously.
 For more information about Mass Storage Mode, see Related Topics: Print Using the USB Interface (Mass Storage Mode).
- Status Indicator
- Data Indicator
- Power Indicator
- Feed Button
Function Operation Feed the paper
Load the paper and press the Feed button
to feed the paper. If you continue to press and hold the Feed button
after about 55 mm of paper has been fed, approximately one page length of paper is fed at high speed. The amount of paper fed is determined by the Form Feed Mode setting in the Printer Setting Tool.
For more information, see Related Topics: Change Printer Settings Using the Printer Setting Tool (Windows).
For more information, see Related Topics: Change Printer Settings Using the Printer Setting Tool (Mac).
To ensure that printing is complete, wait five seconds after the printer has received the data before using a form feed command.
Print the configuration report
You can print a configuration report without connecting the printer to a computer or mobile device.
For more information, see Related Topics: Confirm Printer Settings.
PJ-862/PJ-863
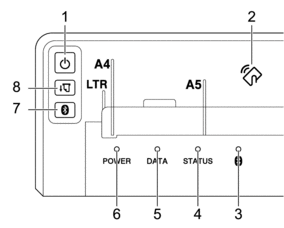
- Power Button
Function Operation Turn the printer on
Press and hold the Power button
for about one second until the Power LED lights up. Turn the printer off
Press and hold the Power button
for about one second. (If the Auto Power Off feature is enabled in the Printer Setting Tool, the printer will turn off automatically after the selected period of inactivity.) For more information, see Related Topics: Change Printer Settings Using the Printer Setting Tool (Windows).
For more information, see Related Topics: Change Printer Settings Using the Printer Setting Tool (Mac).
Start the printer in Mass Storage Mode
Press and hold the Power button
and press the Feed button simultaneously. For more information about Mass Storage Mode, see Related Topics: Print Using the USB Interface (Mass Storage Mode).
- Near-Field Communication (NFC) Sensor
 Bluetooth Indicator
 - Status Indicator
- Data Indicator
- Power Indicator
- Bluetooth Button
Function Operation Enable/Disable the Bluetooth function
Press the Bluetooth button
. - Feed Button
Function Operation Feed the paper
Load the paper and press the Feed button
to feed the paper. If you continue to press and hold the Feed button
after about 55 mm of paper has been fed, approximately one page length of paper is fed at high speed. The amount of paper fed is determined by the Form Feed Mode setting in the Printer Setting Tool.
For more information, see Related Topics: Change Printer Settings Using the Printer Setting Tool (Windows).
For more information, see Related Topics: Change Printer Settings Using the Printer Setting Tool (Mac).
To ensure that printing is complete, wait five seconds after the printer has received the data before using a form feed command.
Print the configuration report
You can print a configuration report without connecting the printer to a computer or mobile device.
For more information, see Related Topics: Confirm Printer Settings.
PJ-883
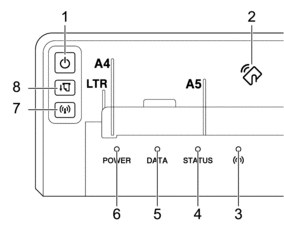
- Power Button
Function Operation Turn the printer on
Press and hold the Power button
for about one second until the Power LED lights up. Turn the printer off
Press and hold the Power button
for about one second. (If the Auto Power Off feature is enabled in the Printer Setting Tool, the printer will turn off automatically after the selected period of inactivity.) For more information, see Related Topics: Change Printer Settings Using the Printer Setting Tool (Windows).
For more information, see Related Topics: Change Printer Settings Using the Printer Setting Tool (Mac).
Start the printer in Mass Storage Mode
Press and hold the Power button
and press the Feed button simultaneously. For more information about Mass Storage Mode, see Related Topics: Print Using the USB Interface (Mass Storage Mode).
- Near-Field Communication (NFC) Sensor
 Bluetooth and Wi-Fi Indicator
 - Status Indicator
- Data Indicator
- Power Indicator
- Bluetooth and Wi-Fi Button
Function Operation Enable/Disable the Bluetooth and Wi-Fi function
Press the Bluetooth and Wi-Fi button
to enable or disable the Bluetooth and Wi-Fi functions of the printer. To toggle between connection modes, press and hold the Bluetooth and Wi-Fi button
for about three seconds. The connection mode changes each time you press and hold the Bluetooth and Wi-Fi button . The Bluetooth and Wi-Fi indicator
colour shows the wireless connection: - Blue
 : Bluetooth
 - Green
 : Wi-Fi
 - Cyan
 : Both Bluetooth and Wi-Fi
Use WPS to configure Wi-Fi settings easily
Press and hold the Bluetooth and Wi-Fi button
for about five seconds to configure the Wi-Fi settings using WPS. Use WLAN Assistant Wizard to configure Wi-Fi settings
Press and hold the Bluetooth and Wi-Fi button
for about 10 seconds to configure the Wi-Fi settings using WLAN Assistant Wizard. - Feed Button
Function Operation Feed the paper
Load the paper and press the Feed button
to feed the paper. If you continue to press and hold the Feed button
after about 55 mm of paper has been fed, approximately one page length of paper is fed at high speed. The amount of paper fed is determined by the Form Feed Mode setting in the Printer Setting Tool.
For more information, see Related Topics: Change Printer Settings Using the Printer Setting Tool (Windows).
For more information, see Related Topics: Change Printer Settings Using the Printer Setting Tool (Mac).
To ensure that printing is complete, wait five seconds after the printer has received the data before using a form feed command.
Print the configuration report
You can print a configuration report without connecting the printer to a computer or mobile device.
For more information, see Related Topics: Confirm Printer Settings.