Home > Print Labels Using Barcode Scanner or Other Devices (P-touch Template) > Try the P-touch Template Function Using the Barcode List > Insert Information into a Template Transferred to the Printer and Print It (Merge Printing)


Insert Information into a Template Transferred to the Printer and Print It (Merge Printing)

- For more information on the barcodes scanned using various settings, see Related Information.
- If a barcode has a different protocol than the barcode template already registered with the printer, you may be unable to create or print the barcode.
- Depending on the barcode scanner model, some barcode symbols and protocols may not be supported by this printer.
- Use P-touch Editor to transfer a template or label layout from the computer to the printer.For more detailed information, see Related Information.
- NOTE
- It is important to design a template to meet the barcode symbology or protocol requirements, especially for the label size and barcode position in the label to fit the maximum number and type of characters being inserted from the barcode scanner. A barcode in the template cannot be created or scanned if the barcode with the inserted data does not fit entirely within the label printable image area.
- Open the template you want or create a new layout and click .
- To change the Key Assign number (memory location in the printer) assigned to an item, click the item you want, and then select the number.
- To change the transfer name of the template or other data, click the item you want, and then type the new name. The number of characters differs depending on the printer model.
- NOTE
-
- The database is not assigned a Key Assign number.
- The printer will overwrite any previously saved template that has the same key number as a new template being transferred to it.
- Make sure the template or other data you want to transfer is selected in the file list, and then click Transfer and click OK.
- Scan the following barcode:
- P-touch template command (Initialize + begin specifying settings)

- From the following barcode list, scan each barcode to send a command or setting to the printer:
- Basic settings
Auto cut on (Cut every one label) + Cut at end on
Auto cut on (Cut every two labels) + Cut at end on
Auto cut off + Cut at end on
Auto cut off + Cut at end off
Number of copies

- Settings can be made with multiple commands.
- If no settings have been made by scanning the barcode commands, a template is printed using the P-touch Template settings. The default P-touch Template settings are to print a single copy with Auto Cut turned on.
For more information on P-touch Template Settings, see the P-touch Template Manual/Command Reference (English only). You can download the latest version from the Brother support website at support.brother.com/manuals.
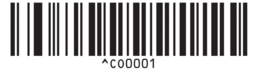
- Specify the number of copies you want.
- Scan the following barcode:
Number of copies
- Scan the following barcodes to specify a three-digit number:
Example:
Specify numbers by scanning the following barcodes: when printing 7 sheets; [0][0][7], when printing 15 sheets; [0][1][5]
- For entering numbers
1

2

3

4

5

6

7

8

9

0

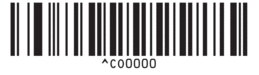
00

To change the setting for the number of copies, repeat these steps. - Scan the following barcode:
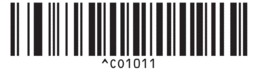
- Select template
- Scan the following barcodes with the same number (three digits) as the Key Assign number used for the downloaded template to be printed:
Example:
Specify numbers by scanning the following barcodes: when printing number 7; [0][0][7], when printing number 15; [0][1][5]
- For entering numbers
1
2
3
4
5
6
7
8
9
0
00
The downloaded template is selected after the three digit numbers have been scanned.
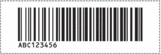
You can use P-touch Editor to create and print a label with a single barcode.Example:

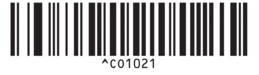
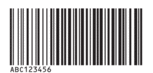
- Scan a barcode containing the data you want inserted into the barcode object in the selected downloaded template.
Example:
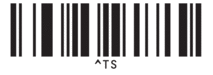
- Scan the following barcode to send the command to start printing:
- Begin printing

The barcode in the printed template contains the data from the barcode scanned.Example: